AWS Identity and Access Management (IAM) is the foundation of AWS security. Understanding IAM thoroughly is critical for both AWS Solutions Architect and DevOps roles. This guide walks you through everything step by step.
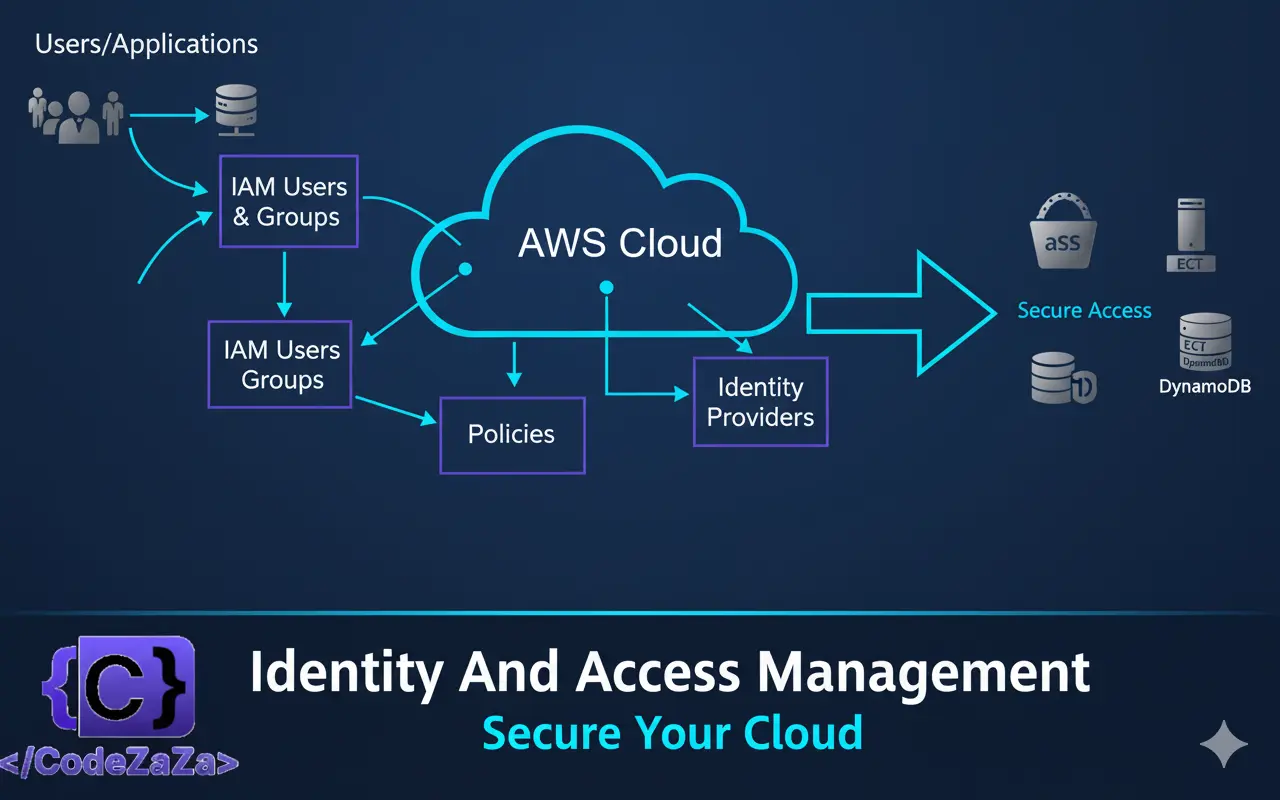
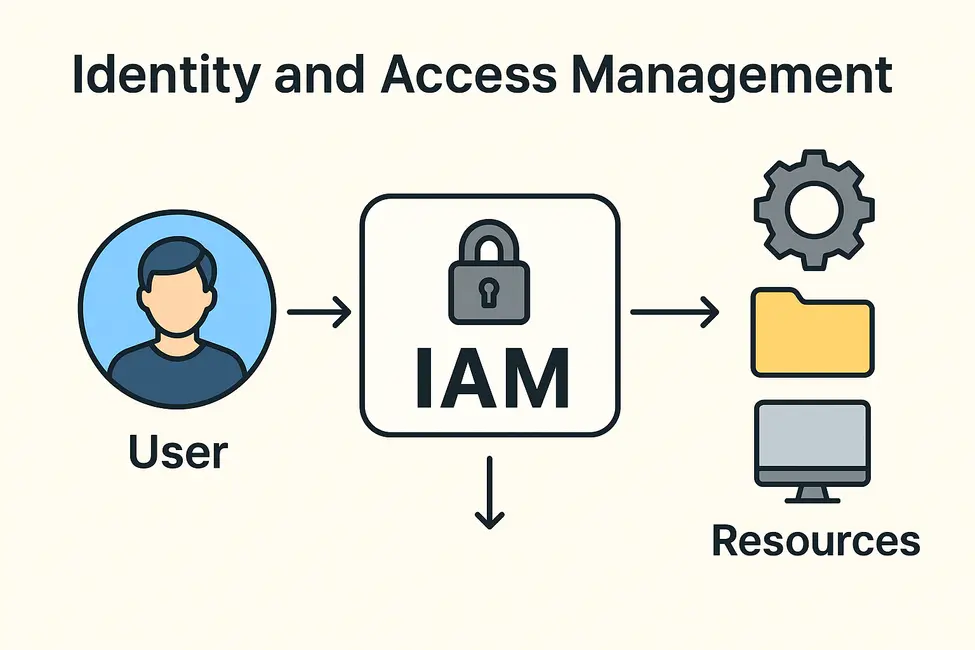
AWS Identity and Access Management (IAM) is a web service that helps you securely control access to AWS resources. With IAM, you can manage permissions that control which AWS resources users can access. You use IAM to control who is authenticated (signed in) and authorized (has permissions) to use resources. IAM provides the infrastructure necessary to control authentication and authorization for your AWS accounts.
IAM User
An IAM user is an entity that you create in your AWS account. The IAM user represents the human user or workload who uses the IAM user to interact with AWS resources. An IAM user consists of a name and credentials.
An IAM user with administrator permissions is not the same thing as the AWS account root user. For more information about the root user, see AWS account root user.
Steps to create a user:
- Go to AWS Console → IAM → Users → Add users.
- Choose Access type:
- Programmatic access (for API/CLI/SDK).
- AWS Management Console access (for UI).
- Set password settings if console access.
- Click Next: Permissions.

Example CLI Command:
aws iam create-user --user-name aws-learnerIAM user groups
An IAM user group is a collection of IAM users. User groups let you specify permissions for multiple users, which can make it easier to manage the permissions for those users. For example, you could have a user group called Admins and give that user group typical administrator permissions. Any user in that user group automatically has Admins group permissions. If a new user joins your organization and needs administrator privileges you can assign the appropriate permissions by adding the user to the Admins user group. If a person changes jobs in your organization, instead of editing that user’s permissions you can remove them from the old IAM groups and add them to the appropriate new IAM groups.
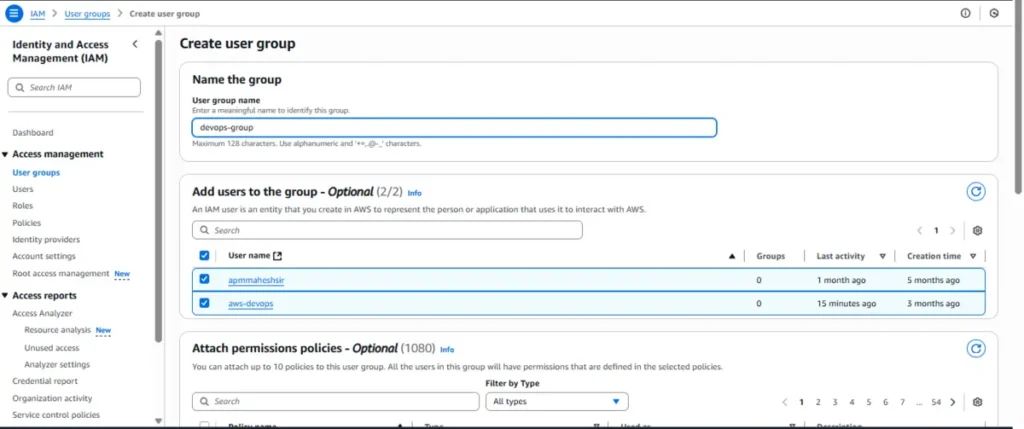
Steps to create a Group:
- IAM → User groups → Create group.
- Enter Group name (e.g., devops).
- Attach Policies (like Administrator Access or custom policies).
- Click Create group.
- Add Users to the Group:
- Select the user(s) → Add to group
IAM Roles
An IAM role is an IAM identity that you can create in your account that has specific permissions. An IAM role is similar to an IAM user, in that it is an AWS identity with permission policies that determine what the identity can and cannot do in AWS. However, instead of being uniquely associated with one person, a role is intended to be assumable by anyone who needs it. Also, a role does not have standard long-term credentials such as a password or access keys associated with it. Instead, when you assume a role, it provides you with temporary security credentials for your role session.
You can use roles to delegate access to users, applications, or services that don’t normally have access to your AWS resources. For example, you might want to grant users in your AWS account access to resources they don’t usually have, or grant users in one AWS account access to resources in another account. Or you might want to allow a mobile app to use AWS resources, but not want to embed AWS keys within the app (where they can be difficult to update and where users can potentially extract them). Sometimes you want to give AWS access to users who already have identities defined outside of AWS, such as in your corporate directory. Or, you might want to grant access to your account to third parties so that they can perform an audit on your resources.
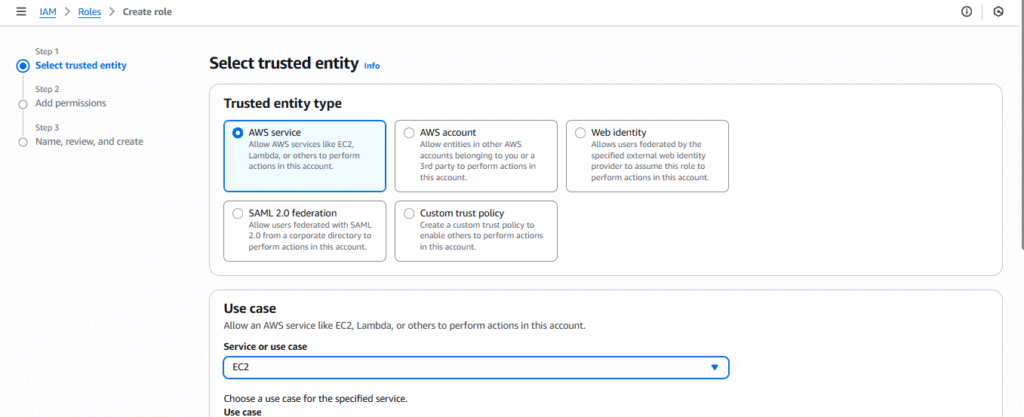
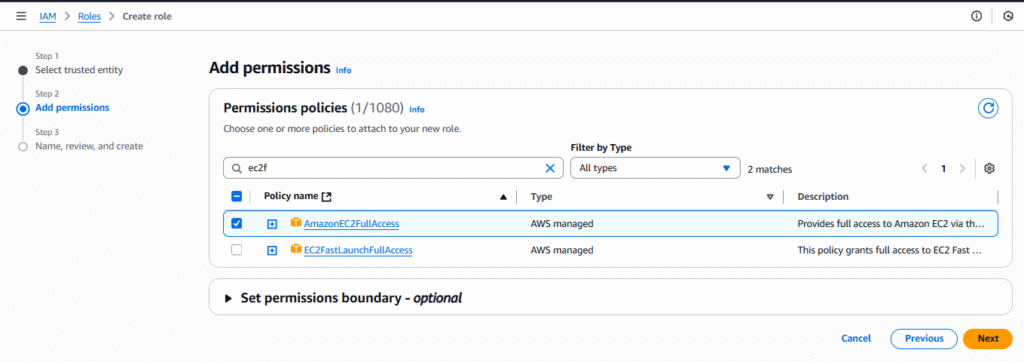
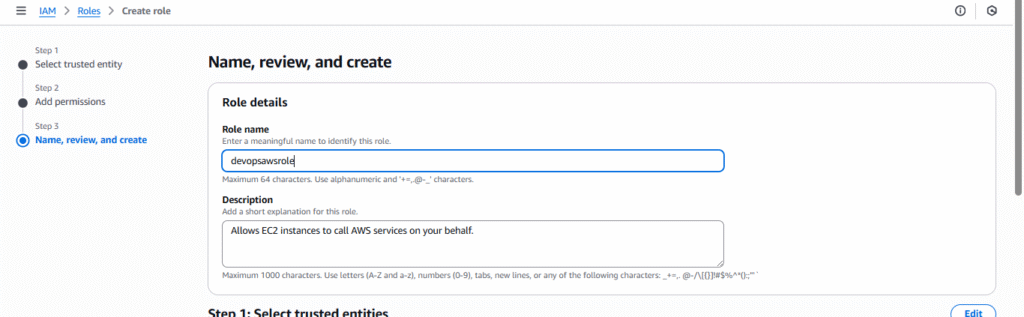
Steps to create a Role:
- IAM → Roles → Create role.
- Choose Trusted entity:
- AWS service (e.g., EC2, Lambda)
- Another AWS account
- Web identity / SAML
3. Attach Policy (e.g., AmazonEc2FullAccess).
4. Add Role name → Create Role.
Tip: Use roles for least privilege and temporary access.
IAM policies
IAM policies are documents that define permissions to control who can access what resources and what actions they can perform within an organization’s digital environment. These policies, often written in JSON, are attached to users, groups, roles, or resources to grant or deny access, thereby enforcing the principle of least privilege and maintaining security
Steps to create a Policy:
- IAM → Policies → Create policy → JSON.
- Example: S3 Read-only Policy
{
  "Version": "2012-10-17",
  "Statement": [
    {
      "Effect": "Allow",
      "Action": [
        "s3:GetObject",
        "s3:ListBucket"
      ],
      "Resource": [
        "arn:aws:s3:::your-bucket-name",
        "arn:aws:s3:::your-bucket-name/*"
      ]
    }
  ]
}
- Click Next: Tags → Review → Create Policy.
- Attach policy to User, Group, or Role.
MFA
AWS multi-factor authentication (MFA) is an AWS Identity and Access Management (IAM) best practice that requires a second authentication factor in addition to user name and password sign-in credentials. You can enable MFA at the AWS account level for root and IAM users you have created in your account.
AWS is expanding eligibility for its free MFA security key program. Verify your eligibility and order your free MFA key.
With MFA enabled, when a user signs in to the AWS Management Console, they are prompted for their user name and password— something they know—and an authentication code from their MFA device— something they have (or if they use a biometrics-enabled authenticator, something they are). Taken together, these factors improve security for your AWS accounts and resources.
We recommend that you require your human users to use temporary credentials when accessing AWS. Your users can use an identity provider to federate into AWS, where they can authenticate with their corporate credentials and MFA configurations. To manage access to AWS and business applications, we recommend that you use AWS IAM Identity Center. For more information, see the IAM Identity Center User Guide.
See the following available MFA options that you can use with your IAM MFA implementation. You can download virtual authenticator apps through the links provided, or you can acquire a hardware MFA device from the respective manufacturer. After you’ve acquired a supported virtual or hardware MFA device, AWS does not charge additional fees for using MFA.
Steps to enable MFA for a user:
- IAM → Users → Select user → Security credentials → Manage MFA.
- Choose Virtual MFA device (Google Authenticator, Authy).
- Scan QR code → Enter two consecutive MFA codes → Assign MFA.
AWS STS (Security Token Service)
AWS Security Token Service (STS) is a web service that enables you to request temporary, limited-privilege credentials for AWS Identity and Access Management (IAM) users or federated users. These temporary credentials allow secure and time-bound access to AWS resources without using long-term access key
Steps:
- Create a Role with trusted entity = another AWS account.
- Attach required Policy.
- Use STS API to assume role:
aws sts assume-role \
  --role-arn "arn:aws:iam::123456789012:role/TempAccessRole" \
--role-session-name "TemporarySession"- This returns AccessKeyId, SecretAccessKey, SessionToken (valid for few minutes to hours).
- Use credentials to access AWS resources programmatically.
IAM best practices
Use least privilege – grant only the permissions required.
Enable MFA for all users, especially the root account.
Use groups to manage permissions instead of individual users.
Rotate access keys regularly to reduce security risks.
Avoid using root account for daily tasks.
Use roles for EC2, Lambda, ECS, and cross-account access.
Enforce strong password policies for IAM users.
Monitor with CloudTrail and enable logging for auditing.
Use AWS Organizations for centralized account and policy management.
Review IAM policies regularly to remove unused permissions.
