Amazon provides scalable computing capacity in the AWS cloud. You cans use Amazon EC2 to lunch as many or as few virtual servers as you need, configure security and networking and manage storage. Amazon EC2 enables you to scale up or scale down the instance. Amazon EC2 is having two storage options i.e EBS and instance store. Preconfigured templates are available known as amazon machine image. By default when you create an EC2 account with amazon your account is limited to a
maximum of 20 instances per EC2 region with two default high I/O instances.
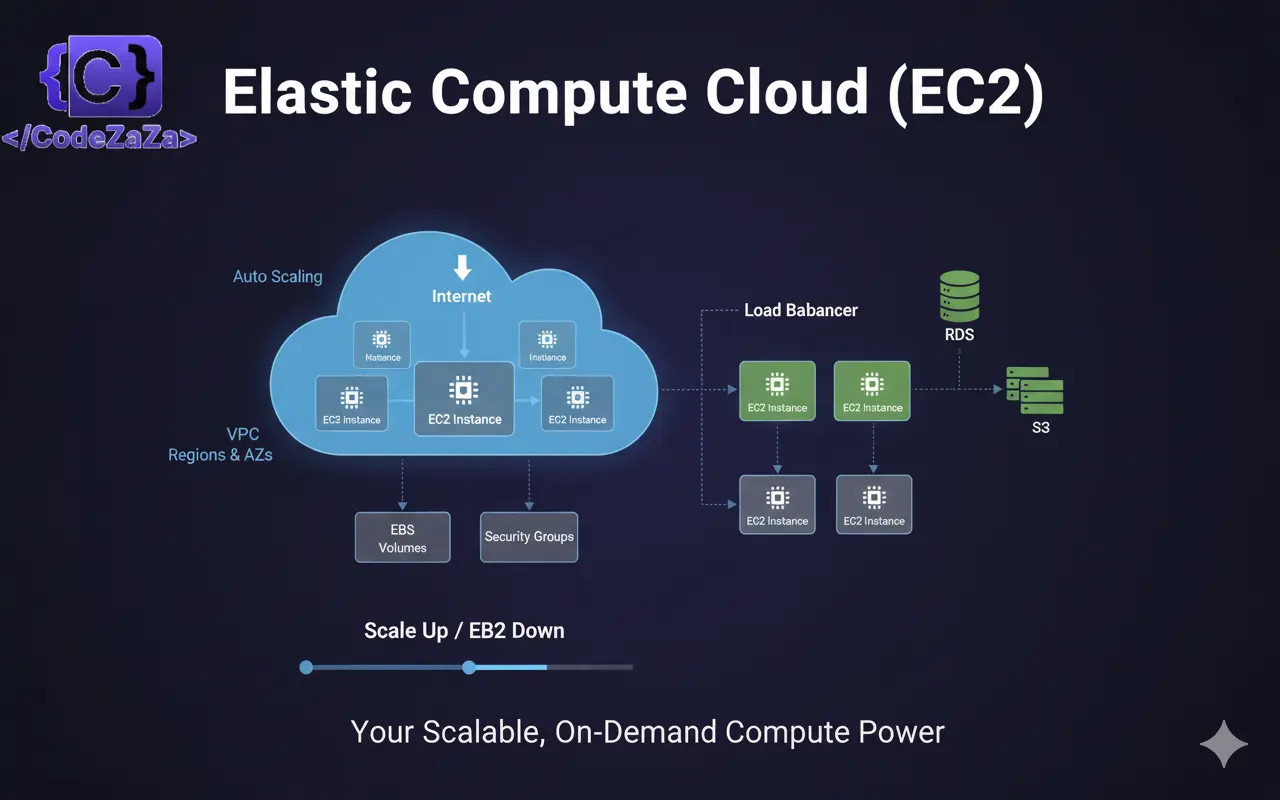
Working of AWS EC2
Instead of buying and managing your own servers, EC2 gives you a virtual machine, where you can run websites, apps, or even big data tasks.
Choose the memory, storage, and CPU you need, and stop the instance when done.
- EC2 offers secure, reliable, high-performance, and cost-effective infrastructure.
- Deploy applications without managing physical hardware.
- Secure your instance using VPC, Subnets, and Security Groups.
- Attach Auto Scaling to scale EC2 based on demand.
- Automatically scale up or down based on traffic.
Types of EC2 instances

1. General purpose
General purpose instances provide a balanced mix of compute, memory, and networking resources. They are ideal for diverse workloads, like web services, code repositories, and when workload performance is uncertain.
2. Compute optimized
Compute optimized instances are ideal for compute-intensive tasks, such as gaming servers, high performance computing (HPC), machine learning, and scientific modeling.
3. Memory optimized
Memory optimized instances are used for memory-intensive tasks like processing large datasets, data analytics, and databases. They provide fast performance for memory-heavy workloads.
4. Storage optimized
Storage optimized instances are designed for workloads that require high performance for locally stored data, such as large databases, data warehousing, and I/O-intensive applications.
5. Accelerated computing or GPU
Accelerated computing instances use hardware accelerators, like graphics processing units (GPUs), to efficiently handle tasks, such as floating-point calculations, graphics processing, and machine learning
Amazon Machine Images (AMIs)
An Amazon Machine Image (AMI) is a pre-configured template that serves as the blueprint for launching a virtual machine, known as an EC2 instance, in the AWS cloud. Think of it as a virtual hard drive that’s been packaged up with everything you need to start a server.
When you launch an EC2 instance, you must specify an AMI. The AMI contains the necessary components to boot your instance, including:
- An operating system (OS): This can be Linux, Windows, or another OS.
- An application server and applications: This is where you can pre-install your software, like a web server (e.g., Apache, NGINX), databases, or custom applications.
- Launch permissions: These define which AWS accounts can use the AMI to launch instances.
The primary benefit of an AMI is that it allows you to quickly and consistently deploy multiple identical instances. Instead of manually installing the OS and software on each new server, you can simply launch instances from a pre-built AMI that already has everything configured. This is especially useful for creating a fleet of servers for tasks like auto-scaling or load balancing.
Types of AMIs
There are four main types of AMIs, categorized by their source and ownership:
Amazon-provided AMIs: These are official AMIs created and maintained by AWS. They provide a base OS with minimal configurations and are a great starting point for most projects. Examples include Amazon Linux, Ubuntu, and Windows Server AMIs.
AWS Marketplace AMIs: These are AMIs created by third-party vendors and are available for purchase in the AWS Marketplace. They often come pre-packaged with licensed software, like enterprise applications or specialized development tools. You’re charged a fee in addition to the standard EC2 instance costs.
Community AMIs: These are publicly shared AMIs created by other AWS users. They are free to use but come with no guarantee of integrity or security. You should be cautious when using a community AMI from an unknown source.
Custom AMIs: This is an AMI that you create yourself from an existing EC2 instance that you’ve already configured with your own applications and settings. They are private to your account by default, but you can share them with specific AWS accounts or make them public.
Security Groups: The Virtual Firewall
Think of a Security Group as a virtual firewall that sits right in front of your EC2 instance. It’s a set of rules that controls the traffic that’s allowed to enter (inbound) and leave (outbound) your instance.
A few key things to remember:
- Allow-Only Rules: Security Groups are permissive. This means you can only create “allow” rules. By default, all inbound traffic is denied, and all outbound traffic is allowed. You have to explicitly create a rule to permit traffic you want to let in. For example, if you want your website to be accessible on the internet, you’d need to create an inbound rule that allows HTTP (port 80) traffic.
- Stateful Nature: Security Groups are “stateful.” This is a fancy way of saying they are smart. If you create an inbound rule to allow traffic from a certain IP address, the Security Group automatically allows the response traffic to flow back out. You don’t need to create a separate outbound rule for it.
- Instance Level: Security Groups are attached to the EC2 instance itself, not to the entire network or subnet. This means you can have a different set of security rules for each of your virtual servers.
In short, a Security Group acts like a bouncer at the door of your server, only letting in the people (or traffic) you’ve put on the guest list.
Key Pairs: The Digital Keys
A Key Pair is a secure login method for your EC2 instances. It’s used to securely connect to your instances, especially for command-line access using a protocol like SSH (for Linux) or for retrieving the administrator password for a Windows instance.
A Key Pair consists of two parts:
- Public Key: This is like a lock. AWS stores this public key on your EC2 instance when you launch it. Anyone can have a copy of the public key, but it can’t be used to connect to the instance. Its purpose is to encrypt data that can only be unlocked by the private key.
- Private Key: This is like the actual key that unlocks the lock. You download this file to your local computer when you create the key pair in AWS. It’s crucial that you keep this file secure and private. You’ll use this private key to authenticate yourself when you try to connect to your EC2 instance.
The process of connecting is based on public-key cryptography. When you try to connect to the EC2 instance, your local machine uses the private key to prove that you are the legitimate owner. The instance then verifies this proof using the public key it has, and if they match, you’re granted access.
Think of it this way: your Security Group controls who can even knock on the door, and your Key Pair is the specific key you use to unlock that door once you’re allowed to approach it. You must have both configured correctly to get in and manage your server securely.
Elastic Network Interface (ENI): The Virtual Network Card
An Elastic Network Interface (ENI) is a virtual network card for your EC2 instance. Every EC2 instance has at least one ENI, which is what allows it to communicate on the network. But what makes it “elastic”? Well, it can be detached from one instance and re-attached to another.
Here’s why that’s a powerful feature:
- Fixed Network Identity: An ENI has a specific network identity, including a private IP address, a MAC address, and even a public IP address (if you attach an Elastic IP). By detaching an ENI from a failed instance and attaching it to a standby instance, you can achieve high availability. This is a fast failover solution because the new instance immediately assumes the failed instance’s network identity, with the same IP addresses and security groups.
- Multiple ENIs: You can attach multiple ENIs to a single EC2 instance. This is useful for creating complex network architectures, such as a “dual-homed” instance that needs to reside in two different subnets simultaneously. For example, one ENI could be for public-facing web traffic, and another for private database traffic.
In simple terms, an ENI is like a USB network adapter that you can plug into different computers. You don’t have to re-configure the network settings every time you move it.
Instance Store vs. EBS: The Storage Showdown
When you need to save data on an EC2 instance, you have two primary options: Instance Store and Elastic Block Store (EBS). The key difference between them is persistence.
Instance Store: The Temporary, High-Speed Scratchpad
Think of an Instance Store as a very fast, temporary drive. It’s a physical storage device that’s directly attached to the host server where your EC2 instance is running.
- Ephemeral: This is the most important concept. The data on an Instance Store volume is not persistent. It’s only available for the lifetime of the instance. If you stop, hibernate, or terminate the instance, or if the underlying hardware fails, all the data on the Instance Store is deleted forever.
- High Performance: Because it’s a physical disk right on the host machine, Instance Store offers excellent I/O performance and very low latency. It’s perfect for temporary, non-critical data that needs to be accessed quickly, like caches, buffers, or scratch files used during a heavy computation.
- Cost: Instance Store is not a separate service. Its cost is bundled into the price of certain instance types, usually those with a “d” in their name (e.g., m5xlarge).
EBS (Elastic Block Store): The Persistent, Network-Attached Drive
An EBS volume is a network-attached storage device. Unlike Instance Store, it’s not physically on the same host as your instance; it exists on a separate storage network.
- Persistent: Data on an EBS volume is durable and persists even if you stop or terminate the EC2 instance. This is why EBS is the default and recommended choice for the root volume (the volume that contains the operating system) and for any data you need to keep long-term, like databases, logs, or application files.
- Flexibility: Since it’s network-attached, you can detach an EBS volume from one instance and attach it to another in the same Availability Zone. This makes it easy to move data between instances. You can also create point-in-time backups, called snapshots, which are stored on Amazon S3 for even greater durability.
- Cost: EBS is a separate service that you pay for based on the amount of storage you provision and the type of volume you choose. This gives you a lot of flexibility to optimize for performance and cost.
Ec2 Pricing
EC2 instance pricing depends on a number of factors, including the instance type, region, operating system, and the pricing model you choose. The pricing model is the most important factor and offers different ways to pay for your compute capacity, each with its own benefits and drawbacks.
On-Demand Instances
This is the most flexible pricing model. You pay for compute capacity by the hour or the second, with no long-term commitment. On-Demand is great for workloads that have unpredictable usage patterns and cannot be interrupted, like web applications or development environments. The cost is higher compared to other models, but you only pay for what you use.
Savings Plans
Savings Plans offer significant discounts, up to 72% off On-Demand prices, in exchange for a one- or three-year commitment to a specific amount of usage, measured in a dollar amount per hour (e.g., $10/hour). There are two main types:
- Compute Savings Plans: The most flexible plan. It automatically applies the discount to your usage of any EC2 instance family in any region, as well as to other compute services like AWS Lambda and AWS Fargate.
- EC2 Instance Savings Plans: This plan provides a higher discount but requires you to commit to a specific instance family within a single region (e.g., M5 instances in the us-east-1 region). This is a good choice if you know your usage will stay within a certain family.
Reserved Instances
Reserved Instances (RIs) offer a discount of up to 72% for a one- or three-year term. Unlike Savings Plans, you commit to a specific instance type in a specific region. RIs are a good fit for applications with a predictable, steady-state workload. They also provide a capacity reservation in a specific Availability Zone, ensuring that you can launch the instances you’ve reserved whenever you need them.
Spot Instances
Spot Instances let you take advantage of unused EC2 capacity in the AWS cloud at a significant discount, often up to 90% off On-Demand prices. The major catch is that AWS can reclaim these instances with a two-minute warning if it needs the capacity back. Because of this, Spot Instances are best suited for flexible, fault-tolerant, or stateless workloads, like big data analytics, batch processing, or containerized applications.
Steps to launch an Ec2 Instance
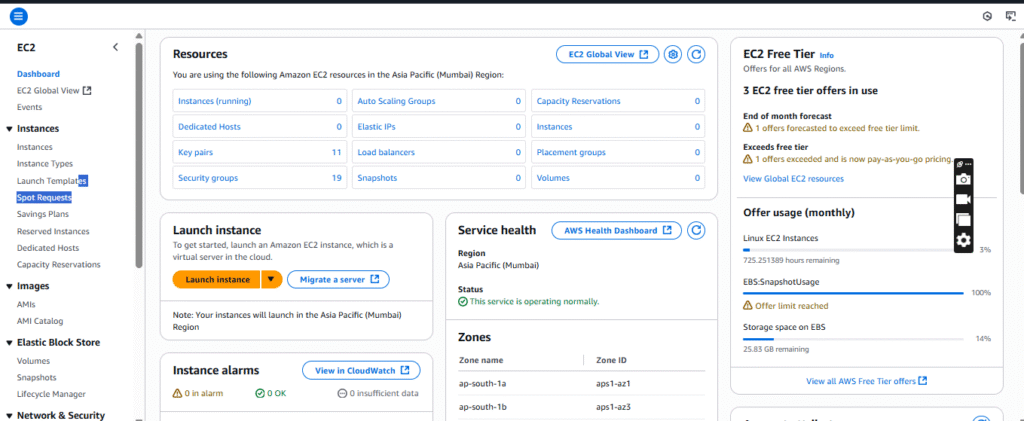
Step 1: Log In to the AWS Console
First, sign in to your AWS account. Once logged in, search for and navigate to the EC2 Dashboard. Make sure you’re in the correct AWS Region for your project.
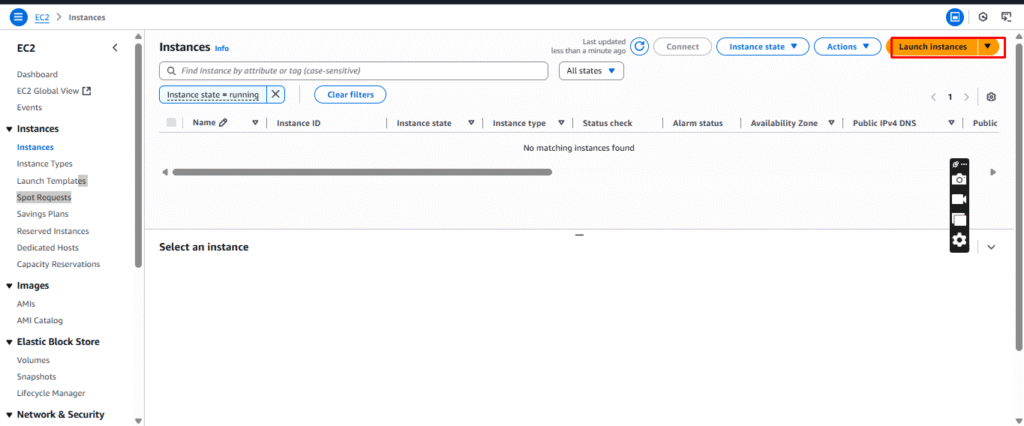
Step 2: Launch an Instance
On the EC2 Dashboard, click the “Launch instance” button. This will open a new wizard to guide you through the configuration process.
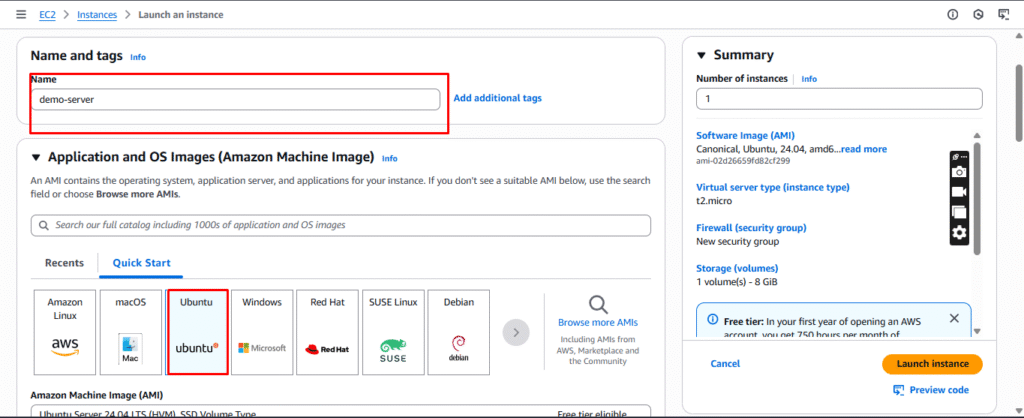
Step 3: Choose Your Instance Configuration
This is where you define the specifications for your virtual server.
- Name and Tags: Give your instance a descriptive name so you can easily identify it later.
- Application and OS Images (AMI): An Amazon Machine Image (AMI) is the template for your instance. Select an AMI that includes the operating system you want, such as Amazon Linux, Ubuntu, or Windows Server. Many are free tier eligible.
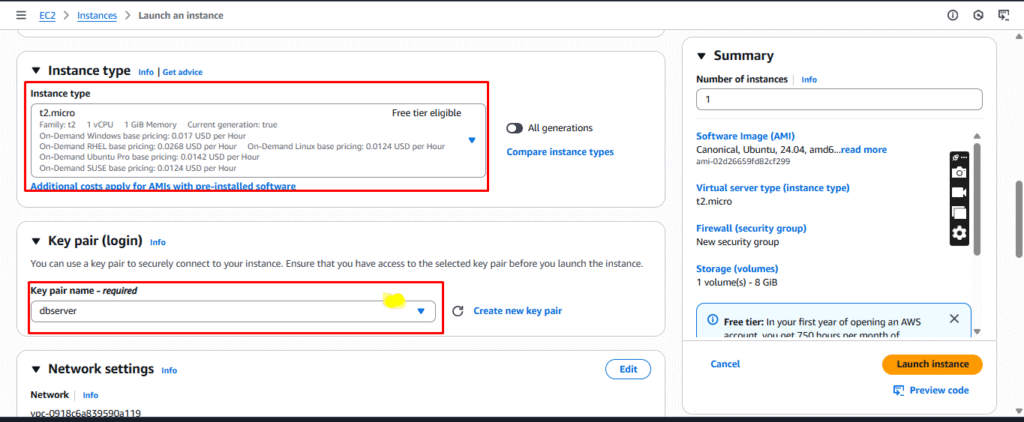
- Instance Type: Choose an instance type, which determines the virtual hardware (CPU, memory, storage, and networking capacity) for your instance. The t2.micro or t3.micro are often a good starting point and are free tier eligible.
- Key Pair (Login): A key pair is essential for securely connecting to your instance. You can either choose an existing key pair or create a new one. If you create a new one, you’ll be prompted to download the private key file (.pem file), which you must save in a secure location. You will not be able to download it again.
Step 4: Configure Network and Storage
In this step, you’ll set up your network and storage options.
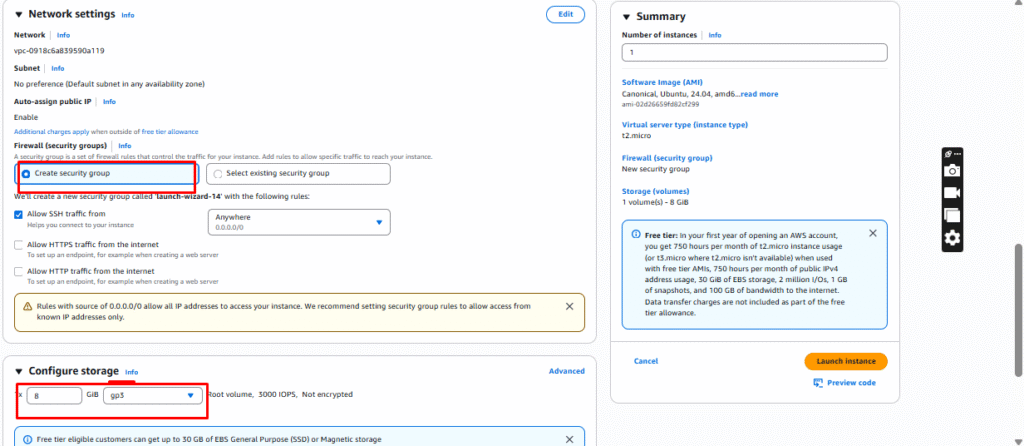
- Network Settings: Here you can choose your VPC, subnet, and Security Group. The security group acts as a firewall, controlling inbound and outbound traffic. For a basic web server, you’d create a security group rule to allow inbound HTTP traffic on port 80 and SSH traffic on port 22.
- Configure Storage: By default, your instance will have a root EBS volume attached. You can adjust the size and type of this volume and add more EBS volumes if needed. The free tier includes up to 30 GB of general-purpose SSD storage.
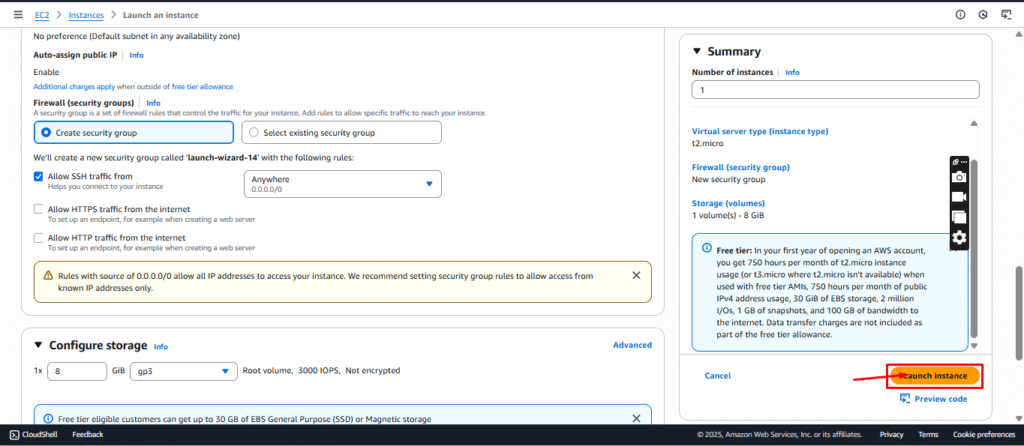
Step 5: Launch and Connect
After reviewing all your settings in the summary pane, click “Launch instance”. 🚀 AWS will then provision and launch your new EC2 instance.
Once the instance’s status changes from “pending” to “running,” you can connect to it. Select the instance from the EC2 dashboard, click the “Connect” button, and follow the instructions to connect using the key pair you created earlier.
