Containers have become essential to modern application development, allowing developers to package their code and dependencies into a portable format. As containers gain popularity, the need for efficient management and storage of container images has grown. This is where Amazon Elastic Container Registry (ECR) comes into play.
This blog post will explore Amazon ECR, its use cases, and benefits, and how you can easily create a repository and upload images from your local PC to ECR.
What is Amazon Elastic Container Registry (ECR)?
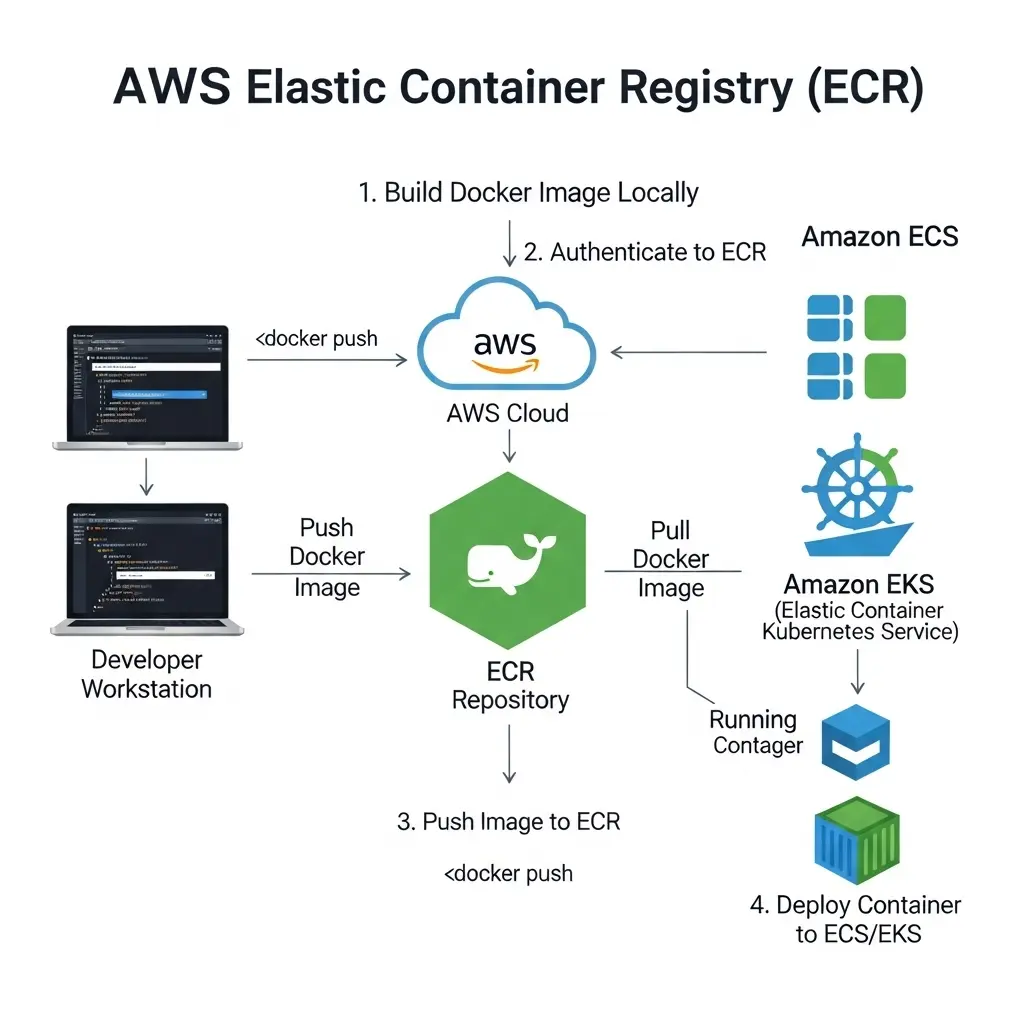
Amazon Elastic Container Registry (ECR) is a fully managed container image registry service provided by AWS. It allows developers to store, manage, and deploy container images securely. ECR is deeply integrated with AWS services such as Amazon Elastic Kubernetes Service (EKS), Amazon Elastic Container Service (ECS), and AWS Lambda, making it easy to use for modern containerized applications.
With ECR, developers no longer need to manage their container registries or worry about scaling availability, or security of their image repositories. AWS handles these tasks, allowing teams to focus on building and deploying their applications.
Use Cases of Amazon ECR
- Storing Container Images: ECR provides a secure and scalable environment for storing container images, which can then be deployed to Amazon ECS, EKS, or Kubernetes clusters.
- CI/CD Pipelines: ECR can be used as part of your Continuous Integration/Continuous Deployment (CI/CD) pipeline, storing images created during the build process and deploying them automatically to your target environments.
- Serverless Containers: With the rise of serverless architectures, developers can use ECR to store and manage container images for AWS Lambda functions.
- Multi-Region Deployments: ECR allows for replication of repositories across different AWS regions, enabling low-latency access to images and seamless global deployments.
Benefits of Amazon ECR
- Security: ECR encrypts images at rest and in transit. In addition, it integrates with AWS IAM, so only authorized users can push or pull images.
- Scalability: The service scales automatically with your storage needs. Moreover, you can manage a few images or thousands without extra setup.
- Seamless Integration: ECR connects easily with AWS services such as ECS, EKS, and Lambda. As a result, deploying containerized applications becomes faster and simpler.
- Cost-Effective: You pay only for the storage you use and the data you transfer. Furthermore, there are no upfront costs or long-term commitments.
- Reliability: ECR runs on AWS’s global infrastructure. Therefore, it delivers high availability and durability for your container images.
How to Create a Repository and Upload Images from Your Local PC to ECR
Step 1: Create an ECR Repository
- Login to AWS Console: Navigate to the Amazon ECR section in the AWS Management Console.
- Create Repository:
- Click on Create Repository.

- Give your repository a name (e.g., devops-repo).

- Choose any additional settings (such as image tag immutability or encryption).
- Click Create.

You now have a repository where your container images will be stored.

View Push Commands: Once the repository is created, you can go to the repository details page. On this page, at the top right corner click on View Push Commands that guide you on how to push your local Docker image to this ECR repository.

Step 2: Authenticate Docker to ECR
Amazon ECR uses the AWS CLI to authenticate Docker to your ECR repository. Use the following command to authenticate Docker:
aws ecr get-login-password --region us-east-1 | docker login --username AWS --password-stdin 76627745XXX.dkr.ecr.us-east-1.amazonaws.comReplace <region> with your AWS region and <aws_account_id> with your AWS account ID.
Step 3: Build and Tag the Docker Image
If you haven’t already built your Docker image, use the following command:
docker build -t devops-repo .
Once the image is built, tag it so that it can be pushed to your newly created ECR repository:
docker tag devops-repo:latest 76627774XXX.dkr.ecr.us-east-1.amazonaws.com/devops-repo:latest
Since the image registry.k8s.io/sig-storage/nfs-subdir-external-provisioner:v4.0.2 is already present in my local environment, I will tag it with my Amazon ECR repository using the following command:
docker tag registry.k8s.io/sig-storage/nfs-subdir-external-provisioner:v4.0.2 7662777XXX.dkr.ecr.us-east-1.amazonaws.com/devops-repo:latest
This will create a new tag for the existing image, associating it with my Amazon ECR repository.
Step 4: Push the Docker Image to ECR
Push the tagged Docker image to ECR using the following command:
docker push 7662777XXX.dkr.ecr.us-east-1.amazonaws.com/devops-repo:latest
This command will upload the tagged image to my AWS ECR repository, making it available for deployments or further use.

You should now see the image being uploaded to your repository. Once the upload completes, the image will be available in your Amazon ECR repository.

Step 5: Deploy the Image
After pushing the image to ECR, you can use the repository URI to deploy the image to ECS, EKS, or any other container service. Simply reference the image in your deployment configuration files using the ECR repository URI.
Conclusion
Amazon Elastic Container Registry (ECR) simplifies the process of storing, managing, and deploying container images, making it a key service for any organization using containers in AWS. ECR’s seamless integration with AWS services, security features, and cost-effectiveness make it an ideal choice for managing your containerized applications.
Whether you’re deploying large-scale microservices, setting up automated CI/CD pipelines, or managing serverless containers, Amazon ECR provides the tools you need to streamline the process. By following the steps above, you can easily create a repository and push images from your local machine, ready for deployment to your AWS services.
If you found this blog post helpful and insightful, I invite you to show your appreciation by giving it a clap! Your support fuels my motivation to continue sharing valuable content. Don’t forget to hit that follow button as well, so you can stay connected and receive updates on upcoming posts. Let’s embark on this journey together and explore even more exciting insights into the world of DevOps. Your engagement is greatly appreciated!
