Losing a PEM key in AWS can be a serious problem because the key is required for secure access to your instances. Once a PEM key is lost, AWS does not provide a way to recover it. This rule exists to protect the security of your resources. The private key should stay confidential, and AWS never stores copies of user-generated keys.
If you lose your PEM key, you cannot get it back. However, you still have a few ways to regain access to your instances. These methods rely on using backups, snapshots, or creating new resources with a new key pair.
It’s crucial always to keep backups of your PEM keys in a secure location.
1. Recover EC2 SSH Access Without PEM Key, Without Restarting — The Smart DevOps Way
You launched an EC2 instance and forgot to back up your .pem file — now you can’t SSH into it. However, you still have:
- EC2 is running
- It’s Amazon Linux / Ubuntu
- It allows EC2 Instance Connect (browser-based SSH)
- You want to regain persistent SSH access with a new
.pemfile
This approach simplifies EC2 SSH recovery by avoiding complex and time-consuming steps. You don’t have to reboot the instance, manipulate storage volumes, use Systems Manager, or launch temporary instances. Instead, you can directly reconnect using EC2 Instance Connect and generate a new SSH key, making the process faster, safer, and easier—especially in production environments.
Step-by-Step Recovery
Step 1: Connect Using EC2 Instance Connect
- Go to AWS Console → EC2 → Instances
- Select the running instance
- Click on Connect → EC2 Instance Connect
- Click Connect to launch the browser-based terminal
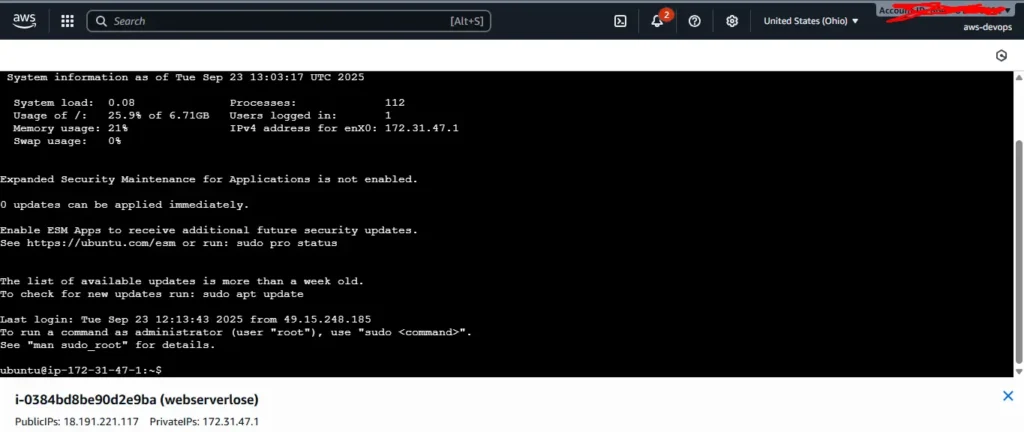
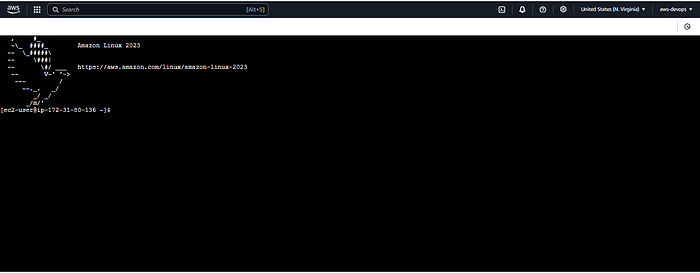
You’re now inside your EC2 instance — without needing the .pem file.
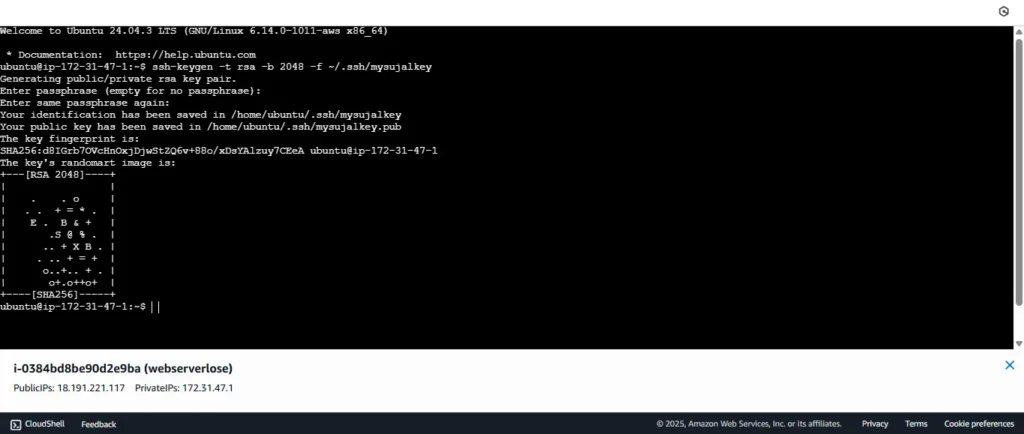
Step 2: Generate a New SSH Key Pair
Inside the EC2 terminal:
ssh-keygen -t rsa -b 2048 -f ~/.ssh/your-new-key
Just press Enter to leave passphrase empty. This will generate two files:
~/.ssh/your-new-key(private key)~/.ssh/your-new-key.pub(public key)
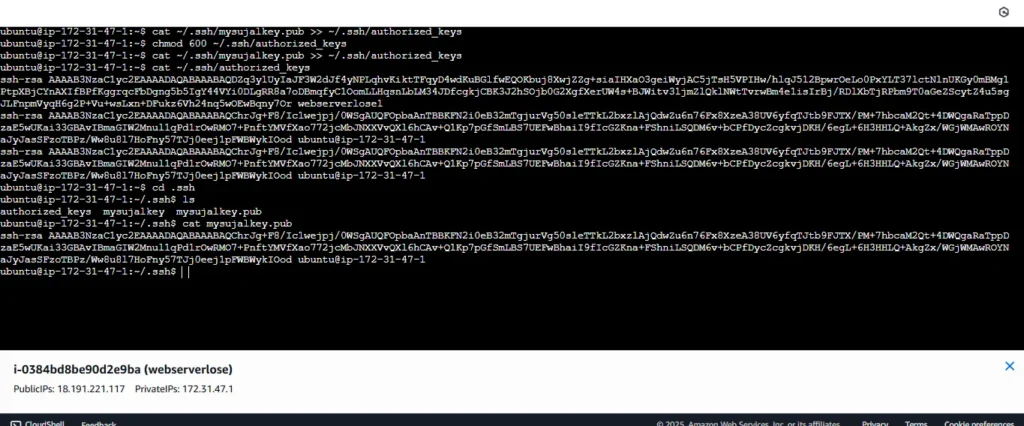
Step 3: Add Public Key to Authorized Keys
Append the newly generated public key to your authorized keys:
cat ~/.ssh/your-new-key.pub >> ~/.ssh/authorized_keys
chmod 600 ~/.ssh/authorized_keys
Verify:
cat ~/.ssh/authorized_keys
Step 4: Convert Private Key to PEM Format (Locally)
Now, copy the contents of my-new-key to your local machine:
- In EC2 terminal:
cat ~/.ssh/my-new-key
2. Copy the entire private key block (-----BEGIN RSA PRIVATE KEY----- ...)
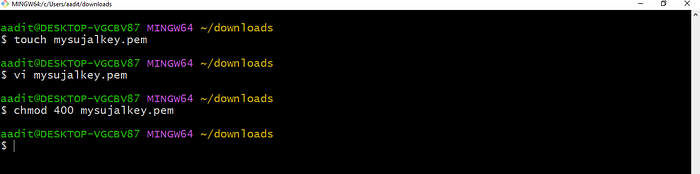
3. On your local system, create a new .pem file:
nano my-new-key.pem
Paste the key, save and exit. Then run:
chmod 400 my-new-key.pem
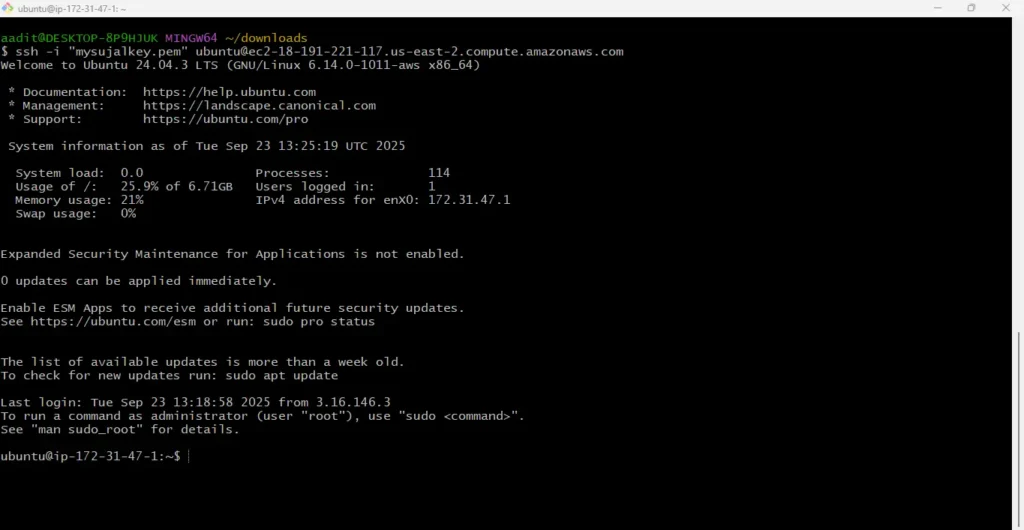
Step 5: SSH from Your Local Machine
Now connect to your instance using your new key:
ssh -i "webserverlose1.pem" ubuntu@ec2-18-191-221-117.us-east-2.compute.amazonaws.com
Or if you’ are using AWS Linux
ssh -i mysujalkey.pem ec2-user@<EC2-Public-IP>
Boom — you’re back in!
2. Recover EC2 Instance Access After Losing PEM Key- By Creating a New Key Pair
In this scenario
You launched an EC2 instance using a PEM key.
That PEM file got deleted/lost.
You do not want to restart or create a new instance.
You want to regain SSH access without using SSM, new volumes, or temporary EC2 instances.
Step 1: Login to AWS Console
- Go to the AWS Management Console
- Navigate to EC2 Dashboard
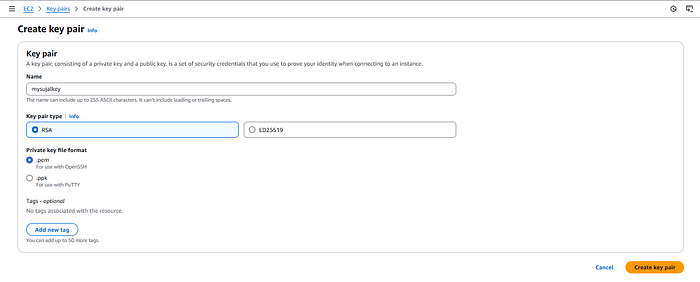
Step 2: Create a New Key Pair
- Go to EC2 > Key Pairs (under “Network & Security”).
- Click “Create Key Pair”.
- Name it something like
recovery-key. - Choose RSA as key type.
- Choose
.pemformat (for Linux/Mac). - Download the key pair and store it securely — this is your new key.
Step 3: Connect to EC2 Using Instance Connect
- Navigate to Instances in the EC2 Dashboard.
- Select your instance.
- Click “Connect”.
- Choose the EC2 Instance Connect (browser-based SSH) option.
- Click Connect.
If you can’t connect using EC2 Instance Connect, this method won’t work. Check your AMI, user permissions, and security group.
Step 4: Replace the Existing Public Key with the New One
Once you’re inside the instance:
cd ~/.ssh
Edit the authorized_keys file using nano or vi:
vi authorized_keys
Now open your downloaded .pem file on your local machine and get the public key. You can generate the public key using:
ssh-keygen -y -f mysujalkey.pem

Copy the output.
Paste the new public key into the authorized_keys file, replacing the old one. Save and exit the file.

Step 5: Update File Permissions (Important)
Ensure .ssh folder and files have correct permissions:
chmod 700 ~/.ssh
chmod 600 ~/.ssh/authorized_keys
Step 6: Test SSH Access from Your Local Machine
Now, try connecting to the EC2 instance from your local terminal using your new PEM file:
ssh -i mysujalkey.pem ec2-user@<public-ip>
Replace ec2-user with your instance’s default user (e.g., ubuntu for Ubuntu AMIs, ec2-user for Amazon Linux).
Output
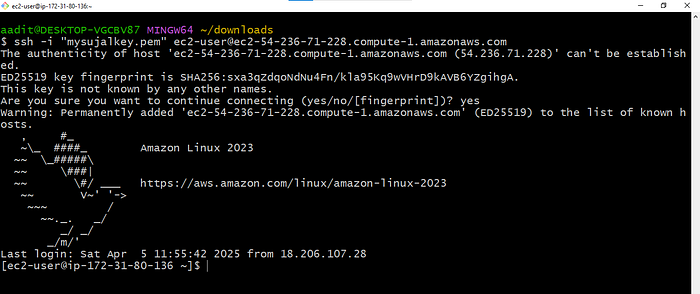
You’re inside the EC2 instance.
Advantages of This Approaches in Production
- Zero Downtime
- Since this method does not require rebooting the instance or detaching/attaching volumes, your production workloads continue to run without any service interruption. Applications, web servers, and databases remain online while you restore SSH access.
- No Additional Infrastructure
- Traditional recovery methods often involve creating temporary EC2 instances, mounting EBS volumes, or using Systems Manager. This approach relies only on EC2 Instance Connect, avoiding extra AWS resources and costs.
- Security First
- By generating a new key pair directly on the instance, you avoid insecure practices like sharing passwords or exposing temporary credentials. The new
.pemfile becomes the only secure access method, aligning with AWS best practices.
- By generating a new key pair directly on the instance, you avoid insecure practices like sharing passwords or exposing temporary credentials. The new
- Faster Recovery
- In a production outage scenario, speed is critical. This method allows you to regain SSH access in minutes instead of hours, avoiding lengthy steps like creating snapshots or reconfiguring IAM/SSM.
- Minimal AWS Permissions Required
- The recovery process only requires EC2 Instance Connect and standard SSH permissions. You don’t need SSM Agent installation, IAM role modifications, or special service integrations, making it simpler to execute under restricted production setups.
- Cost-Effective
- No additional EC2 instances, EBS snapshots, or SSM setups are needed. This keeps recovery cost at $0 extra, which is especially important in large-scale production environments with multiple instances.
- Consistency Across OS Types
- Works seamlessly with Amazon Linux and Ubuntu instances — two of the most common production environments. This makes the approach predictable and repeatable for operations teams.
Conclusion
Losing your EC2 PEM file can be stressful, especially when you’re managing production workloads or critical environments. But as we’ve seen in this step-by-step guide, recovery is absolutely possible without restarting your instance or using complex workarounds.
By leveraging EC2 Instance Connect and replacing the old public key with a new one, you can securely regain SSH access in just a few minutes. This method is not only quick but also AWS-recommended for such scenarios.
Always remember to store your PEM keys safely, enable EC2 Instance Connect as a fallback, and enforce strong security practices across your infrastructure.
