Pods are the smallest unit you can create and manage in Kubernetes.
A Pod is like a pea pod or a group of whales—it contains one or more containers that always stay together. These containers share the same storage, network, and runtime settings. Since they run in the same environment, they work closely with each other, just like apps running on the same computer in non-cloud systems.
Inside a Pod, you can have:
- Application containers → Run your actual app.
- Init containers → Run setup tasks before the app starts.
- Ephemeral containers → Added temporarily to debug a running Pod.
In short: A Pod is a small package that groups containers so they can run together smoothly
Pod Lifecycle in Kubernetes
In Kubernetes, a Pod is the smallest deployable unit that can run one or more containers. Every Pod has a lifecycle, which represents the stages it goes through from creation to termination. Understanding these phases is crucial for DevOps engineers and developers to troubleshoot issues, optimize workloads, and ensure high availability.
A Pod can exist in one of several high-level phases, each reflecting its current state. Let’s look at them in detail.
Pod Lifecycle in Kubernetes
In Kubernetes, a Pod is the smallest deployable unit that can run one or more containers. Every Pod goes through a defined lifecycle, moving across different phases from creation to termination. Each phase reflects the current status of the Pod and helps developers and DevOps engineers understand how their workloads are behaving. Let’s explore each Pod phase in detail.
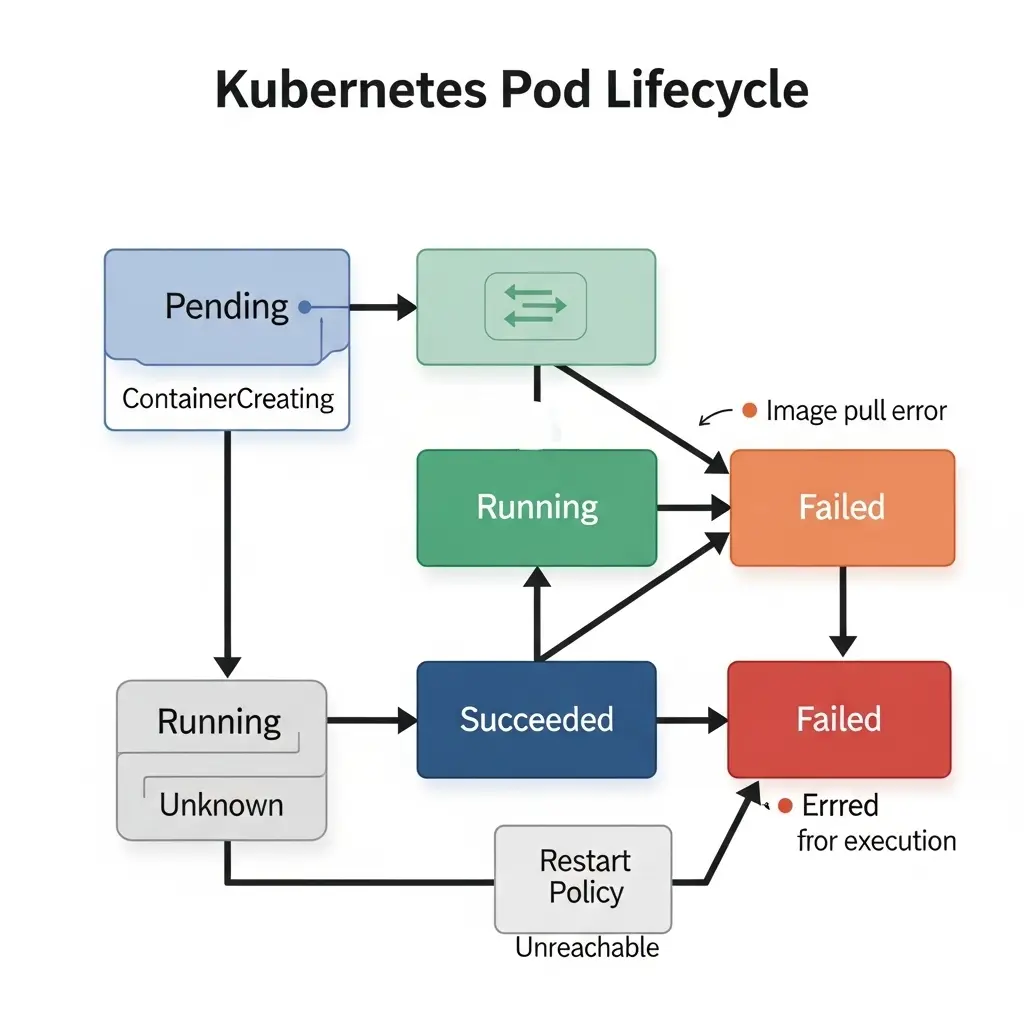
Pending Phase
The Pending phase begins as soon as Kubernetes accepts a Pod’s definition, but the containers inside it are not yet running. This happens because the system might still be downloading the required container images or the scheduler is searching for a suitable node with enough CPU, memory, or other resources. A Pod can remain in the Pending state for an extended period if the cluster has insufficient capacity or if image pulling takes longer than expected. This phase is especially important for diagnosing resource shortages or misconfigurations in scheduling.
Running Phase
Once Kubernetes successfully assigns a Pod to a node and creates all its containers, the Pod enters the Running phase. In this state, at least one container inside the Pod is active or in the process of starting or restarting. During the Running phase, the Pod becomes fully functional, able to respond to requests, and passes health checks like liveness and readiness probes. This is the most common phase during the normal operation of applications in a Kubernetes cluster, and it represents the steady state where workloads are available and serving traffic.
Succeeded Phase
The Succeeded phase indicates that all containers in the Pod have completed their tasks successfully and exited with a status code of zero. Pods in this phase will not restart, making it a terminal state for workloads that are designed to run only once. This phase is common for short-lived jobs such as database migrations, batch processing, or backup tasks. Monitoring Pods that reach the Succeeded state ensures that automation processes finish correctly and that expected jobs are not stuck in earlier phases.
Failed Phase
A Pod enters the Failed phase when all of its containers terminate, and at least one of them exits with a non-zero status, signaling an error. Failures can occur due to various reasons, including application bugs, resource exhaustion, misconfigurations, or dependency issues. Unlike Pods in the Succeeded phase, those in the Failed state often require troubleshooting and user intervention unless restart policies are configured to retry automatically. Investigating Failed Pods is crucial for debugging deployment problems, broken CI/CD pipelines, and failed automation tasks.
Unknown Phase
The Unknown phase occurs when Kubernetes cannot determine the Pod’s status. This usually happens because of network communication problems between the control plane and the node where the Pod is supposed to run. Node crashes, connectivity failures, or issues with the Kubernetes API server can also lead to this state. When a Pod enters the Unknown phase, administrators should immediately check cluster networking, node health, and logs to identify and resolve the root cause.
Kubernetes Pods Overview
In the following diagram, you can see cube-like structures; they are called containers Each of the containers will have one container. The cylinder-like structure is called volume, where the data of the containers will be stored and the circles are called pods.

A Pod can contain one or more containers, and all containers inside a Pod share:
- The same IP address
- Storage volumes
- Network resources
- Other required configurations
Pods allow easy movement of containers within a cluster. They are created and managed by controllers, which handle:
- Rollouts (new versions of Pods)
- Replication (keeping the right number of Pods running)
- Health monitoring (restarting or replacing failed Pods)
If a node fails in the cluster, the controller detects the unresponsive Pod and replicates it on another node to continue the same function.
The three commonly used controllers are:
- Jobs → For batch tasks that run once and complete (ephemeral).
- Deployments → For stateless and persistent applications, such as web services.
- StatefulSets → For stateful and persistent applications, like databases
Working with Kubernetes Pods
Pod Operating System
The operating system (OS) running inside pods is typically determined by the container image used to create the pod’s containers. Pods in Kubernetes can run containers based on various Linux distributions, such as Ubuntu, Alpine Linux, or CentOS, among others.
The choice of OS depends on the requirements of the application and the preferences of the container image author. If a container image is based on Ubuntu, the pod will run Ubuntu as its OS. Similarly, if the container image is based on Alpine Linux, the pod will run Alpine Linux.
Pods and controllers on Kubernetes
The pod will not be rescheduled to a different node when it expires because it is ephemeral (lasting only a very brief time). , we shouldn’t directly construct or use pods; instead, we should deploy pod-like deployment, replica sets, and daemon sets to maintain the pod with the aid of Kubernetes services. We have to deploy the pods with the help of objects. The main objects are
- Deployment.
- Replication Controller.
- Replica Set.
Getting Started with Kubernetes Pod
1. Create a Pod Imperatively
For a quick test, you can create a simple Nginx Pod with a single command. This is a great way to verify that your cluster is working.
kubectl run nginx --image=nginx
This command instructs Kubernetes to create a Pod named nginx using the official nginx container image.
2. Generate a Declarative Manifest
Writing YAML from scratch can be tedious. A powerful technique is to use an imperative command to generate the YAML for you. The --dry-run=client -o yaml flags tell kubectl to output the YAML representation of the object without actually creating it in the cluster.
kubectl run nginx --image=nginx --dry-run=client -o yaml > pod.yaml
Now, open the pod.yaml file. It will look something like this:
apiVersion: v1
kind: Pod
metadata:
  name: nginx
spec:
  containers:
  - name: nginx
    image: nginx:1.14.2
    ports:
    - containerPort: 80
Let’s break down the key fields:
apiVersion: The version of the Kubernetes API you’re using to create this object.v1is the core API group.kind: The type of object you want to create. In this case, aPod.metadata: Data that helps uniquely identify the object, including itsnameandlabels.spec: The most important section, which defines the desired state for the object. For a Pod, this includes the list ofcontainersto run, their images, ports, and more.
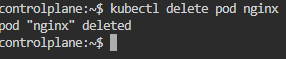
3. Create a Pod Declaratively
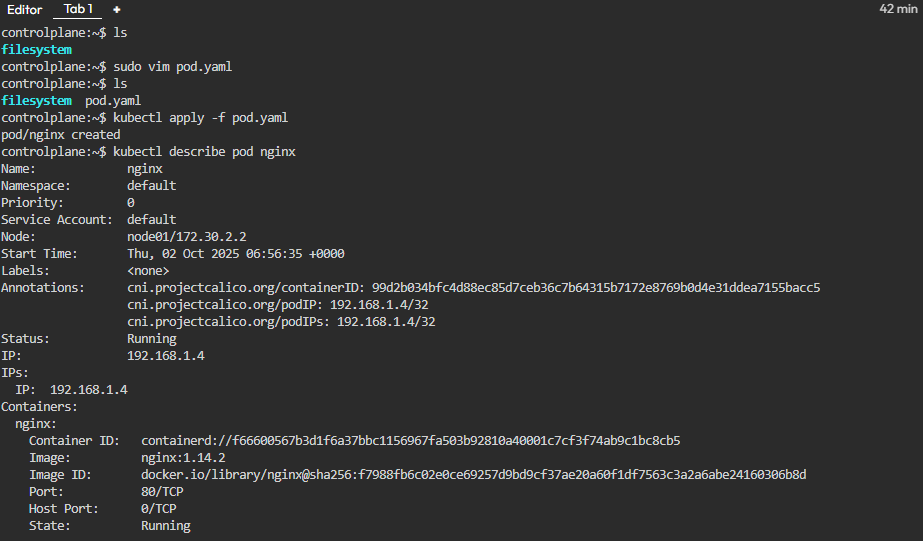
First, let’s clean up the Pod we created imperatively.
kubectl delete pod nginx
Now, apply the configuration from the manifest file you just created. The kubectl apply command is the cornerstone of the declarative approach. It tells Kubernetes to make the cluster’s live state match the state defined in the file.
kubectl apply -f pod.yaml
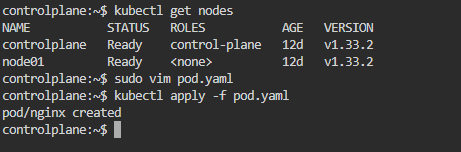
Kubernetes will read the file and create the Pod. If you were to change the file and run kubectl apply again, Kubernetes would intelligently update the existing Pod to match your new desired state.
Inspecting and Interacting with Your Pod
Once a Pod is running, you’ll need a set of commands to check its status, view its logs, and debug any issues.
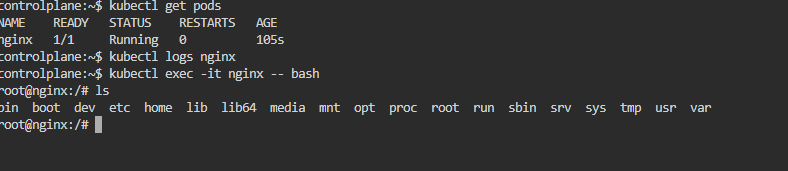
- Get Pod Status: To see a list of your Pods and their current status, use
kubectl get pods.
kubectl get pods
# NAME    READY   STATUS    RESTARTS   AGE
# nginx   1/1     Running   0          60s
- Describe the Pod: For a detailed, human-readable view of the Pod’s state,
kubectl describeis your most powerful tool. It shows labels, resource requirements, events (like image pulling and scheduling), IP address, and more. It is often the first command you run when a Pod isn’t behaving as expected.
kubectl describe pod nginx
- View Container Logs: To see the standard output from a container inside the Pod, use
kubectl logs.
kubectl logs nginx
- Execute a Command Inside a Container: To debug interactively, you can get a shell inside a running container with
kubectl exec. The-itflags connect your terminal to the container’s standard input and output. Once inside, you have a shell where you can run commands likels,cat, orpsto inspect the container’s environment from within.
kubectl exec -it nginx -- bash
Advanced Patterns: Multi-Container Pods
Containers in a Pod are so tightly coupled, you can use them to create powerful, cohesive application units. Two common patterns are Init Containers and Sidecar Containers.
Init Containers
An Init Container is a specialized container that runs and completes before the main application containers are started. They are defined in a separate
initContainers block in the Pod manifest. You can have multiple Init Containers, and they will run sequentially. Each one must exit successfully before the next one is started.
Use cases for Init Containers:
- Waiting for a backend service like a database to become available.
- Running a setup script to prepare a database schema or pre-load data.
- Cloning a Git repository into a shared volume for the main application to use.
- Registering the Pod with a central directory before the main application starts.
Sidecar Containers
A Sidecar container runs alongside your main application container within the same Pod. Unlike an Init Container, it starts with and continues to run for the full life of the application container. This pattern allows you to extend or enhance the functionality of the main container without adding complexity to the application’s own codebase.
Use cases for Sidecar Containers:
- Logging: A sidecar can tail log files from a shared volume and forward them to a centralized logging system.
- Monitoring: A sidecar can collect metrics from the main application and expose them to a monitoring system like Prometheus.
- Service Mesh Proxy: In a service mesh like Istio, a sidecar proxy handles all inbound and outbound network traffic for the main container, enabling features like traffic management, security, and observability.
- Data Synchronization: A sidecar can sync files from a central source (like an S3 bucket or a Git repository) into a shared volume for the main application to consume.
How do Kubernetes Pods Communicate With Each Other?
The creation of a pod has made it easy for communication between various components. If a pod contains multiple containers then they can communicate with each other by using a local host. Communication with outside pods can be made by exposing a pod. Communication within the clusters of the same pod is easy because Kubernetes assigns a cluster private IP address to each pod in a cluster.
Kubernetes Pod update and replacement
In Kubernetes, updating and swapping out pods is like applying an additional application of create to your application.
- Updating Pods: It’s like making changes to your application while it’s still running. You can tweak settings or replace the code without interrupting service. Think of it as a smooth, rolling upgrade that keeps everything running smoothly.
- Pod Replacement: This happens when a pod needs to be swapped out entirely, maybe because it’s crashed or needs an update. Kubernetes automatically replaces it with a new one to keep your application running without missing a beat. It’s like changing a flat tire while your car is still moving, ensuring you keep going without any down
Kubernetes Static Pods
Static pods in Kubernetes are like manually starting a program on your computer. You create a configuration file with details about the program you want to run and place it in a specific folder (usually /etc/kubernetes/manifests), and then your computer automatically starts running it without needing any extra commands. Similarly, in Kubernetes, you create a configuration file for a pod, place it in a designated folder on a node, and Kubernetes automatically starts running that pod on that node without needing to go through the usual Kubernetes control mechanisms.
What are the Basic Kubectl Commands for Kubernetes Pods?
Create Pod: A pod can be created by using the create command format.
$ kubectl create -f [FILENAME]
In the [FILENAME], you need to insert the required filename with which you want to create your file, and then a new pod with the name codezaza will be created.
To Delete Kubernetes Pod: Delete the pod using the below command.,
$ kubectl delete -f FILENAME
Here the pod named Codezaza will be deleted
Troubleshooting with kubectl
kubectl get pods: Lists all pods in the current namespace.kubectl describe pod <pod-name>: Provides detailed information about a specific pod.kubectl logs <pod-name>: Retrieves the logs from a specific pod.
Conclusion
Pods are the building blocks of Kubernetes, acting as the smallest deployable units that group one or more containers to run in a shared environment. By understanding how Pods work, along with their lifecycle phases—Pending, Running, Succeeded, Failed, and Unknown—you can effectively monitor workloads, troubleshoot issues, and design resilient applications. Whether you are deploying microservices, running batch jobs, or debugging containerized workloads, Pods serve as the foundation of application management in Kubernetes. For DevOps engineers and developers, mastering Pods is the first step toward mastering Kubernetes itself.
