Kubernetes (also known as K8s) is an open-source Container Management tool. It helps us automate all the processes like deployment, load balancing, rolling updates, etc. We can deploy, scale, and manage containerized applications.
Kubernetes Liveness and Readiness Probes
In Kubernetes, Liveness and Readiness probes are used to monitor the health of pods. Although they serve similar purposes, they perform distinct functions. The Liveness probe checks whether a pod is running and restarts it automatically if it fails. The Readiness probe determines whether a pod is ready to accept traffic. Both probes can be defined directly in the YAML configuration files, ensuring efficient recovery and smooth traffic management within the cluster.
These Kubernetes Liveness an Readiness are essential for monitoring the health of the pods. While the Liveness probes will determine the if a pod is running, restarting it if necessary and Readines probes will check if a pod is ready to serve the traffic. These can be specified directly in the Yaml configuration files. It ensures the automated recovery and smooth traffic management.
Three Types of Kubernetes Probes
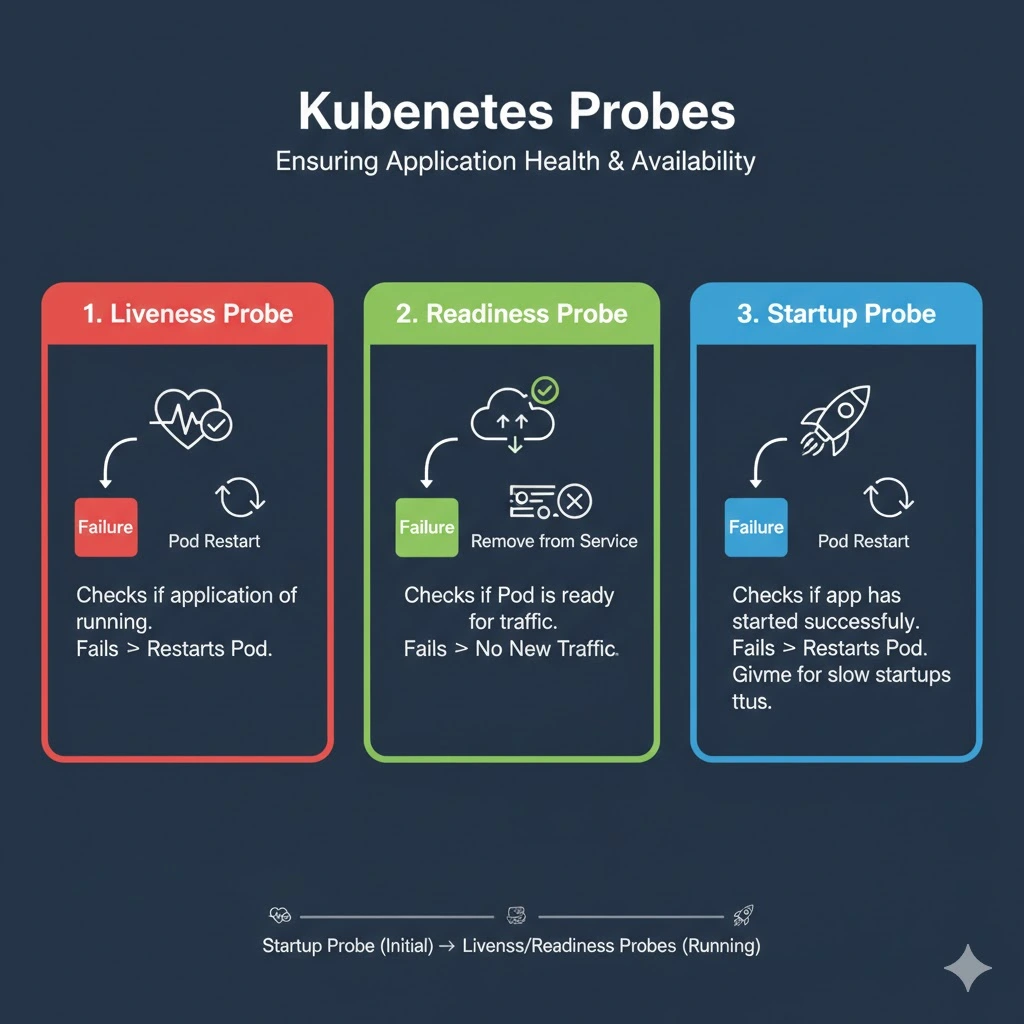
The following are the types of the kubernetes probes and those discussed here inshort and effectively:
1. Liveness Probe
Liveness probes in kubernetes facilitates the application within a pod running as expected. If a liveness probe fails then it will that pod and then it will restarted the pod according to the restart policy. It faciliates automatic recovery from the broken state and ehance the overall system reliability.
2. Readiness Probe
Readines probes are determined if a pod is ready for accepting the incoming traffic. When a readines probe fails, then it temporarily removes the probe from the service load balancer preventing it from receiving any requests unitl it is ready. These are particularly helpful during startup, maintenance or when scaling the applications.
3. Startup Probe
Startup probes are designed for managing the startup sequence of applications that taking longer to initialize. These probes are run to check if the application has successfully started. If the startup probe fails, then it will restart the pod according to its restart policy. It ensure that such applications to give enough time to become ready before other probes take over.
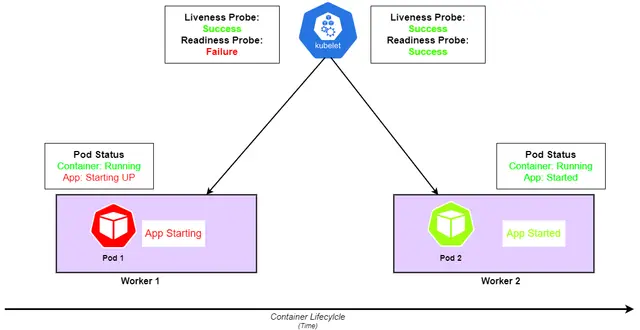
How Do Liveness and Readiness Probes Work?
In Kubernetes, Liveness and Readiness probes actively monitor the health and availability of pods to ensure smooth application performance.
The Liveness probe checks whether a pod is alive and functioning properly. It identifies if a container is in a healthy state and restarts it when it becomes unresponsive. You can configure it under spec.containers.livenessProbe in the YAML file.
The Readiness probe verifies whether a pod is ready to handle incoming requests. Even if a pod is running, it might not be able to process new requests due to network issues or resource constraints. The readiness probe detects such situations and temporarily removes the pod from the service endpoints until it recovers. It is defined under spec.containers.readinessProbe in the YAML configuration and is especially useful in Kubernetes Deployments.
By defining both probes in the pod’s YAML file, Kubernetes continuously monitors application health, enabling automated recovery and maintaining a stable, reliable deployment environment.
Configuration Settings of Kubernetes Probes
The following are the important configuration settings of Kuberentes Probes:
- SuccessThreshold: if the probe failed last time, the successes required for it to be successful.
- PeriodSeconds: the period of time between each run of the probe.
- InitialDelaySeconds: it tells how much time needs to be waited after startup for the first probe to run
- FailureThreshold: if the probe failed last time, the failures required for it to be called failed.
- /tmp/healthy: this path/command can be used on kubernetes which provides the health of the pods.
- TimeoutSeconds: the time after which the probe can timeout if it doesn’t run
How to Configure Kubernetes Liveness, Readiness and Startup Probes?
The following are the steps for configuring the kubernetes Livenes, Readiness and Startup Probes:
Step 1: Define Probes in Pod Specification
Firstly create a pod-probes.yaml file and define the configuration with including liveness, readines and startup probes in the YAML configuration of the Pod.
Step 2: Specify Probe Parameters
Choose the probe type such as HTTP or TCP or any type and then define the parameters like initialDelaySeconds, periodSeconds, timeoutSeconds, and failureThreshold.
The yaml configuration file of pod-probes.yaml looks as follows:
apiVersion: v1
kind: Pod
metadata:
  name: codezaza-pod
spec:
  containers:
  - name: codezaza
    image: nginx
    livenessProbe:
      httpGet:
        path: /healthz
        port: 8000
      initialDelaySeconds: 3
      periodSeconds: 3
    readinessProbe:
      httpGet:
        path: /ready
        port: 8000
      initialDelaySeconds: 5
      periodSeconds: 5
    startupProbe:
      httpGet:
        path: /startup
        port: 8000
      initialDelaySeconds: 10
      periodSeconds: 10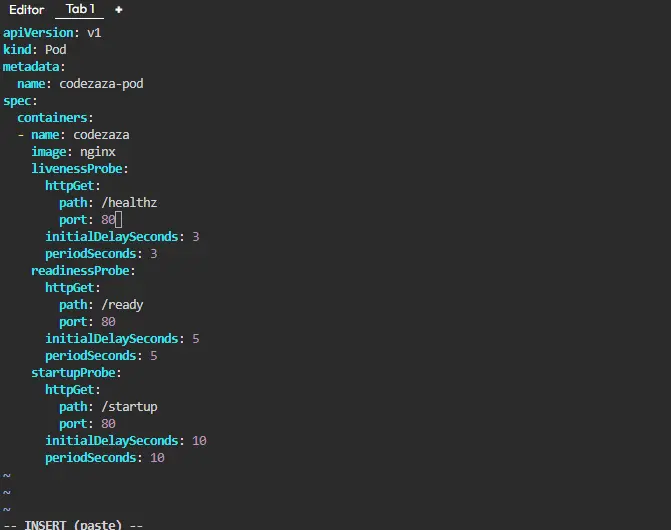
Step 3: Apply the Configuration
Use the kubectl command to create or update the pod configurations in your kubernetes cluster with following command:
kubectl apply -f pod-probes.yaml

Defining Various Types of Liveness Probes in Kubernetes
Kubernetes support different types of liveness probes to check the health of an application within a pod:
1. Define a liveness Command
It executes a specific command inside the container, if the command returns a non-zero exit code then pod is considered as unhealthy. The following is the example of the defined liveness probe configuration yaml code:
livenessProbe:
  exec:
    command:
    - cat
    - /tmp/healthy
  initialDelaySeconds: 5
  periodSeconds: 5
2. Define a liveness HTTP request
It sends an HTTP GET request to a specified endpoint. If the response code is not in the 200-299 range, the pod is marked as unhealthy. The example yaml code of the livness HTTP request is as follows:
livenessProbe:
  httpGet:
    path: /healthz
    port: 80
  initialDelaySeconds: 3
  periodSeconds: 3
3. Define a TCP liveness Probe
It attempts in establishing a TCP connection to the specified port. If the connection cannot be established, the pod is considered unhealthy. Example:
livenessProbe:
  tcpSocket:
    port: 80
  initialDelaySeconds: 10
  periodSeconds: 10
4. Define a gRPC liveness probe
It uses grpc to check the health of a service by calling a specified method. Example:
livenessProbe:
  grpc:
    port: 80
    service: grpc.health.v1.Health
  initialDelaySeconds: 5
  periodSeconds: 5
These are the probes that ensure the kubernetes it automatically detecting and making to recover form the application failures maintaining the reliability and availability of your services.
How to use Kubernetes Liveness Probe?
To use liveness probe for our application, we need to specify them in the yaml configuration file in the place defined above.To check if the pod is alive or not, we can specify a command or a custom script to run periodically. The container is killed by the kubelet and is subject to its restart policy if the liveness probe fails.First of all, for adding a liveness probe we could add something like this:
spec:

containers :

name: "demo_container"

livenessProbe:

failureThreshold: 6

exec :

command: ["bash", "-c", "./liveness-script.sh"]

periodSeconds: 5
In the above, we added liveness probe for one of the containers and specified the failureThreshold as 6 which means it will check 6 times when the pod fails before declaring it as failed and periodSeconds as 5 on how periodically we want to check the liveness probe.
Now, coming to the actual command which will run to check the liveness probe – in this case it runs a script (we can also run a set of commands directly).
The content of the script would differ based on type of container and how do we verify the pod is alive for that.
We can have a command as simple as “ping” for the url or more complex scripts. The liveness probes also differ if we need to check a HTTP connection or a TCP connection.
Suppose for checking an HTTP request we can use something similar to this:
livenessProbe:
  httpGet:
    path: /health
    port: 80
This will make an HTTP Get request on the specified path and port to check the aliveness.
On the other hand, for a TCP connection request we can do this:
livenessProbe:
  tcpSocket:
    port: 80
This will try opening a TCP socket connection on the specified port and if it succeeds, then the pod is alive
Define Readiness Probes
Readiness probes in Kubernetes ensures if a pod is ready to handle traffic by periodically checking its health. When a readiness probe leads to fail, then the pod is temporarily removed from the service’s load balancer, preventing it from receiving traffic until it becomes healthy again. These probes play a crucial role during startup, scaling, or maintenance tasks, ensuring that only fully functional pods serve user requests. They offer flexibility with various check types like HTTP requests, TCP connections, or command execution, contributing to the stability and reliability of Kubernetes deployments.
Configuring and Using Kubernetes Readiness Probe? A Step-By-Step Guide
To use readiness probe for our application, we need to specify them in the yaml configuration file in the place defined above.
To check if the pod/container is ready to take a request, we can specify a command or a custom script to run periodically. And if the pod is not ready, it won’t get any traffic from the kubernetes services.
First of all, for adding a readiness probe we could add something like this:
spec:
   containers :
      name: "demo_container"
      readinessProbe:
         exec :
           command:  ["bash", "-c", "./readiness-script.sh"]
         periodSeconds: 5
         failureThreshold: 5
It is very similar to how we define livenessProbe, just using readinessProbe instead.
Using HTTP and TCP connections also work in similar manner for readiness probes as liveness probes.
For the same pod/container, both the probes can be utilised simultaneously.
Using both can guarantee that traffic does not go to a pod which is not ready and that containers are restarted when they encounter problems.
When to use Readiness Probe?
The following are the some of the cases or scenarios to use the Readiness Probes:
During Application Startup: The readiness probes can used for ensuring that the pods are fully initialized and ready to handle incoming traffic before allowing them to receive requests. This helps prevent users from accessing partially functional or initializing pods.
Scaling Operations: It employes the readiness probes when scaling up or down the number of pods in a deployment. By confirming that newly created pods are ready to serve traffic, readiness probes ensure a seamless transition without disrupting user experience.
Application Updates and Maintenance: Try on implementing the readiness probes during application updates or maintenance activities to verify that pods have successfully completed any necessary configuration changes or updates before directing traffic to them. This minimizes downtime and potential disruptions for users.
What are HTTP and TCP Probes?
HTTP probes in Kubernetes are the one that used to determine the health of an application by sending HTTP requests to a specific endpoint. They check if the response status code falls within a specified range i.e., typically 200-399 to consider the application healthy. These are versatile with supporting various HTTP request methods faciliating with customization of the request path and port.
TCP probes are the one that used for knowning the health of an application by attempting to establish a TCP connection to a specified port. They are simpler than HTTP probes as they only verify whether a TCP connection can be successfully established. These are useful for application that don’t expose HTTP endpoints but still requires the health monitoring.
How Does Readines Probes Work?
The Readiness probes in kubernetes periodically checks the health of the pods by determining whether they are ready to handle the traffic or not. The following are some of its main working functionalities:
Regular Checks: They helps in performing the periodic checks typically uses HTTP requests, TCP connections or command execution for accessing the pod readiness.
Traffic Management: When a readiness pod fails, It temporarily removes the pod from the service’s load balancer, preventing it from the receiver traffic until it becomes ready again.
Critical for Availability: These will be crucial during the startup, scaling or maintenance tasks. It ensures that only functional pods serve users requests.
How to Disable the Readiness Probe in Kubernetes?
We can disable the readiness probes in kubernetes by removing or commenting out the readines probe section from the pod’s yaml configuration. The following are the steps to disable the readiness probes in Kubernetes:
Step 1: Edit Pod Configuration – open the Yaml configuration file of the Pod.
Step 2: Remove Readiness Probe – It delete or comment out the readinessProbe section.
Step3: Appy Changes to Pod resource with the following command:
kubectl apply -f pod-config.yaml
By removing the readiness probe, Kubernetes will no longer perform the health cheks to determine the pod readiness, potentially impacting the traffic management and overall application reliability.
Advantages of Using Liveness and Readiness Probes
As mentioned earlier liveness and readiness probes are used to check the health of the resources in Kubernetes, but this also has many added advantages. Some of them include:
Using liveness probes can help us improve the availability of our application and containers.
Readiness probes can actively help in troubleshooting. If there’s some failure in a readiness probe it lets us know there is an issue with the service and can help fix it.
Liveness probes can also help us verify if the services restart properly if any of the pods are unhealthy.
On the other hand, readiness probe help us verify if the services run as designed.
Troubleshooting of Kubernetes Liveness and Readines Probes
The following are the troubleshooting cases of Kubernetes Liveness and Readiness Probes:
Protect Slow Starting Containers with Startup Probes
- Define Startup Probes: It specifies a seperate startup probe in the Pod’s YAML configuration allowing more time for slow starting of containers to initialize.
- Adjust Probe Parameters: Try on increasing the initialDelaySeconds and periodSeconds parameters of the startup probe to providesufficient time for container initialization.
Fixing Kubernetes Readiness Probe Failures
- Review Probe Configuration: Firstly check the pod’s configuration file, ensuring whether the readiness probe section is correctly reflecting the application’s readiness conditions.
- Check Application Dependencies: Try to investigate the application dependencies or external services that required for readiness checks are properly configured and accesible or not.
Difference Between Liveness and Readiness Probes in Kubernetes
| Aspect | Liveness Probe | Readiness Probe |
|---|---|---|
| Purpose | Checks if the container inside a pod is alive and running properly. If it fails, Kubernetes restarts the container. | Checks if the container is ready to serve traffic. If it fails, Kubernetes temporarily removes the pod from the Service’s endpoint list. |
| Primary Role | Ensures the application’s health and keeps it running. | Ensures traffic routing and load balancing only happen to healthy pods. |
| Action Taken on Failure | If the liveness probe fails, the kubelet kills the container and restarts it according to the pod’s restart policy. | If the readiness probe fails, the pod is removed from the Service endpoint, but it is not restarted. |
| Use Case | Used when the application may get stuck or deadlocked and needs a restart to recover. | Used when the application needs some initialization time or cannot serve requests temporarily (e.g., during startup, updates, or maintenance). |
| YAML Field | Defined under spec.containers.livenessProbe | Defined under spec.containers.readinessProbe |
| Example | Example check: httpGet, tcpSocket, or command like cat /tmp/healthy to verify if the app is alive. | Example check: httpGet request on /ready endpoint to confirm readiness to serve traffic. |
| Restart Behavior | Yes, the pod or container is restarted. | No restart; only removed from load balancer until it’s ready. |
| Impact on Application | Helps achieve self-healing by recovering failed containers. | Helps achieve zero downtime deployments by routing traffic only to ready pods. |
| Common Scenario | Application thread is deadlocked or stopped responding. | Application is still loading configuration files or waiting for a dependent service to start |
Common Error Scenarios for Readiness Probes
- Connection Timeout: Readiness probes may fail due to network issues or incorrect endpoint configurations, resulting in connection timeouts.
- Application Initialization: If the application takes longer than expected to initialize, readiness probes may fail prematurely, leading to pod eviction.
Conclusion
Kubernetes Liveness, Readiness, and Startup probes are essential tools for maintaining application reliability, availability, and performance within a Kubernetes cluster. They enable Kubernetes to automatically detect issues, restart unhealthy containers, and route traffic only to healthy and ready pods.
By defining these probes in YAML configurations, developers can ensure continuous monitoring, smooth rolling updates, and minimal downtime. Liveness probes focus on keeping applications alive, Readiness probes ensure that only responsive pods receive traffic, and Startup probes safeguard slow-starting containers during initialization.
Together, these probes create a self-healing system where applications recover automatically, maintain consistent performance, and deliver seamless user experiences — making them an integral part of every production-grade Kubernetes deployment.
