Kubernetes is designed to manage containerized applications at scale, automating deployment, scaling, and operations. While it excels at managing resources efficiently, it also needs a mechanism to clean up unused or orphaned objects to prevent resource leaks. This is where Kubernetes Garbage Collection (GC) comes in.
What Is Garbage Collection?
Garbage collection is a term that covers all the ways Kubernetes cleans up unused or unnecessary resources in a cluster. Think of it as your virtual janitor, sweeping away the remnants of past tasks to make room for new ones. Here are some of the things garbage collection helps with:
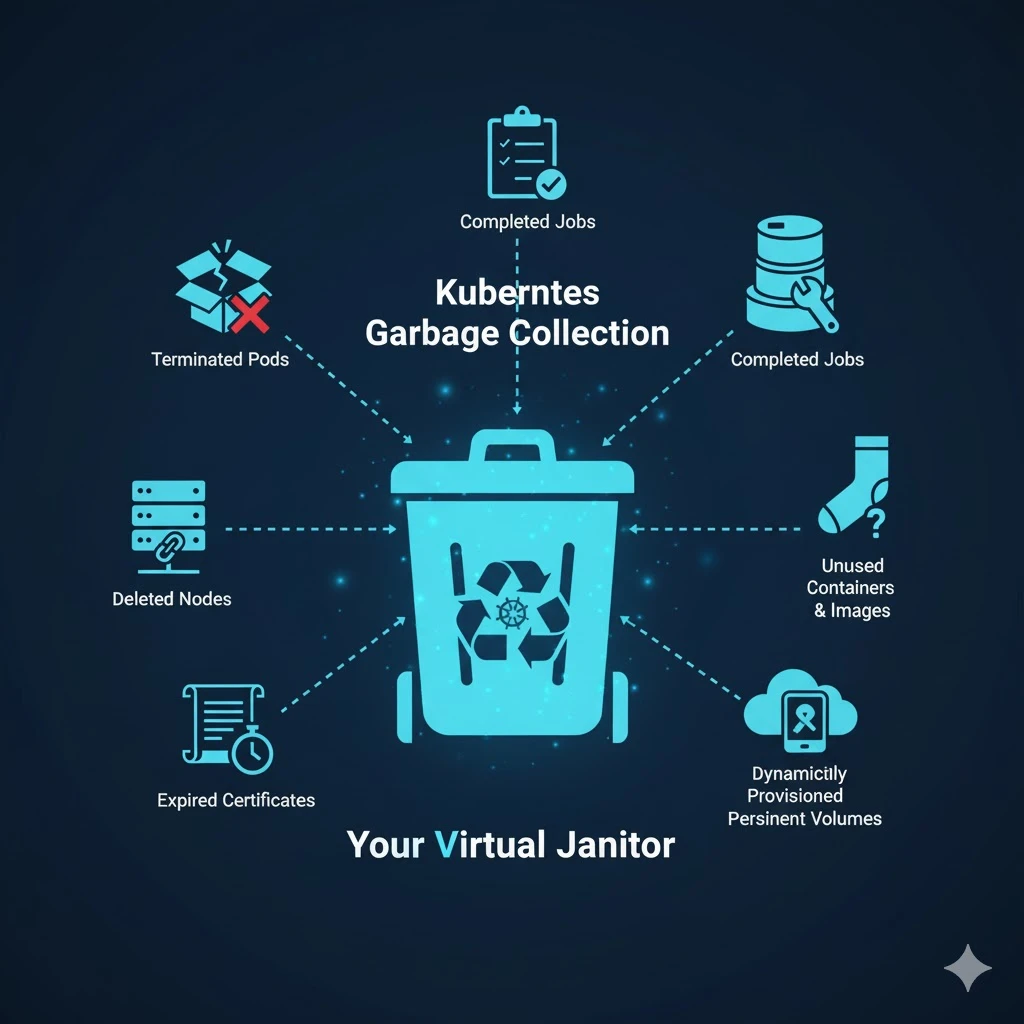
Terminated Pods: Those poor pods that have done their job but are left hanging around.
Completed Jobs: Just like your to-do list, some jobs get done, and it’s time to cross them off!
Unused Containers and Images: The leftovers of old containers that are no longer needed.
Dynamically Provisioned Persistent Volumes: If they’re marked for deletion, they’re outta here!
Expired Certificates: Think of these as those coupons that are no good anymore.
Deleted Nodes: Kubernetes clears out nodes that are no longer part of the party.
Orphaned Objects: Left behind, just like socks after a laundry day!
Types of Garbage Collection in Kubernetes
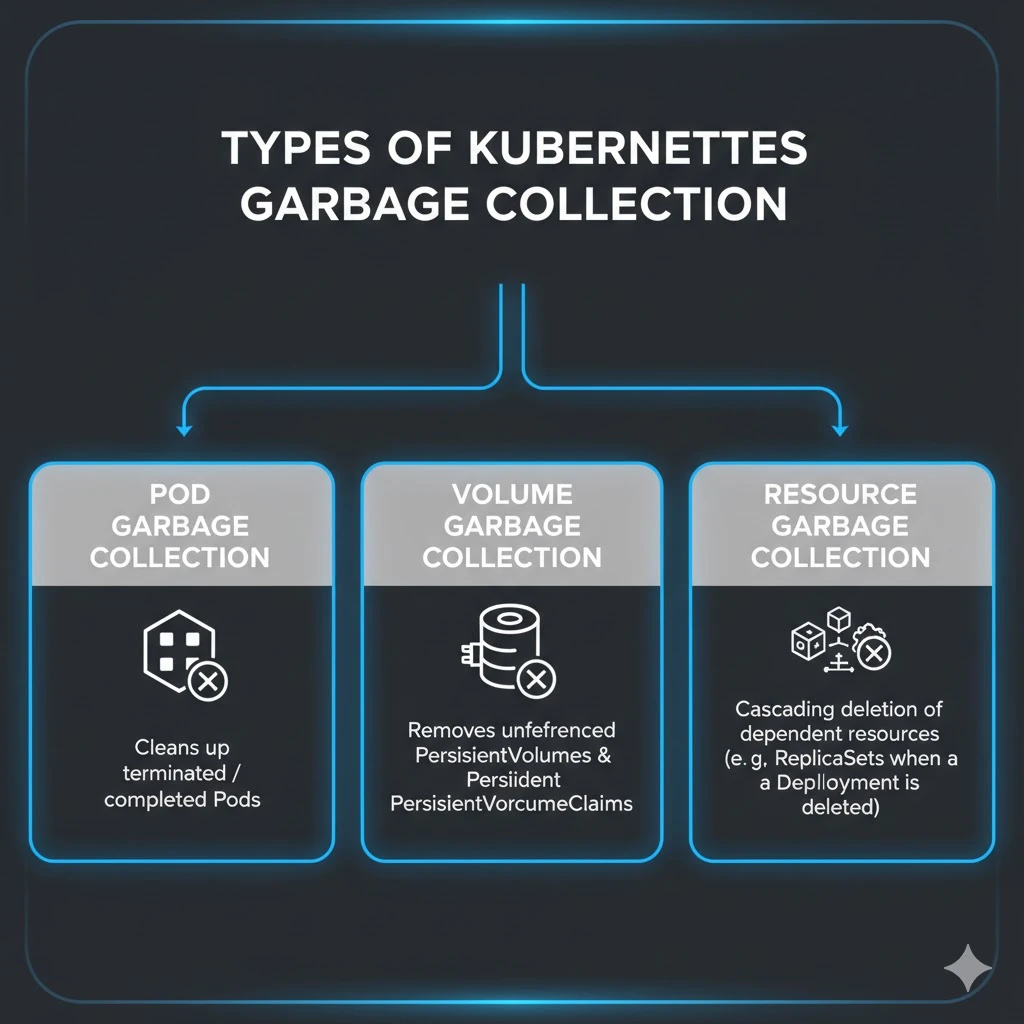
1. Container Image Garbage Collection
What It Is:
Container Image Garbage Collection focuses on reclaiming disk space by removing unused container images from nodes. In Kubernetes, the kubelet periodically checks for images that are not referenced by any running or scheduled pods and removes them automatically.
Benefits:
- Frees Disk Space: By removing stale or unused images, this process ensures that node disk space is not consumed unnecessarily. Consequently, new deployments and existing workloads can operate smoothly.
- Improves System Performance: Reducing disk I/O operations associated with storing or pulling images can enhance overall system performance.
- Enhances Cluster Stability: Preventing disk space exhaustion mitigates risks of node failure or degraded application performance.
When to Use:
- Regular Maintenance: Incorporate it as part of routine node maintenance to keep your Kubernetes nodes clean and efficient.
- Frequent Deployments: Particularly useful in environments with rapid container updates, where old images can accumulate quickly.
- Disk Space Concerns: Activate when node disk usage approaches critical thresholds to avoid operational issues.
2. Evicted Pod Garbage Collection
Important note:
Zakaria EL BAZI 🇲🇦 made a wonderful experiment to test if pods really do get evicted due to CPU pressure — and has shared the (surprising) results in this useful blog post. I recommend everyone to read it and take these findings into consideration:
What It Is: Kubernetes may evict pods from nodes when resources like memory or CPU are under pressure (debatable — see the above post which disproves this claim). The garbage collection for evicted pods cleans up these evicted pod objects, freeing associated resources.
Benefits:
- Reclaims Resources: Releases resources allocated to evicted pods, such as IP addresses and volumes, for reuse by other pods.
- Maintains a Clean Cluster State: Helps in keeping the cluster state clean and manageable by removing pods that are no longer active.
- Prevents Resource Fragmentation: Avoids the accumulation of evicted pods that could lead to fragmentation of allocatable resources.
When to Use:
- After resource pressure situations have been resolved to clean up residual evicted pods.
- In clusters where workloads experience variable resource demands, leading to occasional pod eviction.
- As part of routine cluster maintenance to ensure optimal resource allocation.
3. Orphaned Resource Garbage Collection
What It Is:
Kubernetes establishes ownership relationships between objects using owner references. When you delete a parent object, Kubernetes automatically cleans up its dependent objects that no longer have other owners. Orphaned Resource Garbage Collection focuses on these dependent objects that have lost their active owner.
Benefits:
- Maintains Cluster Consistency: Removing orphaned objects preserves the integrity and consistency of your cluster, ensuring that only functional workloads occupy resources.
- Reduces Cluster Clutter: Cleaning up unused resources makes cluster management and troubleshooting more straightforward.
- Optimizes Resource Utilization: By eliminating orphaned objects, Kubernetes ensures that resources are allocated to active and necessary workloads.
When to Use:
- Decommissioning Workloads: Use it when you remove workloads, services, or applications to clean up all associated resources efficiently.
- Dynamic Environments: Apply it in clusters with frequent creation and deletion of resources to prevent orphaned objects from accumulating.
- Cluster Upgrades or Migrations: Run it as a precautionary measure to remove leftovers from previous configurations and maintain a clean cluster state.
Tip: Regularly reviewing owner references and monitoring orphaned objects helps prevent resource waste and keeps your Kubernetes environment organized.
How Garbage Collection Works in Kubernetes
Kubernetes garbage collection (GC) actively manages and cleans up unused or orphaned resources in a cluster. It ensures that Pods, Volumes, Jobs, ReplicaSets, and other objects do not consume unnecessary resources, maintaining cluster efficiency and stability.
Detection of Unused or Orphaned Resources
The garbage collector continuously scans the cluster to identify resources that no longer have a purpose. For example, it flags completed or failed Pods, Jobs that have finished execution, and orphaned dependent objects such as Pods or PersistentVolumeClaims (PVCs) without active owners. By detecting these resources promptly, Kubernetes prevents accumulation and resource wastage.
Owner References Control Resource Cleanup
Kubernetes relies on owner references to understand relationships between objects. Each dependent resource, like a Pod, has metadata pointing to its owner, such as a ReplicaSet or Deployment. When the garbage collector detects that an owner object has been deleted, it checks these references to determine whether it can safely remove the dependent resource. This approach ensures that Kubernetes deletes only the objects no longer needed.
Cascading Deletion and Propagation Policies
Kubernetes implements cascading deletion to manage the cleanup of dependent resources. Administrators can choose from three propagation policies:
- Foreground Deletion: Kubernetes deletes all dependent objects before removing the parent, ensuring complete cleanup.
- Background Deletion: Kubernetes removes the parent immediately and deletes dependents asynchronously in the background.
- Orphan Deletion: Kubernetes deletes the parent but retains dependent objects as orphans for manual management.
These policies allow precise control over how the cluster cleans up resources, preventing accidental deletion of critical dependents.
Handling Finalizers Before Deletion
Some resources include finalizers that perform essential tasks before deletion. For example, PersistentVolumes use finalizers to release underlying storage safely, while Jobs may clean up logs or temporary files. Kubernetes waits for these finalizers to complete before fully deleting the resource, ensuring safe and reliable cleanup.
Execution of Garbage Collection
After detecting eligible resources, the garbage collector sends deletion requests to the Kubernetes API server. Depending on the configured propagation policy and finalizers, Kubernetes removes the resources and automatically cleans up any dependent objects. This process frees cluster resources, prevents orphaned objects, and maintains overall performance and stability.
Key Takeaways
Kubernetes garbage collection actively monitors, detects, and removes unused resources. By leveraging owner references, cascading deletions, and finalizers, it prevents resource leaks, improves cluster efficiency, and simplifies management. Administrators should configure GC properly to maintain a healthy, scalable Kubernetes environment.
What Are Owner References?
An owner reference is a metadata field in a Kubernetes object that points to another object as its owner. It contains details such as:
apiVersion: The API version of the owner object.kind: The type of the owner object (e.g.,Deployment,ReplicaSet).name: The name of the owner object.uid: A unique identifier for the owner object.controller: A boolean that indicates whether this owner object is a managing controller of the dependent.blockOwnerDeletion: Optional field that prevents deletion of the owner until the dependent is deleted.
Kubernetes uses these fields to determine what to delete and when. If a parent object is deleted, Kubernetes checks owner references to see which objects should also be removed, depending on the configured propagation policy.
Why Owner References Are Important
- Prevent Resource Leaks: Without owner references, dependent resources like Pods or PVCs can become orphaned, consuming unnecessary CPU, memory, and storage.
- Enable Cascading Deletions: When deleting a Deployment, all its ReplicaSets and Pods can be automatically deleted if owner references are correctly set.
- Simplify Cluster Management: Developers and administrators don’t need to manually track dependent resources. Kubernetes handles cleanup automatically.
How Owner References Work with Garbage Collection
- Resource Creation: When a parent object (e.g., Deployment) creates a dependent object (e.g., Pod), Kubernetes automatically adds an owner reference in the dependent’s metadata.
- Parent Deletion: When you delete the parent object, the garbage collector inspects the owner references of all dependents.
- Propagation Policy: Depending on the policy (
Foreground,Background, orOrphan), Kubernetes either deletes the dependents immediately, asynchronously, or leaves them intact. - Finalizers Execution: If dependents have finalizers, Kubernetes waits until those cleanup tasks finish before deletion.
Implementation Example: Owner References in Pods
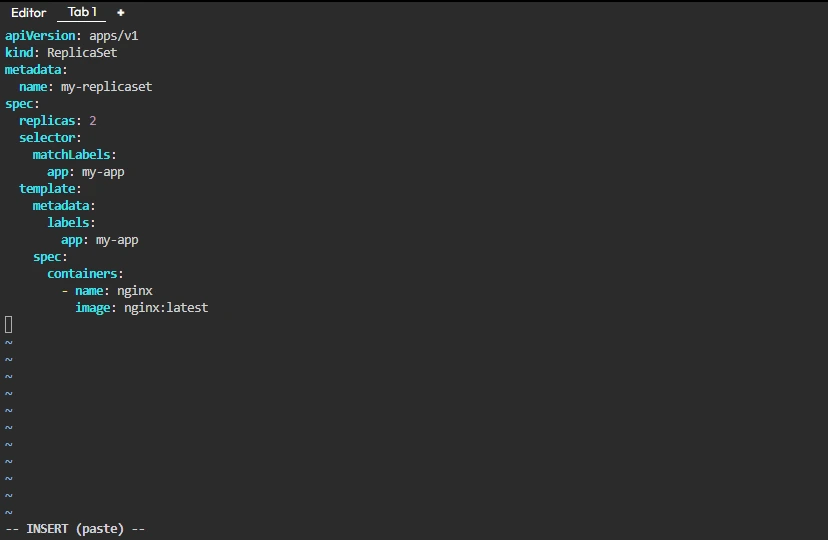
Here’s a practical example. Suppose you create a ReplicaSet, and you want its Pods to be automatically deleted when the ReplicaSet is removed.
Step 1: Create a ReplicaSet
apiVersion: apps/v1
kind: ReplicaSet
metadata:
  name: my-replicaset
spec:
  replicas: 2
  selector:
    matchLabels:
      app: my-app
  template:
    metadata:
      labels:
        app: my-app
    spec:
      containers:
        - name: nginx
          image: nginx:latest
Step 2: Check Owner References of Pods
After creating the ReplicaSet, Kubernetes automatically creates Pods. You can inspect the owner references of one Pod:
kubectl get pod my-replicaset-abcde -o yaml
You’ll see something like this:
metadata:
  name: my-replicaset-abcde
  ownerReferences:
  - apiVersion: apps/v1
    kind: ReplicaSet
    name: my-replicaset
    uid: 12345-abcdef-67890
    controller: true
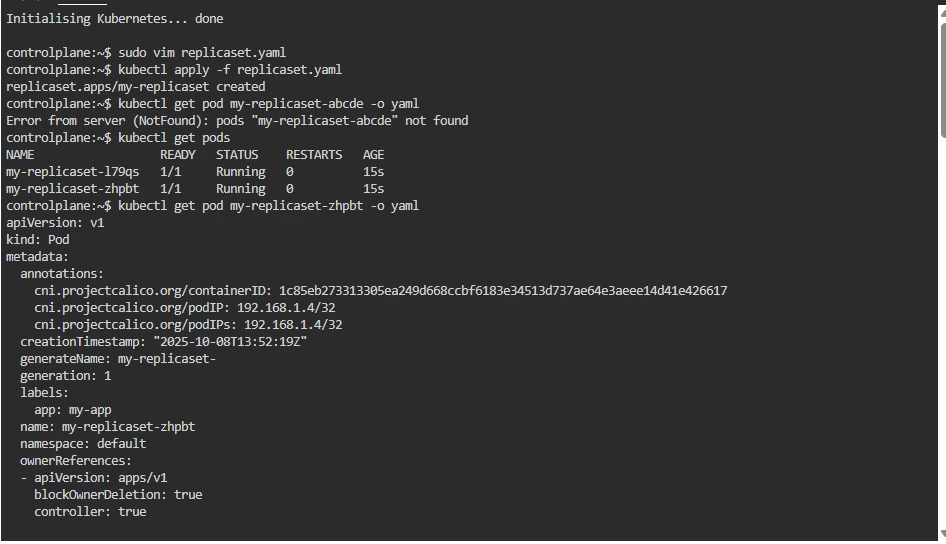
Step 3: Delete the ReplicaSet with Cascading Deletion
kubectl delete replicaset my-replicaset --cascade=foreground

What Happens:
- Kubernetes marks the ReplicaSet for deletion.
- The garbage collector identifies all Pods with owner references pointing to this ReplicaSet.
- Kubernetes deletes all dependent Pods before removing the ReplicaSet (because we used
foregroundcascading).
Cascading Deletion and Propagation Policies in Kubernetes
When you delete a resource in Kubernetes, such as a Deployment, you often want its dependent resources (ReplicaSets, Pods) to be deleted automatically. This is where cascading deletion comes in. Kubernetes uses propagation policies to determine how the dependents of a deleted resource should be handled.
What is Cascading Deletion?
Cascading deletion ensures that deleting a parent resource automatically removes its child resources based on defined rules. It relies on owner references, which link dependent resources to their parent. Without cascading deletion, deleting a parent object like a Deployment could leave orphaned Pods or ReplicaSets behind, consuming resources unnecessarily.
Propagation Policies
Kubernetes supports three types of propagation policies that control cascading deletion:
| Policy Name | Behavior |
|---|---|
| Foreground | Kubernetes deletes all dependents first, then deletes the parent. The parent stays in Terminating until dependents are gone. |
| Background | Kubernetes deletes the parent immediately and deletes dependents asynchronously in the background. |
| Orphan | Kubernetes deletes only the parent and leaves the dependents intact as orphans. |
Example: Using a Deployment to Demonstrate Cascading Deletion
Let’s go step by step.
Step 1: Create a Deployment
apiVersion: apps/v1
kind: Deployment
metadata:
  name: nginx-deployment
spec:
  replicas: 2
  selector:
    matchLabels:
      app: nginx
  template:
    metadata:
      labels:
        app: nginx
    spec:
      containers:
        - name: nginx
          image: nginx:latest
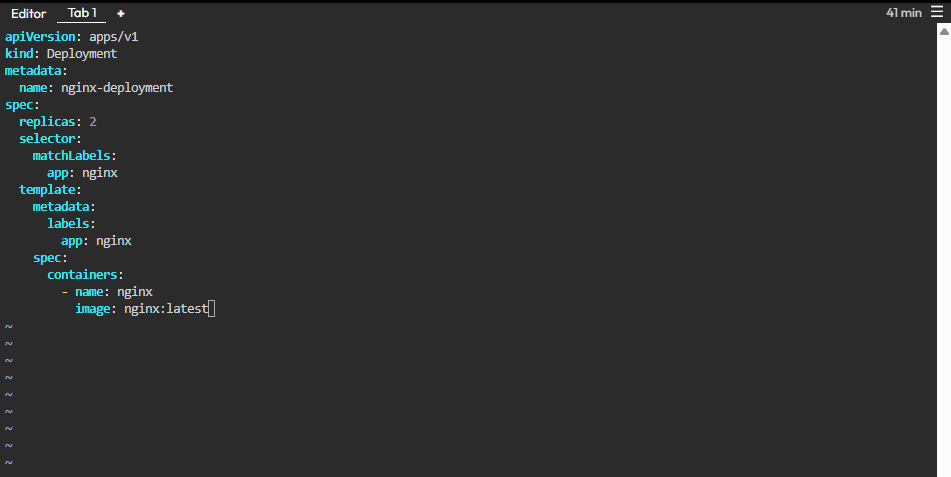
This Deployment will create:
1 ReplicaSet (nginx-deployment-xxxx)
2 Pods (managed by the ReplicaSet)
Step 2: Inspect Owner References
After creating the Deployment:
kubectl get pods -l app=nginx -o yamlYou’ll see that the Pods have an ownerReferences section:
ownerReferences:
- apiVersion: apps/v1
  kind: ReplicaSet
  name: nginx-deployment-xxxx
  uid: 12345-abcdef-67890
  controller: true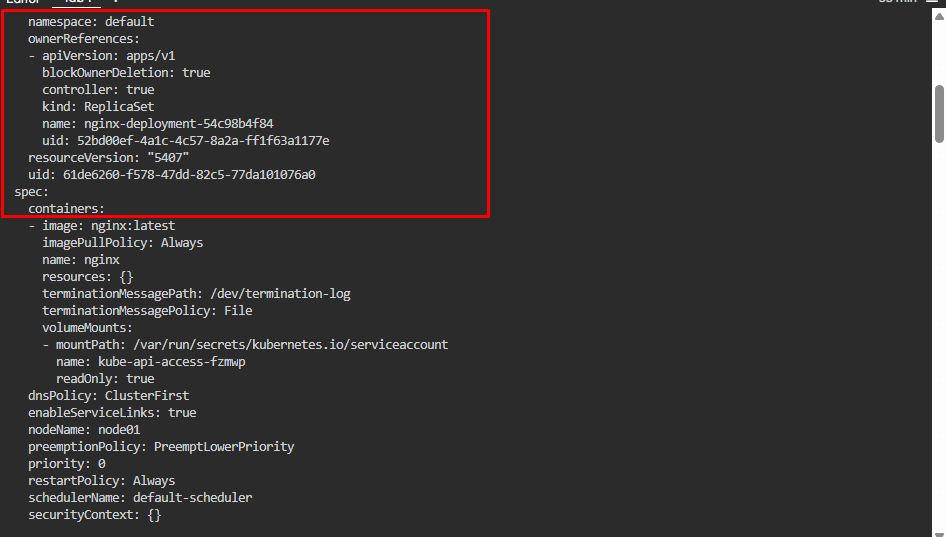
The ReplicaSet, in turn, has an owner reference pointing to the Deployment:
ownerReferences:
- apiVersion: apps/v1
  kind: Deployment
  name: nginx-deployment
  uid: 98765-fedcba-43210
  controller: true
This hierarchy allows Kubernetes to understand the dependency chain: Deployment → ReplicaSet → Pods.
Step 3: Delete the Deployment with Different Propagation Policies
Foreground Deletion:
kubectl delete deployment nginx-deployment --cascade=foregroundKubernetes first deletes all Pods and the ReplicaSet.
The Deployment remains in Terminating until all dependents are gone.
This ensures a safe cleanup, leaving no orphaned resources.
Background Deletion:
kubectl delete deployment nginx-deployment --cascade=backgroundKubernetes deletes the Deployment immediately.
ReplicaSet and Pods are deleted asynchronously in the background.
This is faster but may leave dependents temporarily visible in the cluster.
Orphan Deletion:
kubectl delete deployment nginx-deployment --cascade=orphan
Only the Deployment is deleted. ReplicaSet and Pods remain in the cluster.Useful when you want to keep dependent resources for debugging or migration.
Step 4: Observe the Deletion
kubectl get deployments
kubectl get replicasets
kubectl get pods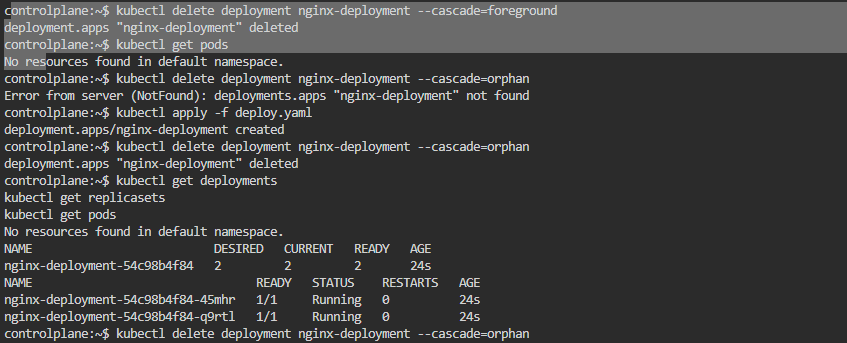
Depending on the policy used:
Foreground: All dependent Pods and ReplicaSets disappear first.
Background: Deployment disappears first, then dependents vanish gradually.
Orphan: Deployment disappears, dependents remain untouched.
Why Cascading Deletion Matters
- Prevents Orphaned Resources: Automatically cleans up dependent objects, freeing CPU, memory, and storage.
- Simplifies Operations: Admins don’t have to manually track and delete all dependent objects.
- Supports Safe Deletion: Foreground deletion ensures a controlled, step-by-step removal of resources.
Best Practices for Kubernetes Garbage Collection
Optimizing garbage collection in Kubernetes is essential for maintaining a healthy, efficient, and stable cluster environment. Implementing best practices for garbage collection not only aids in resource management but also enhances the performance and scalability of your applications. Here are several best practices to consider:
1. Proactively Monitor Garbage Collection Metrics
Implement Monitoring Tools: Utilize Kubernetes-native and third-party monitoring solutions to keep an eye on garbage collection metrics. Tools like Prometheus, coupled with Grafana for visualization, can provide insights into the frequency and impact of garbage collection operations.
Set Alerts for Anomalies: Configure alerts for unusual garbage collection activity, such as an unexpected increase in evicted pods or disk usage spikes. Early detection can prevent issues from escalating into critical problems.
2. Regularly Review and Adjust GC Thresholds
Assess Workload Patterns: Different workloads have varying resource utilization patterns. Regularly review these patterns and adjust garbage collection thresholds accordingly to strike a balance between resource availability and optimal cluster performance.
Customize Thresholds per Node: In clusters with heterogeneous nodes (differing in purpose, capacity, or hardware), consider customizing garbage collection thresholds on a per-node basis to accommodate the specific needs of each node.
3. Optimize Resource Usage
Implement Resource Quotas: Use Kubernetes resource quotas to set hard limits on resource consumption at the namespace level. This prevents any single application or team from monopolizing cluster resources, mitigating the need for aggressive garbage collection.
Use Requests and Limits: Define CPU and memory requests and limits for pods to ensure that they consume only their fair share of resources. This practice helps in preventing resource contention and reduces the likelihood of pod eviction due to resource shortages.
4. Clean Up Resources Gracefully
Employ PreStop Hooks: Use PreStop hooks in your pod specifications to perform graceful shutdown and cleanup operations before a pod is terminated. This ensures that resources such as connections and temporary files are properly released.
Leverage Finalizers for Controlled Deletion: Use finalizers to delay the deletion of critical resources until all necessary cleanup operations have been completed. This ensures that resources are only removed when it’s safe to do so, preventing potential data loss or inconsistencies.
5.Manage Image Lifecycle
Prune Images Strategically: Regularly prune unused images and tags from your container registry to prevent unnecessary resource consumption. Implement a lifecycle policy in your container registry to automate this process based on criteria such as age or usage.
Use Narrowly Scoped Base Images: When building container images, choose base images that include only the necessary dependencies for your application. This reduces the overall size of your images, minimizing the overhead associated with image pulling and storage.
6. Automate Garbage Collection Processes
Script Routine Cleanup Tasks: Automate routine cleanup tasks with scripts or Kubernetes jobs. For instance, schedule jobs to remove dangling volumes or prune old ConfigMaps and Secrets that are no longer in use.
Integrate GC into CI/CD Pipelines: Incorporate garbage collection operations into your continuous integration and continuous deployment (CI/CD) workflows. This ensures that each deployment is accompanied by necessary cleanup steps, keeping your cluster environment tidy and efficient.
Conclusion
Optimizing garbage collection in Kubernetes is essential for maintaining resource efficiency and ensuring the smooth operation of your workloads. By configuring workload-specific garbage collection settings and employing strategic cleanup practices, you can significantly improve the performance and stability of your Kubernetes environment. Remember, the key to effective garbage collection is continuous monitoring and adjustment based on the evolving needs of your applications and clusters.
