
Role-Based Access Control enforces constraints that limit the actions available to specific users. You can distinguish between different resource types and actions (such as creating, updating, and deleting) so a user’s capabilities match their role within your organization.
What is Kubernetes RBAC?
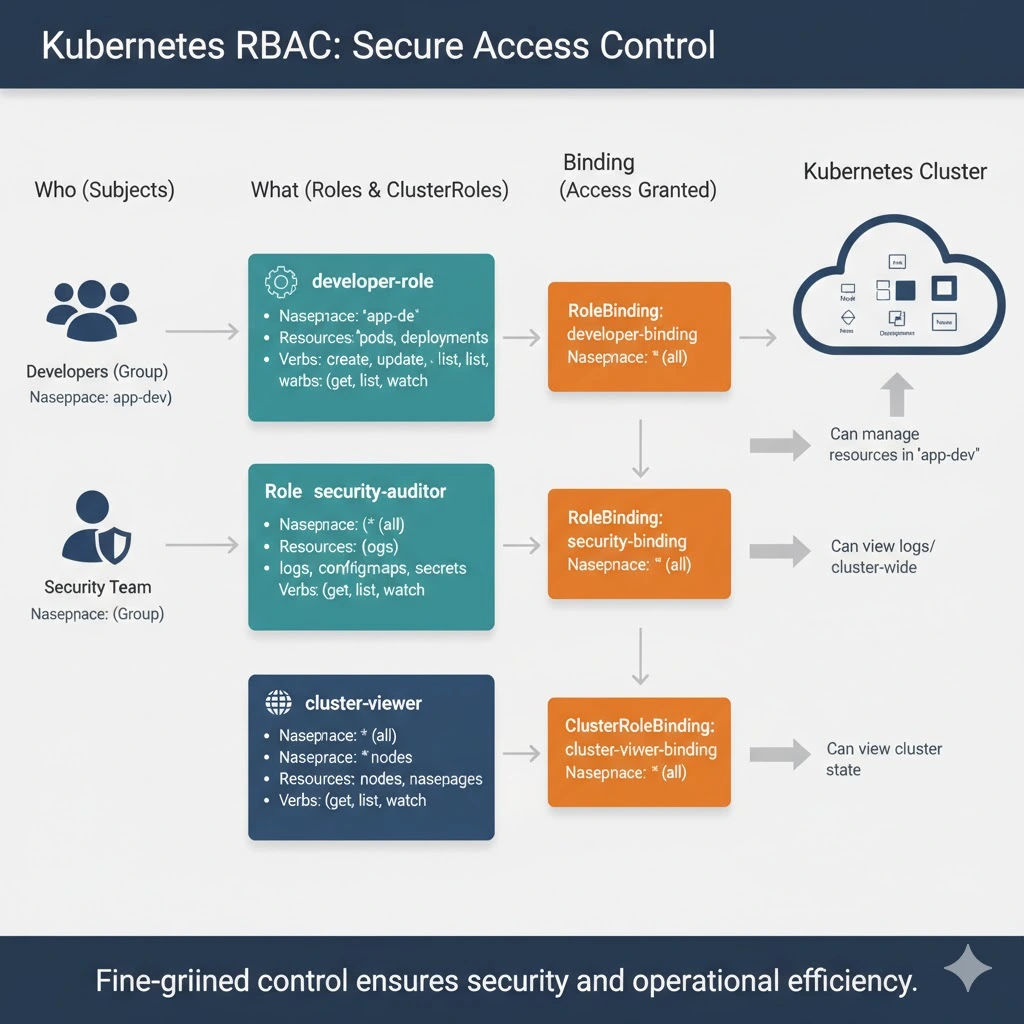
RBAC (Role-Based Access Control) in Kubernetes defines who can do what within a cluster. It assigns specific roles to users, service accounts, or groups, determining which actions they are allowed to perform.
For example, you can allow a user to create Pods but prevent them from deleting any. This fine-grained control helps secure your Kubernetes environment by ensuring that each user only has the permissions they truly need.
Kubernetes provides a powerful RBAC system that lets administrators enforce access policies across teams, applications, and namespaces. You can design roles that reflect your organizational structure—such as Developer, Manager, or Security Team.
A Developer role might allow actions like deploying or managing Pods, while a Manager role could include wider permissions for monitoring and resource management. By using RBAC, organizations maintain both security and operational efficiency within their clusters.
Example:
Imagine a company running multiple applications in a Kubernetes cluster. Developers need permission to deploy and update their applications, but they shouldn’t be able to delete system resources or change cluster-wide settings. In this case, administrators can create a Developer role with permissions to create, update, and view Pods within a specific namespace. The Security Team, on the other hand, might have a Security role that allows them to view logs and check configurations but not make changes. This setup ensures that everyone can do their job without accidentally affecting critical parts of the cluster.
How does RBAC work in Kubernetes?
The Kubernetes API server has built-in RBAC support that works with both Users and Service Accounts. RBAC is configured in your cluster by enabling the RBAC feature, then creating objects using the resources provided by the rbac.authorization.k8s.io API. There are four of these objects available:
Role: A Role is a collection of permissions that allow users to perform specific actions (verbs, such as “get”, “create”, “and “delete”) on a defined set of Kubernetes resource types (such as Pods, Deployments, and Namespaces). Roles are namespaced objects; the permissions they grant only apply within the namespace that the Role belongs to.
ClusterRole: ClusterRoles work similarly to Roles but are a non-namespaced alternative for cluster-level resources. You’ll need to use a ClusterRole to control access to objects such as Nodes, which don’t belong to any namespace. ClusterRoles also allow you to globally access namespaced resources across all namespaces, such as every Pod in your cluster.
RoleBinding: RoleBindings represent the links between your Roles and Users or Service Accounts. A RoleBinding lets you reference a Role, then grant those permissions to one or more users (termed Subjects).
ClusterRoleBinding: ClusterRoleBinding is equivalent to RoleBinding, but targets ClusterRole resources instead of Roles.
Users vs Service Accounts
Before setting up RBAC, it’s important to understand the Kubernetes user model. There are two ways to create “users” depending on the type of access that’s required:
Users — In Kubernetes, a User represents a human who authenticates to the cluster using an external service. You can use private keys (the default method), a list of usernames and passwords, or an OAuth service such as Google Accounts. Users are not managed by Kubernetes; there is no API object for them so you can’t create them using Kubectl. You must make changes at the external service provider.
Service Accounts — Service Accounts are token values that can be used to grant access to namespaces in your cluster. They’re designed for use by applications and system components. Unlike Users, Service Accounts are backed by Kubernetes objects and can be managed using the API.
How to set up RBAC in Kubernetes – example
Now let’s walk through a simple Kubernetes RBAC demo. We’ll create a Service Account, then assign it a Role that allows the user to list, create, and modify Pods in a specific namespace. The account won’t be able to interact with other actions, resource types, or namespaces.
1. Check whether RBAC is enabled
RBAC is technically an optional Kubernetes feature, although it’s enabled by default in popular distributions. You can check whether it’s available by running the kubectl api-versions command—if the rbac.authorization.k8s.io API exists, then you’re ready to use RBAC:
$ kubectl api-versions | grep rbac
rbac.authorization.k8s.io/v1
To manually enable RBAC support, you must start the Kubernetes API server with the --authorization-mode=RBAC flag set:
$ kube-apiserver --authorization-mode=RBACYou should refer to your distribution’s documentation for instructions on how to configure API server startup flags.
2. Create a Service Account
You need to create a Service Account to use in the next steps. You’ll bind the Role you create to this Service Account:
$ kubectl create serviceaccount codezaza-user
serviceaccount/demo-user created
Next, run the following command to create an authorization token for your Service Account:
$ TOKEN=$(kubectl create token codezaza-user)The token’s value will now be saved to the $TOKEN environment variable in your terminal.
Configure kubectl with your Service Account
Now add a new kubectl context that lets you authenticate as your Service Account. First, add your Service Account as a credential in your Kubeconfig file:
$ kubectl config set-credentials codezaza-user --token=$TOKEN
User "codezaza-user" set.
Next, add your new context—we’re calling it demo-user-context. Reference your new codezaza-user credential and your current Kubernetes cluster. (We’re using the default cluster, but you should change this value if you’re connected to a differently named cluster.)
$ kubectl config set-context codezaza-user-context --cluster=default --user=codezaza-user
Context "codezaza-user-context" created.
Before switching to your new context, first check the name of your current context so you can easily switch back to your administrative account in the next section:
$ kubectl config current-context
default
Now, switch over to your new context that authenticates as your service account:
$ kubectl config use-context codezaza-user-context
Switched to context "codezaza-user-context".
Try to list the Pods in the namespace:
$ kubectl get pods
Error from server (Forbidden): pods is forbidden: User "system:serviceaccount:default:codezaza-user" cannot list resource "pods" in API group "" in the namespace "default"
A \Forbidden error is returned because your Service Account hasn’t been assigned any RBAC roles that include the get pods permission.
Before continuing, switch back to your original Kubectl context to restore your administrator privileges. This will allow you to create your Role and RoleBinding objects in the next section.
$ kubectl config use-context default
Switched to context "default".
3. Create a Role
A Role (or ClusterRole) object is required for each of the roles you want to use with Kubernetes. We’re using a Role in this tutorial because we’re working with Pods, which are a namespaced resource.
Role manifests require a rules field which lists the API groups, resource types, and verbs that holders of the Role can use.
Here’s an example that allows the get, list, create, and update actions on Pods:
apiVersion: rbac.authorization.k8s.io/v1
kind: Role
metadata:
  name: codezaza-role
  namespace: default
rules:
  - apiGroups:
      - ""
    resources:
      - pods
    verbs:
      - get
      - list
      - create
      - update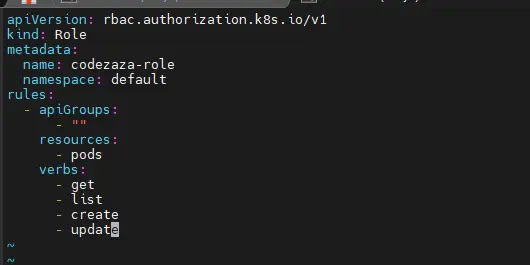
The apiGroups field is set to an empty array because Pods exist in the top-level group. The resources and verbs fields list out the permitted interactions within the API groups you’ve defined. Because Roles are namespaced, the Role’s holders can only access the allowed resources within the namespace that the Role belongs to.
Save the Role manifest to role.yaml, then use Kubectl to add it to your cluster:
$ kubectl apply -f role.yaml
role.rbac.authorization.k8s.io/codezaza-role created
4. Create a RoleBinding
The Role has been created but it’s not yet assigned to your Service Account. A RoleBinding is required to make this connection.
RoleBinding objects require roleRef and subjects fields:
roleRef— Identifies the Role object that is being assigned.subjects— A list of one or more users or Service Accounts to assign the Role to.
Here’s a RoleBinding that will assign your newly created Role to your Service Account:
apiVersion: rbac.authorization.k8s.io/v1
kind: RoleBinding
metadata:
  name: codezaza-role-binding
  namespace: default
roleRef:
  apiGroup: rbac.authorization.k8s.io
  kind: Role
  name: codezaza-role
subjects:
  - namespace: default
    kind: ServiceAccount
    name: codezaza-user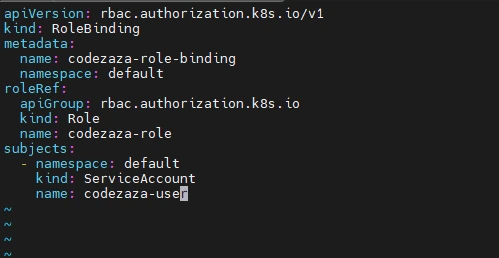
The manifest states that the codezaza-role Role (within the default namespace) should be assigned to the Service Account called codezaza-user. (If you were assigning the Role to a human User, you would set kind: User instead of kind: ServiceAccount.)
Save the RoleBinding manifest as rolebinding.yaml, then add it to your cluster to grant your role to your user:
$ kubectl apply -f rolebinding.yaml
rolebinding.rbac.authorization.k8s.io/codezaza-role-binding created
5. Verify your service account has been granted the Role’s Permissions
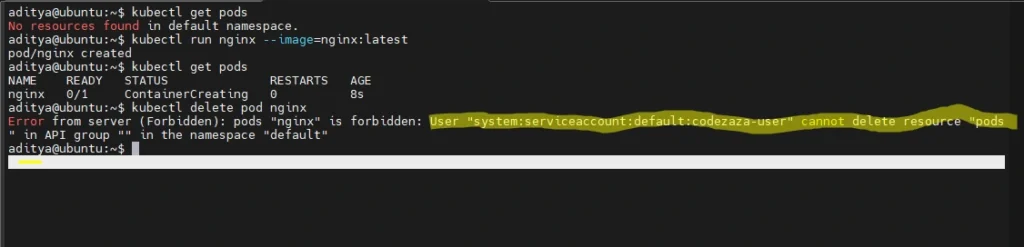
You can now test that your new RBAC rule is working correctly. It should be possible for your Service Account to interact with the Pods in the default namespace.
Switch back to the Kubectl context that authenticates as the Service Account user:
$ kubectl config set-context codezaza-user-context   --cluster=kind-kind-hpa   --user=codezaza-user
Switched to context "codezaza-user-context".
Verify that the get pods command now runs successfully:
$ kubectl get pods
No resources found in default namespace.
You can also try creating a Pod as your Service Account:
$ kubectl run nginx --image=nginx:latest
pod/nginx created
The Pod is successfully created:
$ kubectl get pods
NAME    READY   STATUS    RESTARTS   AGE
nginx   1/1     Running   0          15s
However, it’s not possible for the Service Account user to delete Pods because the Role you’ve assigned doesn’t include the required delete action verb:
$ kubectl delete pod nginx
Error from server (Forbidden): pods "nginx" is forbidden: User "system:serviceaccount:default:codezaza-user" cannot delete resource "pods" in API group "" in the namespace "default"
You’ve successfully used RBAC to enforce per-user access control constraints in your Kubernetes cluster.
Use Cases of RBAC
1. Keeping Teams in Their Own Space
Imagine you work in a big office where different teams handle different projects — like a finance team and a marketing team. RBAC works like giving each team access only to their own room. The finance team can’t walk into the marketing room and start changing things, and vice versa. This keeps everyone’s work separate and safe.
2. Protecting Sensitive Information
Some data, like passwords or secret business details, should only be seen by certain people. RBAC lets you lock these “confidential files” so that only trusted people (or programs) can open them — just like a manager having the key to the safe.
3. Limiting What People Can Do
Not everyone needs full control. For example, a junior employee might only be allowed to view files, not delete them. Or a delivery person might only be allowed to drop packages, not open office drawers. RBAC makes sure everyone can only do what’s necessary for their job.
4. Controlling Admin Power
In any company, only a few people (like managers or IT admins) can make major decisions or changes — like hiring or firing. In Kubernetes, RBAC helps assign those “admin powers” to only trusted users, so not everyone can make big changes.
5. Giving Apps the Right Access
Sometimes it’s not people but software that needs permission — like a payroll app that should only access employee salary info, not personal emails. RBAC lets you control what each app can see or do, making sure programs don’t accidentally or maliciously cause trouble. can see or do, making sure programs don’t accidentally or maliciously cause trouble.
Kubernetes RBAC best practices
RBAC is a critical Kubernetes security control that protects your cluster from unauthorized access. Here are a few best practices that will further improve security and maintainability:
1. Always enable RBAC
RBAC should be enabled in every production Kubernetes cluster. Restrict the use of default administrator accounts; instead, ensure every user, application, and integration has its own identity and individual roles.
2. Keep your roles precise
Roles should be as precise as possible, containing only the minimum set of permissions required for the task they represent. Try to assign users multiple small roles instead of a single large one that’ll be hard to maintain. This keeps your attack surface small and reduces the risk associated with compromised accounts.
3. Understand Roles vs ClusterRoles
Most of the RBAC rules you create should be Roles. These provide narrow scoping of permissions within individual namespaces. ClusterRoles are required if you’re assigning access to cluster-level resources like Nodes, but should be used with caution for namespaced resources such as Pods—they will provide access to all resources, across all namespaces.
4. Regularly review and remove unused roles
You should regularly audit your Roles, RoleBindings, ClusterRoles, and ClusterRoleBindings and prune any that are no longer used. This prevents over-privileged accounts from lingering and will make it easier to examine who can access different resources.
5. Avoid using wildcards in roles
Roles allow you to use the * wildcard in their resources and verbs fields. This is dangerous because it means that users will automatically receive access to any new resource types that are added to the cluster, in addition to those that exist today.
Finally, remember that RBAC is only one part of Kubernetes security. You should also implement other protections such as the 4C security model to keep your clusters secure
Conclusion
Role-Based Access Control (RBAC) is a fundamental security mechanism in Kubernetes that ensures users and applications can only perform the actions they are explicitly allowed to. By assigning precise roles, binding them to users or service accounts, and enforcing namespace or cluster-level restrictions, RBAC helps organizations maintain operational safety and prevent accidental or malicious changes.
Using RBAC effectively means carefully designing roles, limiting permissions to what is strictly necessary, regularly auditing access, and avoiding overly broad privileges. When combined with other security best practices, RBAC empowers teams to collaborate safely, protects sensitive resources, and keeps your Kubernetes cluster secure, manageable, and efficient.
