A Kubernetes admission controller acts like a gatekeeper for your cluster. It checks every request that reaches the Kubernetes API server before the system saves it, but after the user passes authentication and authorization.
When you send a request to create a Pod or deploy an app, Kubernetes first confirms who you are and what you can do. Next, the admission controller reviews your request to ensure it follows the cluster’s rules and policies.
For example:
It stops users from creating Pods without resource limits.
It adds labels, sidecars, or security settings automatically.
It keeps the cluster secure, consistent, and efficient.
Admission controllers help you control what happens in your Kubernetes cluster and make sure everything follows your organization’s policies.
Types of Admission Controllers
There are two main types of admission controllers in Kubernetes:
- Mutating Admission Controllers
These controllers change or add information to a request before it’s saved.
Suppose you create a Pod without some settings — the mutating controller can automatically fill in missing details like labels, sidecars, or security rules.
A common example is the MutatingAdmissionWebhook, which lets you use custom logic to modify requests before they’re stored. - Validating Admission Controllers
These controllers make sure a request follows all the rules before Kubernetes accepts it.
They can block Pods that don’t meet security or resource requirements.
The ValidatingAdmissionWebhook enables teams to apply their own validation logic for stronger control.
Some controllers perform both functions — they can modify and validate requests at the same time. This combined approach keeps clusters secure, consistent, and compliant with organizational policies.
How Kubernetes Admission Controllers Work
The admission control process plays a vital role in Kubernetes resource management and policy enforcement. Acting as a sophisticated filter for incoming requests to the API server, it ensures that each request aligns with the cluster’s rules and configurations.
Kubernetes admission controllers operate in two primary modes: mutating and validating. A mutating controller modifies request objects—
for example, by injecting sidecar containers or adding default values—before saving them to the cluster state. Validating controllers, on the other hand, analyze those requests to verify compliance with defined policies and reject any that violate them. In some cases, a single controller performs both actions, combining mutation and validation to maintain consistency and automation across the cluster.
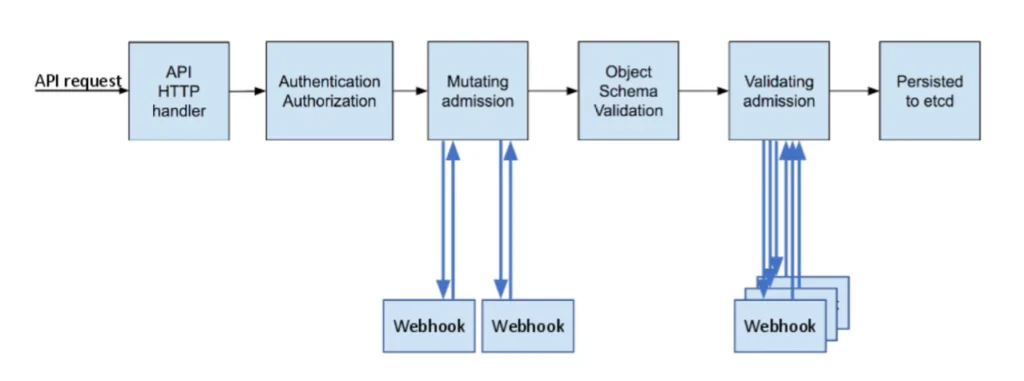
API HTTP Handler
Each Kubernetes request—whether creating, updating, or deleting a resource—first goes to the API server through its HTTP interface. The API HTTP handler receives the request, parses it, and routes it to the correct internal handler based on the resource type (for example, pods, deployments, or services).
Authentication and Authorization
After receiving the request, Kubernetes verifies who sent it through authentication. It then checks whether that identity has permission to perform the requested action through authorization. These checks often use certificates, tokens, or identity providers for authentication, and RBAC or ABAC mechanisms for authorization.
Mutating Admission
Next, the request moves into the mutating admission phase. In this stage, mutating admission controllers—either built-in or configured as external webhooks—can change the request object before saving it. They might inject sidecar containers, add default values, or apply required labels. External webhooks communicate with the API server during this phase to modify the request dynamically.
Object Schema Validation
Kubernetes then validates the object’s structure and content against the defined schema. This step confirms that the object meets API requirements such as valid field types, required properties, and allowed values. Schema validation stops malformed or incomplete objects from entering the system.
Validating Admission
The next phase uses validating admission controllers to enforce cluster policies. These controllers don’t modify objects; they only approve or reject requests based on compliance rules. Both internal and external webhooks may verify that the object meets security standards, resource quotas, or namespace restrictions.
Persisted to etcd
If the request passes all previous checks, Kubernetes stores the object in etcd, its distributed key-value store. Once stored, the object becomes part of the cluster’s state and is visible to other components such as the scheduler and controllers.
This process ensures that Kubernetes handles every request securely and consistently. The API server authenticates, authorizes, mutates, validates, and finally stores each resource while maintaining policy compliance and cluster integrity.
Lifecycle of mutating and validating admission
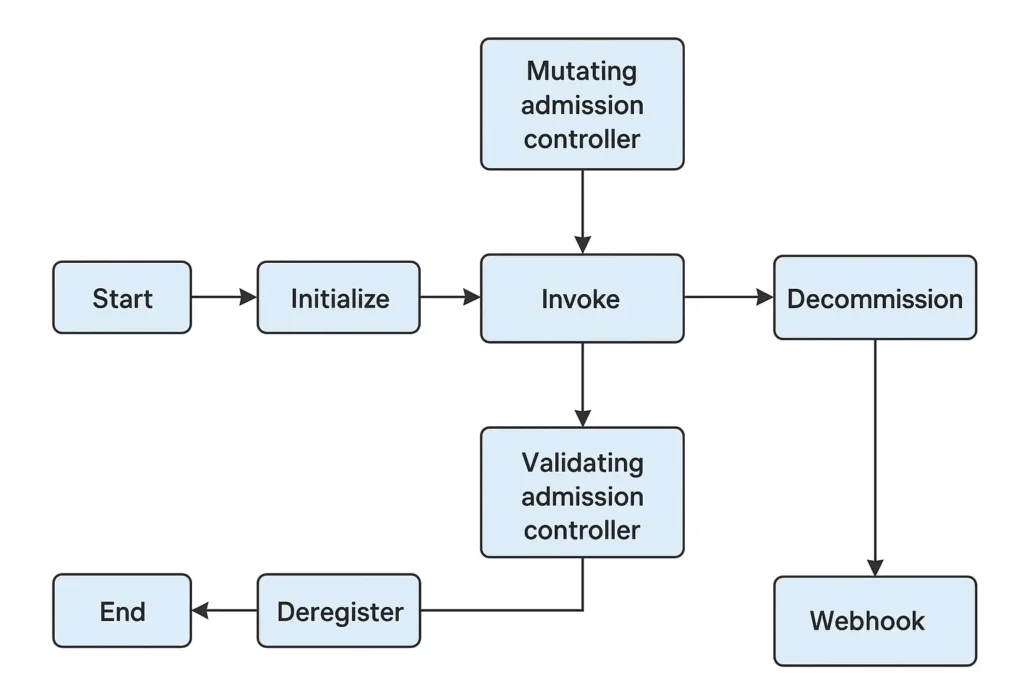
This diagram shows the full lifecycle of Kubernetes mutating and validating admission controllers, showing how they are registered, invoked, and eventually decommissioned. Each component in the diagram represents a specific phase in this lifecycle.
Start
The lifecycle begins when the Kubernetes API server starts up. During initialization, it identifies and loads all configured admission controllers. These controllers can be built-in plugins provided by Kubernetes or custom webhook-based controllers defined by cluster administrators. The “Start” phase marks the beginning of the admission control setup process.
Initialize
In the initialization phase, the API server reads the admission controller configuration files or webhook configurations (for dynamic admission controllers). It establishes the necessary communication settings, such as URLs, certificates, and authentication credentials for webhooks. At this stage, the API server ensures that each admission controller is properly registered and ready to process incoming API requests.
Invoke
When an API request arrives, the API server invokes the relevant admission controllers. The process typically starts with the mutating admission controller, followed by the validating admission controller. The mutating controller can modify the request object—such as adding sidecar containers or default values—before validation. The validating controller then checks whether the object complies with cluster policies and constraints. Both steps can involve communication with external webhook services for custom logic and policy enforcement.
Mutating Admission Controller
The mutating admission controller is responsible for modifying objects before they are persisted to etcd. It applies default configurations, injects additional fields, or alters specific resource attributes to maintain consistency. These controllers often run as webhooks that receive the API request, make the required changes, and return a patched version of the object back to the API server.
Validating Admission Controller
The validating admission controller runs after mutation and ensures that the final object adheres to the cluster’s security, policy, and compliance standards. It reviews the resource and decides whether to accept or reject the request. Like mutating controllers, validating controllers can also operate as webhooks that send validation responses to the API server. If the controller rejects the object, the request fails, and the API server returns an error to the client.
Decommission
When the API server shuts down or an admission controller configuration changes, the decommission phase begins. In this phase, Kubernetes gracefully terminates active admission controller connections and cleans up associated resources. For webhook-based controllers, this may include disconnecting from external services or invalidating certificates.
Webhook
Webhooks are external HTTP endpoints that implement custom admission control logic. Kubernetes sends the admission review requests to these endpoints and expects a response that either mutates, approves, or rejects the object. Webhooks allow dynamic admission control without modifying the core Kubernetes API server, making them flexible and extensible for custom use cases.
Deregister
Once an admission controller is no longer needed—due to configuration changes or decommissioning—it is deregistered from the API server’s list of active controllers. Deregistration ensures that the server no longer attempts to invoke that controller for incoming requests, maintaining efficiency and consistency in request handling.
End
The lifecycle concludes once all controllers have been deregistered and the API server has fully shut down or reloaded its configuration. At this point, the system is ready to restart the process when new admission controllers are initialized or the server restarts.
The lifecycle of mutating and validating admission controllers moves through well-defined stages—starting from initialization, invocation during API requests, and ending with decommissioning and deregistration—ensuring that admission control in Kubernetes remains both consistent and extensible.
Building a Custom Admission Webhook
A custom admission webhook extends Kubernetes’ default admission control by introducing your own validation or mutation logic whenever an API request occurs. Essentially, it functions as a web service that receives an AdmissionReview request from the API server, processes it, and returns an AdmissionResponse indicating whether to accept, reject, or modify the object.
To build a webhook, start by creating a small HTTPS server using Go, Python, or another supported language. The server listens for POST requests from the Kubernetes API server. When called, it receives a JSON payload describing the object being created, updated, or deleted. The webhook then parses the data, applies your custom logic—such as enforcing naming conventions, checking labels, or adding default values—and returns a decision.
For instance, using Go’s client-go library and the admission/v1 package, you can implement a webhook that ensures all Pods have specific security labels or defined resource limits. After evaluation, the webhook constructs a response similar to this example:
{
  "response": {
    "allowed": true,
    "patchType": "JSONPatch",
    "patch": "W3sicGF0aCI6Ii9tZXRhZGF0YS9sYWJlbHMiLCJ2YWx1ZSI6eyJhZG1pbiI6InRydWUifX1d"
  }
}
The response either allows the operation, denies it with a reason, or mutates the object using a JSON patch.
After building the webhook, deploy it as a Kubernetes Deployment and expose it internally through a Service. Secure communication between the API server and your webhook requires TLS certificates, which can be managed automatically with tools like cert-manager.
Finally, register the webhook by creating a MutatingWebhookConfiguration or ValidatingWebhookConfiguration resource. This configuration tells the API server when to invoke your webhook—for example, during CREATE or UPDATE operations on Pods.
Example configuration:
apiVersion: admissionregistration.k8s.io/v1
kind: ValidatingWebhookConfiguration
metadata:
  name: pod-validation-webhook
webhooks:
  - name: validate-pods.example.com
    clientConfig:
      service:
        name: pod-webhook-service
        namespace: default
        path: /validate
      caBundle: <base64-encoded-CA-cert>
    rules:
      - apiGroups: [""]
        apiVersions: ["v1"]
        operations: ["CREATE", "UPDATE"]
        resources: ["pods"]
    admissionReviewVersions: ["v1"]
    sideEffects: None
    failurePolicy: Fail
Whenever someone attempts to create or update a Pod, the Kubernetes API server sends the object to your webhook for review. Based on the implemented logic, the webhook decides whether to approve, reject, or adjust the request before it’s persisted.
Best Practices Using Admission Controllers and Webhooks
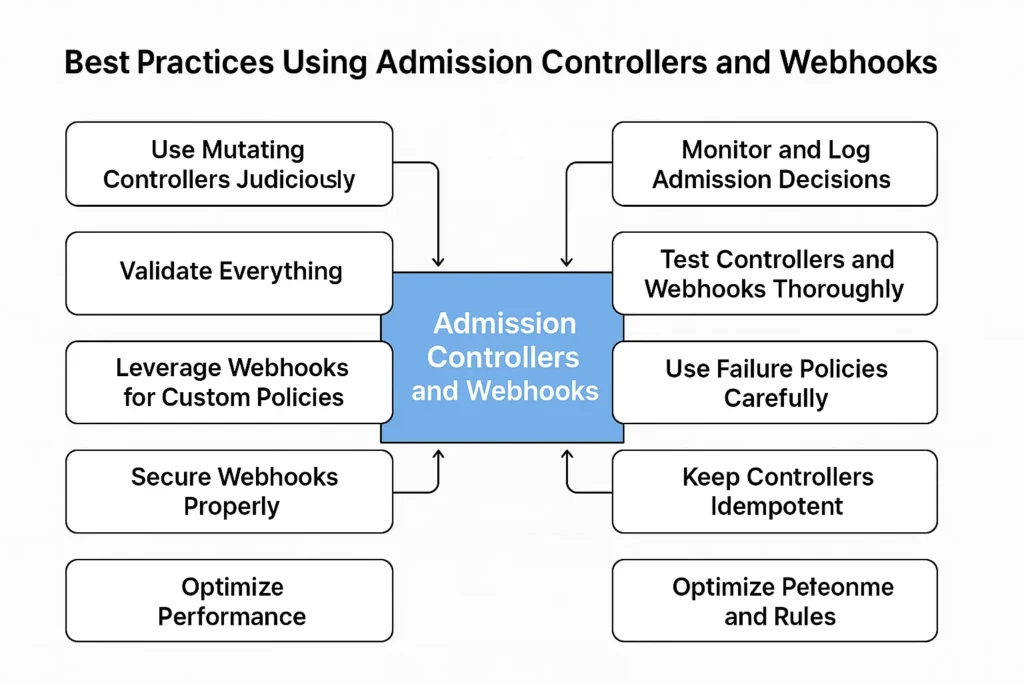
Using admission controllers and webhooks effectively requires careful planning and implementation. Following these best practices ensures your Kubernetes clusters remain secure, compliant, and efficient:
1. Use Mutating Controllers Judiciously
Mutating admission controllers can automatically inject defaults, labels, or sidecars. While powerful, overusing them may introduce complexity or unexpected behaviors. Only mutate objects when necessary and clearly document what changes the controller makes.
2. Validate Everything
Always pair mutating controllers with validating controllers. Even if a request is mutated to meet standards, validating controllers ensure policies, quotas, and security requirements are enforced consistently. Never assume that mutation alone guarantees compliance.
3. Leverage Webhooks for Custom Policies
Custom admission webhooks are ideal for implementing organization-specific rules, such as enforcing naming conventions, mandatory security labels, or restricting image registries. Keep webhook logic simple and efficient to avoid API server latency.
4. Secure Webhooks Properly
Webhooks communicate over HTTPS and may handle sensitive information. Always use TLS with proper certificates (automated via cert-manager or similar tools) and authenticate webhook calls to prevent unauthorized access.
5. Monitor and Log Admission Decisions
Track the actions of admission controllers and webhooks. Logging accepted, rejected, or mutated requests helps with auditing, debugging, and compliance reporting. Monitoring webhook latency ensures they don’t become a bottleneck in request processing.
6. Test Controllers and Webhooks Thoroughly
Before deploying in production, test your admission controllers and webhooks in a staging environment. Validate different scenarios, including edge cases and failure responses, to ensure they behave as expected and don’t block legitimate requests.
7. Use Failure Policies Carefully
When configuring webhooks, choose the right failure policy (Fail or Ignore). For critical policies, use Fail to prevent non-compliant resources from being created. For non-critical enforcement, Ignore ensures cluster operations continue even if the webhook is temporarily unreachable.
Conclusion
Kubernetes admission controllers secure clusters, enforce policies, and maintain operational consistency. They intercept API requests after authentication and authorization, then mutate, validate, or reject resources before storing them in etcd.
Mutating controllers add defaults, inject sidecars, and enforce labels. Validating controllers check that objects meet organizational policies, security standards, and resource constraints. These combined actions help administrators maintain reliable, secure, and standardized clusters.
The lifecycle of admission controllers—from initialization to decommissioning—ensures requests follow a predictable process. Custom admission webhooks provide extra flexibility. Teams can enforce organization-specific rules and dynamic policies without modifying the core API server.
By using admission controllers and webhooks effectively, teams automate policy enforcement, protect cluster integrity, and streamline operational workflows. These tools are essential for managing modern Kubernetes environments.
