In modern DevOps workflows, secure secret management and automated deployments are key to building scalable, production-grade applications. This guide walks you through the end-to-end deployment of a Laravel application on AWS EKS (Elastic Kubernetes Service) using AWS Secrets Manager for secure credential storage and ArgoCD for GitOps-based continuous delivery.
We’ll cover how to configure IAM roles with IRSA, integrate secrets into Kubernetes using CSI drivers and External Secrets Operator, and automate deployment using Helm and ArgoCD. By the end, you’ll have a fully functional, secure, and automated Laravel deployment pipeline on AWS cloud infrastructure.
Prerequsite:-
1. Update EC2 & Install Prerequisites
sudo apt-get update -y
sudo apt-get install -y unzip curl wget git
2. Install AWS CLI (v2)
curl "<https://awscli.amazonaws.com/awscli-exe-linux-x86_64.zip>" -o "awscliv2.zip"
unzip awscliv2.zip
sudo ./aws/install
aws --version
Configure credentials (make sure your IAM user/role has EKS, EC2, VPC, and IAM permissions):
aws configure
3. Install kubectl
curl -o kubectl <https://amazon-eks.s3.us-west-2.amazonaws.com/1.19.6/2021-01-05/bin/linux/amd64/kubectl>
chmod +x ./kubectl
sudo mv ./kubectl /usr/local/bin
kubectl version --short --client
4. Install eksctl
eksctl is the official CLI for creating EKS clusters.
curl -sL "<https://github.com/eksctl-io/eksctl/releases/latest/download/eksctl_$>(uname -s)_amd64.tar.gz" -o eksctl.tar.gz
tar -xvzf eksctl.tar.gz
sudo mv eksctl /usr/local/bin/
eksctl version
5. Create EKS Cluster with 2 Nodes (t2.medium)
Run:
eksctl create cluster \\
  --name my-eks-cluster \\
  --region ap-south-1 \\
  --nodegroup-name linux-nodes \\
  --node-type t2.medium \\
  --nodes 2 \\
  --nodes-min 2 \\
  --nodes-max 2 \\
  --managed
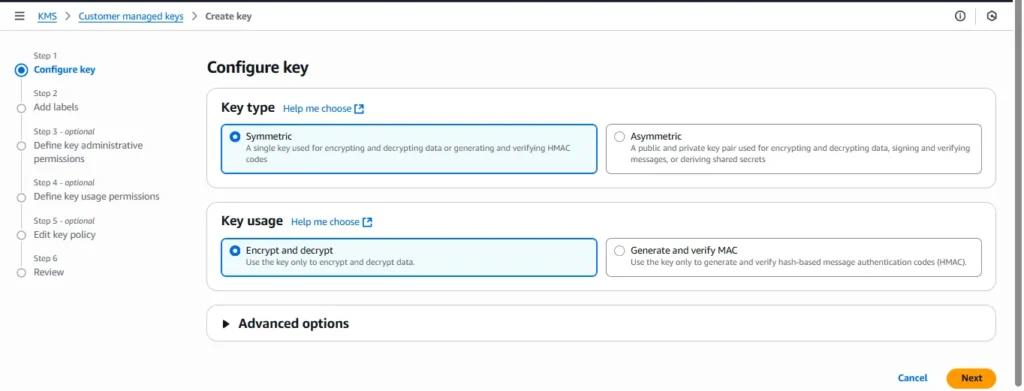
Step 1 :- Create a KMS CMK (console)
- Go to AWS Console → KMS → Customer managed keys → Create key
- Key type: Symmetric, Key usage: Encrypt/Decrypt.
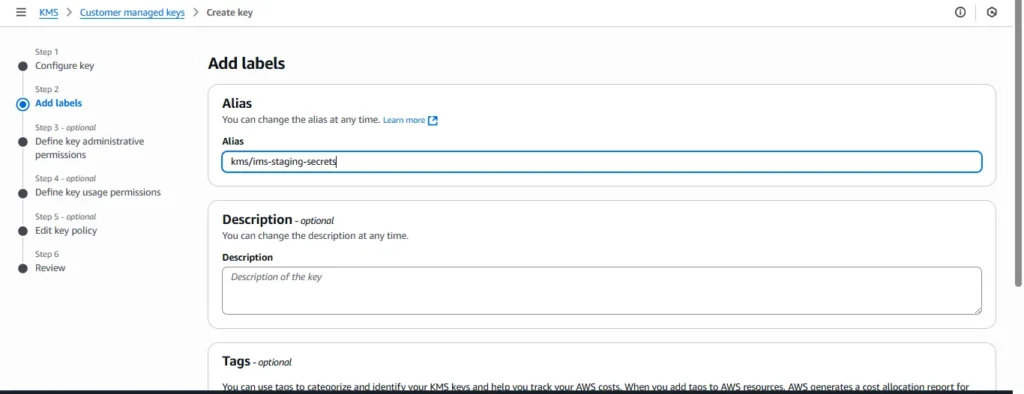
3.Alias: kms/ims-staging-secrets.

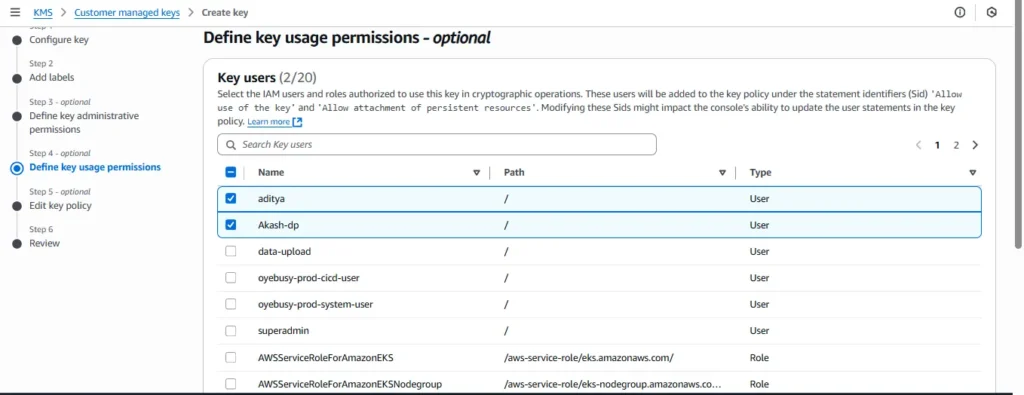
4.Administrators: your admin IAM users/roles.
5.Key users: (you can skip for now; Secrets Manager will use it via service role, and your pod will only need kms:Decrypt through IRSA later).
Create the key.
Production tip: Keep this key region-scoped with tight key policy—only Secrets Manager and your IRSA role should have Decrypt.
Step 2 :- Create the secret in Secrets Manager (console)
- AWS Console → Secrets Manager → Store a new secret
- Secret type: “Other type of secret”.

3. Key/value pairs (JSON) — put only sensitive or config you want centralized. For your case:
{
  "DB_HOST": "10.0.130.192",
  "DB_PORT": "3306",
  "DB_DATABASE": "IMS",
  "DB_USERNAME": "inv-staging-user",
  "DB_PASSWORD": "admin"
}

4.Encryption key: select kms/ims-staging-secrets.

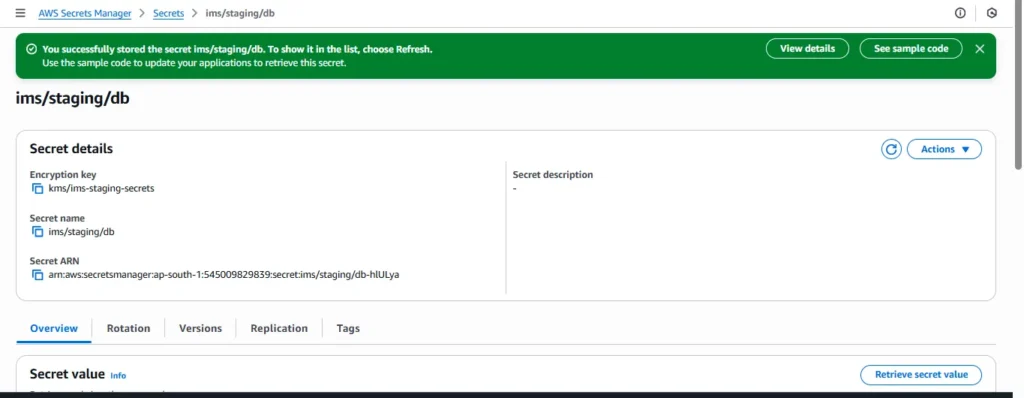
5.Secret name: ims/staging/db. (Use a clear path-like naming convention.)

6.Create secret. Copy the ARN.
arn:aws:secretsmanager:ap-south-1:545009829839:secret:ims/staging/db-hlULya
Production tip: do not commit these values anywhere; rotate credentials periodically and restrict who can read the secret.
Step3:- Install CSI driver
1. Add the Helm repo
helm repo add secrets-store-csi-driver <https://kubernetes-sigs.github.io/secrets-store-csi-driver/charts>
helm repo update
2. Install the CSI driver (into kube-system)
helm install csi-secrets-store secrets-store-csi-driver/secrets-store-csi-driver -n kube-system
This will install the driver and the CRDs (including SecretProviderClass).
3. Verify installation
Check if CRDs exist:
kubectl get crd | grep secretproviderclasses
You should see something like:
secretproviderclasses.secrets-store.csi.x-k8s.io
secretproviderclasspodstatuses.secrets-store.csi.x-k8s.io
Also check pods:
kubectl get pods -n kube-system | grep csi-secrets-store


Fix: Install ESO
Run:
helm repo add external-secrets <https://charts.external-secrets.io>
helm repo update

helm install external-secrets external-secrets/external-secrets \\
  -n external-secrets --create-namespace


Step 4 :- Set up IRSA (service account with IAM role) via cli
Get your cluster OIDC provider
aws eks describe-cluster --name <your-cluster-name> --region ap-south-1 \\
  --query "cluster.identity.oidc.issuer" --output text
You should get something like:
<https://oidc.eks.ap-south-1.amazonaws.com/id/EXAMPLED539D4633E53DE1B71EXAMPLE>Associate an OIDC provider with your EKS cluster
Run:
eksctl utils associate-iam-oidc-provider \\
  --region ap-south-1 \\
  --cluster <your-cluster-name> \\
  --approve
This will create an IAM OIDC identity provider for your cluster
Create an IAM policy for Secrets Manager access
Save this as secretsmanager-policy.json:
{
  "Version": "2012-10-17",
  "Statement": [
    {
      "Effect": "Allow",
      "Action": [
        "secretsmanager:GetSecretValue",
        "secretsmanager:DescribeSecret"
      ],
      "Resource": "arn:aws:secretsmanager:ap-south-1:<your-account-id>:secret:ims-staging-db-secret-*"
    }
  ]
}
Create the policy:
aws iam create-policy \\
  --policy-name SecretsManagerAccessForIMSStaging \\
  --policy-document file://secretsmanager-policy.json
Create an IAM role for the K8s service account
eksctl create iamserviceaccount \\
  --name ims-staging-chart \\
  --namespace staging \\
  --cluster <your-cluster-name> \\
  --attach-policy-arn arn:aws:iam::<your-account-id>:policy/SecretsManagerAccessForIMSStaging \\
  --approve \\
  --region ap-south-1
This will create an IAM role and annotate your ims-staging-chart service account with it.
Verify the service account
kubectl get sa ims-staging-chart -n staging -o yamlYou should see something like:
annotations:
  eks.amazonaws.com/role-arn: arn:aws:iam::<your-account-id>:role/eksctl-<cluster>-addon-iamserviceaccount-staging-ims-staging-chart-Role...
Create an IAM role bound to your K8s service account
eksctl create iamserviceaccount \\
  --name ims-staging-chart \\
  --namespace staging \\
  --cluster <your-cluster-name> \\
  --attach-policy-arn arn:aws:iam::<your-account-id>:policy/SecretsManagerAccessForIMSStaging \\
  --approve \\
  --region ap-south-1
This will:
- Create an IAM role
- Attach your Secrets Manager policy
- Annotate the
ims-staging-chartservice account with the IAM role ARN
create trust-policy.json
{
  "Version": "2012-10-17",
  "Statement": [
    {
      "Effect": "Allow",
      "Principal": {
        "Federated": "arn:aws:iam::<your-account-id>:oidc-provider/oidc.eks.ap-south-1.amazonaws.com/id/FDA2C3141988F88462C71B9CA2355D17"
      },
      "Action": "sts:AssumeRoleWithWebIdentity",
      "Condition": {
        "StringEquals": {
          "oidc.eks.ap-south-1.amazonaws.com/id/FDA2C3141988F88462C71B9CA2355D17:sub": "system:serviceaccount:staging:ims-staging-chart"
        }
      }
    }
  ]
}
Create the IAM Role
aws iam create-role \\
  --role-name ims-staging-db-role \\
  --assume-role-policy-document file://trust-policy.json
Attach the Secrets Manager Policy
aws iam attach-role-policy \\
  --role-name ims-staging-db-role \\
  --policy-arn arn:aws:iam::545009829839:policy/SecretsManagerAccessForIMSStaging
Verify
aws iam list-attached-role-policies --role-name ims-staging-db-role
You should see SecretsManagerAccessForIMSStaging attached.
At that point, your service account annotation:
eks.amazonaws.com/role-arn: arn:aws:iam::545009829839:role/ims-staging-db-role
- IAM → Roles → Create role → Web identity
- Identity provider: the OIDC for your cluster.
- Audience:
sts.amazonaws.com. - Add permissions: attach policy
EKSSecretsManagerRead-ims-staging. - Role name:
eks-irsa-ims-staging-secrets. - Trust policy condition: limit to the namespace/serviceaccount you will use (sa name
ims-staging-sa, nsims-staging). In the console, after role creation, edit trust policy to add the condition:
{ "Effect": "Allow", "Principal": { "Federated": "arn:aws:iam::<ACCOUNT_ID>:oidc-provider/oidc.eks.<REGION>.amazonaws.com/id/<OIDC_ID>" }, "Action": "sts:AssumeRoleWithWebIdentity", "Condition": { "StringEquals": { "oidc.eks.<REGION>.amazonaws.com/id/<OIDC_ID>:sub": "system:serviceaccount:ims-staging:ims-staging-sa" } } }
Production tip: Scope the role only to this SA & namespace. Never use wildcards unless you must.
Step 5 — Create / Annotate the Kubernetes ServiceAccount (Helm)
Update your Helm chart to ensure the Deployment uses a ServiceAccount annotated with the IAM role ARN.
templates/serviceaccount.yaml (you already have it; update it):
apiVersion: v1
kind: ServiceAccount
metadata:
  name: ims-staging-sa
  namespace: {{ .Release.Namespace }}
  annotations:
    eks.amazonaws.com/role-arn: arn:aws:iam::<ACCOUNT_ID>:role/eks-irsa-ims-staging-secrets
Make sure your deployment.yaml references this SA:
spec:
  serviceAccountName: ims-staging-sa
Step 6 : Create a SecretProviderClass (one small YAML to apply)
This object tells the ASCP which Secrets Manager secret(s) to fetch and how to map them into a Kubernetes Secret (so your app can keep using envFrom.secretRef like before).
Create a file secretproviderclass.yaml:
kind: SecretProviderClass
metadata:
  name: ims-staging-db-credentials
  namespace: staging
spec:
  provider: aws
  parameters:
    region: ap-south-1
    objects: |
      - objectName: "ims-staging-db-secret"   # <-- use the plain secret name as in aws secret manager
        objectType: "secretsmanager"
        jmesPath:
          - path: DB_HOST
            objectAlias: DB_HOST
          - path: DB_PORT
            objectAlias: DB_PORT
          - path: DB_DATABASE
            objectAlias: DB_DATABASE
          - path: DB_USERNAME
            objectAlias: DB_USERNAME
          - path: DB_PASSWORD
            objectAlias: DB_PASSWORD
  secretObjects:
    - secretName: ims-staging-db-secret  # must match with aws secret provider
      type: Opaque
      data:
        - objectName: DB_HOST
          key: DB_HOST
        - objectName: DB_PORT
          key: DB_PORT
        - objectName: DB_DATABASE
          key: DB_DATABASE
        - objectName: DB_USERNAME
          key: DB_USERNAME
        - objectName: DB_PASSWORD
          key: DB_PASSWORD
Apply it:
kubectl apply -f **secretproviderclass.yam**lNow, you need one small CSI volume reference to trigger the fetch/sync (even if you only use the synced Kubernetes Secret):
In your deployment.yaml add a CSI volume and mount (mount can be to an unused path; fetching occurs and the k8s Secret will be created/updated):
template:
    metadata:
      {{- with .Values.podAnnotations }}
      annotations:
        {{- toYaml . | nindent 8 }}
      {{- end }}
      labels:
        {{- include "ims-staging-chart.labels" . | nindent 8 }}
        {{- with .Values.podLabels }}
        {{- toYaml . | nindent 8 }}
        {{- end }}
    spec:
      {{- with .Values.imagePullSecrets }}
      imagePullSecrets:
        {{- toYaml . | nindent 8 }}
      {{- end }}
      serviceAccountName: {{ include "ims-staging-chart.serviceAccountName" . }}
      {{- with .Values.podSecurityContext }}
      securityContext:
        {{- toYaml . | nindent 8 }}
      {{- end }}
      volumes:
        - name: secrets-store-inline
          csi:
            driver: secrets-store.csi.k8s.io
            readOnly: true
            volumeAttributes:
              secretProviderClass: {{ .Values.secretProviderClassName }}
      containers:
        - name: {{ .Chart.Name }}
          {{- with .Values.securityContext }}
          securityContext:
            {{- toYaml . | nindent 12 }}
          {{- end }}
          image: "{{ .Values.image.repository }}:{{ .Values.image.tag | default .Chart.AppVersion }}"
          imagePullPolicy: {{ .Values.image.pullPolicy }}
          ports:
            - name: http
              containerPort: {{ .Values.service.port }}
              protocol: TCP

          # Inject all DB credentials from the Kubernetes Secret synced via CSI
          envFrom:
            - configMapRef:
                name: {{ include "ims-staging-chart.fullname" . }}-config
            - secretRef:
                name: {{ .Values.secretName }}

          volumeMounts:
            - name: secrets-store-inline
              mountPath: /mnt/secrets-store
              readOnly: true

          {{- with .Values.livenessProbe }}
          livenessProbe:
            {{- toYaml . | nindent 12 }}
          {{- end }}
          {{- with .Values.readinessProbe }}
          readinessProbe:
            {{- toYaml . | nindent 12 }}
          {{- end }}
          {{- with .Values.resources }}
          resources:
            {{- toYaml . | nindent 12 }}
          {{- end }
Production tip: You can remove the mount if you use an initContainer to force sync, but the inline volume is the simplest, supported approach.
Step 7 :- Create file external-secret.yaml
apiVersion: external-secrets.io/v1
kind: ExternalSecret
metadata:
  name: ims-staging-db-secret
  namespace: staging
spec:
  refreshInterval: 1h
  secretStoreRef:
    name: ims-staging-chart-aws-secrets-manager
    kind: ClusterSecretStore
  target:
    name: ims-staging-db-secret
    creationPolicy: Owner
  data:
    - secretKey: DB_HOST
      remoteRef:
        key: ims-staging-db-secret
        property: host
    - secretKey: DB_PORT
      remoteRef:
        key: ims-staging-db-secret
        property: port
    - secretKey: DB_DATABASE
      remoteRef:
        key: ims-staging-db-secret
        property: database
    - secretKey: DB_USERNAME
      remoteRef:
        key: ims-staging-db-secret
        property: username
    - secretKey: DB_PASSWORD
      remoteRef:
        key: ims-staging-db-secret
        property: password
Create file secretstore.yaml
apiVersion: external-secrets.io/v1
kind: ClusterSecretStore
metadata:
  name: ims-staging-chart-aws-secrets-manager
spec:
  provider:
    aws:
      service: SecretsManager
      region: ap-south-1   # Change if needed
      auth:
        secretRef:
          accessKeyIDSecretRef:
            name: aws-creds
            namespace: external-secrets
            key: access-key
          secretAccessKeySecretRef:
            name: aws-creds
            namespace: external-secrets
            key: secret-access-key
it will create the aws access key and secret key from the aws-creats.yaml but remember you need to create base 64 type using following commands
You can encode them like this:
echo -n "your access key" | base64
echo -n "your secret key | base64
create aws-creds.yaml
apiVersion: v1
kind: Secret
metadata:
  name: aws-creds
  namespace: staging
type: Opaque
data:
  access-key: QUtJQVg1Wkk2QTdIWVZJRkJYNkg=
  secret-access-key: M3JoazJBWm1EV3Qva1k5RVdJUmZjOG1zYnV2SlFRSUViM0VSOVpINg==
Run the below commands to run application via for testing
- First, create the Kubernetes secret:
kubectl create secret generic aws-creds \\
  --namespace=external-secrets \\
  --from-literal=access-key=<YOUR_AWS_ACCESS_KEY_ID> \\
  --from-literal=secret-access-key=<YOUR_AWS_SECRET_ACCESS_KEY>
2. Verify:
kubectl get secret aws-creds -n external-secrets -o yaml3.Once this secret is present, your ClusterSecretStore manifest will be able to pick it up:
auth:
  secretRef:
    accessKeyIDSecretRef:
      name: aws-creds
      namespace: external-secrets
      key: access-key
    secretAccessKeySecretRef:
      name: aws-creds
      namespace: external-secrets
      key: secret-access-key
4.Install helm chart
helm install your-chart-name /pathto yourchart/ -n staging
helm install ims-stsging-chart ims-staging-chart -n staging
Step 8:- Deploy on argocd and verify
Install argocd on aws ubuntu
1. Add Argo Helm Repo
helm repo add argo <https://argoproj.github.io/argo-helm>
helm repo update
2. Create Namespace for Argo CD
kubectl create namespace argocd
3. Install Argo CD via Helm
helm install argocd argo/argo-cd -n argocd
This installs Argo CD using default Helm values.
4. Verify Installation
kubectl get pods -n argocd
kubectl get svc -n argocd
5. Expose Argo CD Server
Option A – NodePort (simple for testing)
kubectl patch svc argocd-server -n argocd -p '{"spec": {"type": "NodePort"}}'
kubectl get svc argocd-server -n argocd
- Note the NodePort (e.g.,
30080). - Access at:
http://<NodePublicIP>:<NodePort>
Option B – LoadBalancer (production)
kubectl patch svc argocd-server -n argocd -p '{"spec": {"type": "LoadBalancer"}}'
kubectl get svc argocd-server -n argocd
- Wait for an EXTERNAL-IP.
- Access at:
http://<EXTERNAL-IP>
6. Get Initial Admin Password
kubectl -n argocd get secret argocd-initial-admin-secret -o jsonpath="{.data.password}" | base64 -d
- Username:
admin - Password: (output of above command)
Step 9:- Create Application via ArgoCD Web UI
- Open the ArgoCD Web UI in your browser (e.g.,
http://<argocd-server-url>). - Log in with your username and password (default username:
admin). - Click on “+ NEW APP” (top-left corner).
- Fill out the following details:
- Application Name: e.g., ui
- Project: default
- Sync Policy: Manual or Automatic (choose as needed)
- Repository URL: Git URL containing Helm or K8s manifests
- Revision:
HEADor specific Git branch/tag (e.g.,main) - Path: Relative path in the repo to the manifests/chart
- Cluster: Usually
https://kubernetes.default.svc - Namespace: e.g.,
defaultormy-namespace
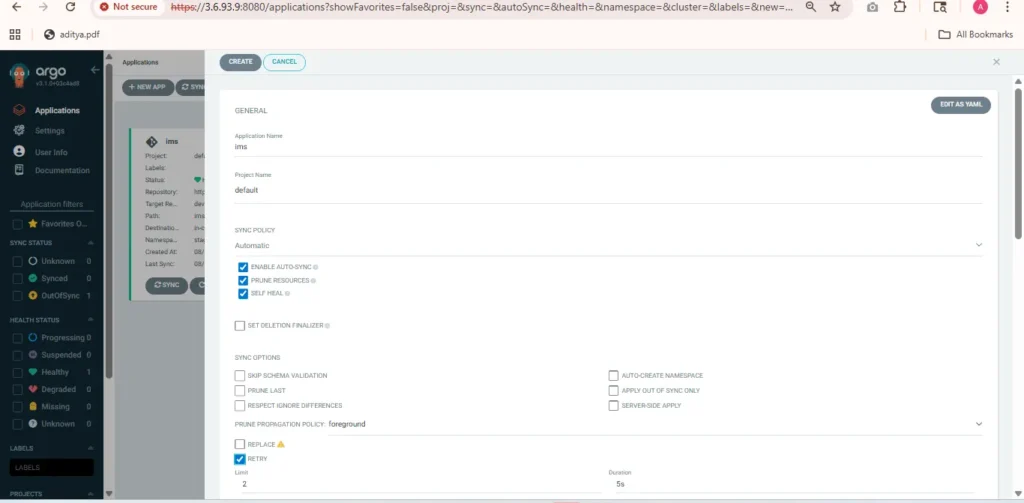


5.Click Create.
➡️ ArgoCD will now list your application, and you can sync or monitor it from the dashboard.

Conclusion
By completing this setup, you’ve implemented a secure and automated Laravel deployment workflow on AWS EKS — combining Secrets Manager, IRSA, CSI driver, Helm, and ArgoCD.
Your Laravel application now fetches sensitive data like database credentials directly from AWS Secrets Manager, eliminating hardcoded secrets and improving compliance and security. With ArgoCD, every code change can be continuously synced to your EKS cluster, providing a seamless GitOps-based CI/CD process.
This architecture not only enhances application reliability and security but also simplifies maintenance, making it ideal for production-ready cloud-native Laravel environments.
