
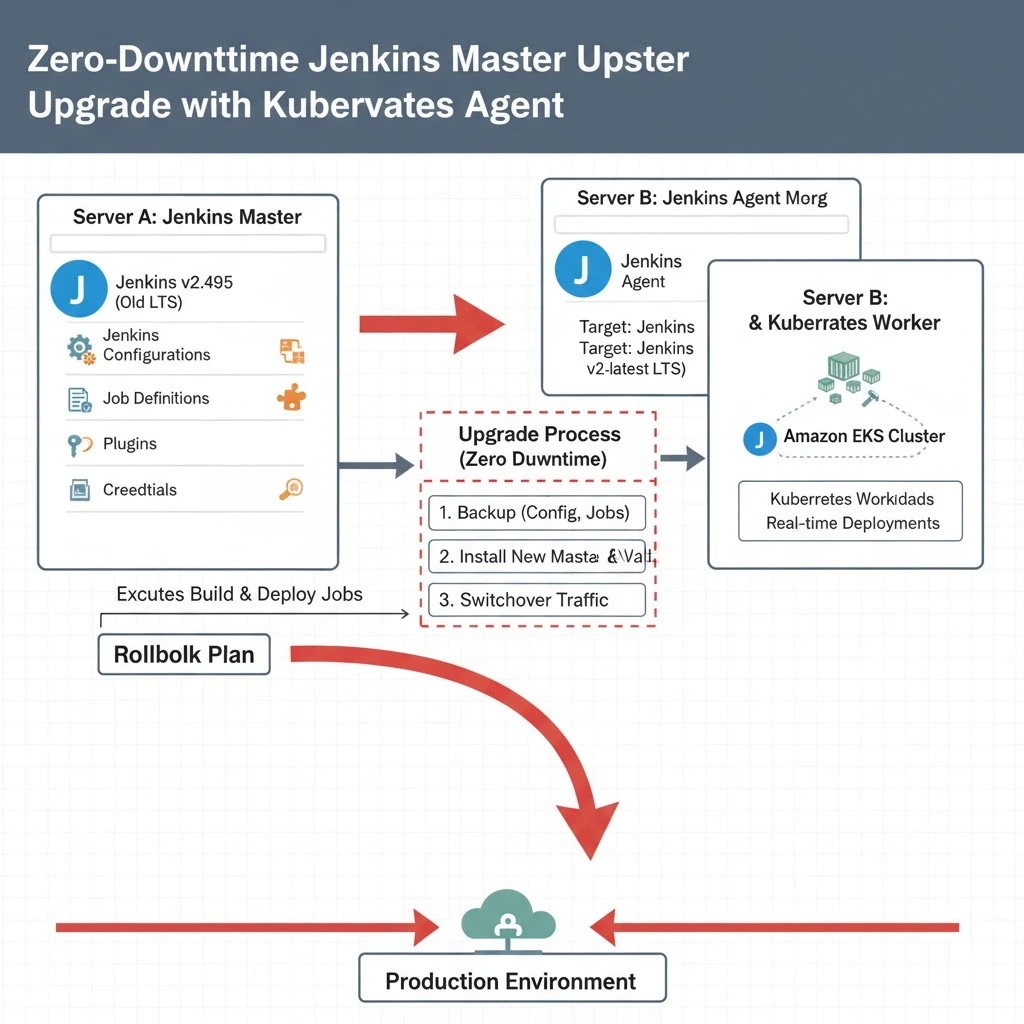
In this setup, there are two servers working together to manage CI/CD pipelines and Kubernetes workloads:
- Server A is the Jenkins Master, currently running version 2.495, which handles Jenkins configurations, job definitions, plugins, and manages the overall Jenkins environment.
- Server B acts as the Jenkins Agent, responsible for executing build and deployment jobs. This same server also runs workloads on a Kubernetes (EKS) cluster, meaning it’s actively involved in real-time production or test deployments.
The main goal of the project is to upgrade the Jenkins Master (Server A) to the latest Long-Term Support (LTS) version without disrupting ongoing operations. The upgrade must be carefully planned so that:
- All existing jobs, pipelines, plugins, and credentials are preserved (no data loss).
- There is zero downtime or interruption to the workloads running on Kubernetes via the agent.
- A rollback plan is in place, allowing Jenkins to be reverted to the previous version safely if any issue occurs after the upgrade.
Architecture
Jenkins Upgrade Steps (With Explanation)
Step 1: Check Current Jenkins and Java Version
Command:
java -version
jenkins --version

Explanation:
Confirm which Jenkins and Java versions are currently running.
Newer Jenkins LTS versions require Java 11 or 17, while older ones run on Java 8.
Step 2: Stop Jenkins Service
Command:
sudo systemctl stop jenkins

Explanation:
Stops Jenkins safely before backup and upgrade. This ensures no jobs or configuration files are being written during the backup.
Step 3: Take Complete Backup
Command:
sudo tar -czvf jenkins_backup_$(date +%F).tar.gz /var/lib/jenkins
sudo cp -r /etc/default/jenkins /etc/default/jenkins.backup
sudo cp -r /etc/init.d/jenkins /etc/init.d/jenkins.backup

Explanation:
This creates a full backup of the Jenkins home directory (/var/lib/jenkins), which contains jobs, plugins, credentials, and configurations.
If anything goes wrong, you can restore this backup easily.
Step 4: Create a System Snapshot (Optional but Recommended)
Explanation:
If Jenkins runs on an EC2 or VM, create a snapshot/AMI.
This allows quick rollback to a working state in case the upgrade fails.
Step 5: Check Plugin Compatibility
In Jenkins UI:
Go to Manage Jenkins → Plugin Manager → Installed / Updates.
Explanation:
Some plugins might not be compatible with newer Jenkins versions. Update them after upgrading Jenkins core.
Step 6: Upgrade Java (If Version < 11)
Command:
sudo apt update
sudo apt install openjdk-21-jdk -y
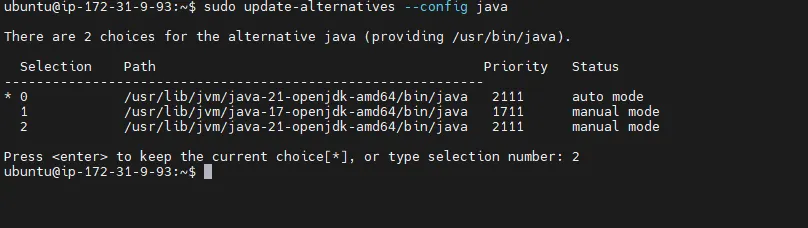
sudo update-alternatives --config java
java -version
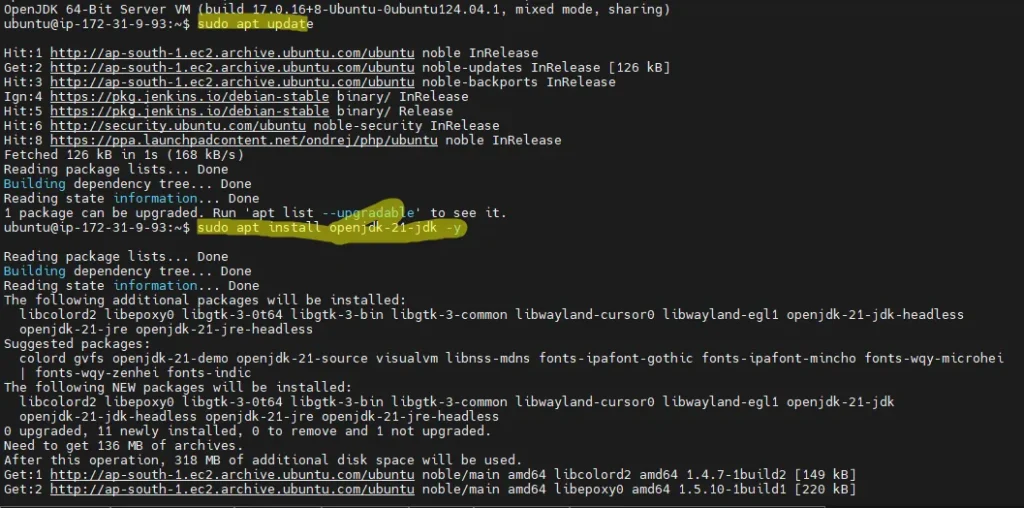
Explanation:
Newer Jenkins versions require at least Java 11.
Update /etc/default/jenkins to use the new Java path if needed.
Step 7: Add Jenkins LTS Repository
Command:
sudo wget -O /etc/apt/keyrings/jenkins-keyring.asc \
  https://pkg.jenkins.io/debian-stable/jenkins.io-2023.key
echo "deb [signed-by=/etc/apt/keyrings/jenkins-keyring.asc]" \
  https://pkg.jenkins.io/debian-stable binary/ | sudo tee \
  /etc/apt/sources.list.d/jenkins.list > /dev/null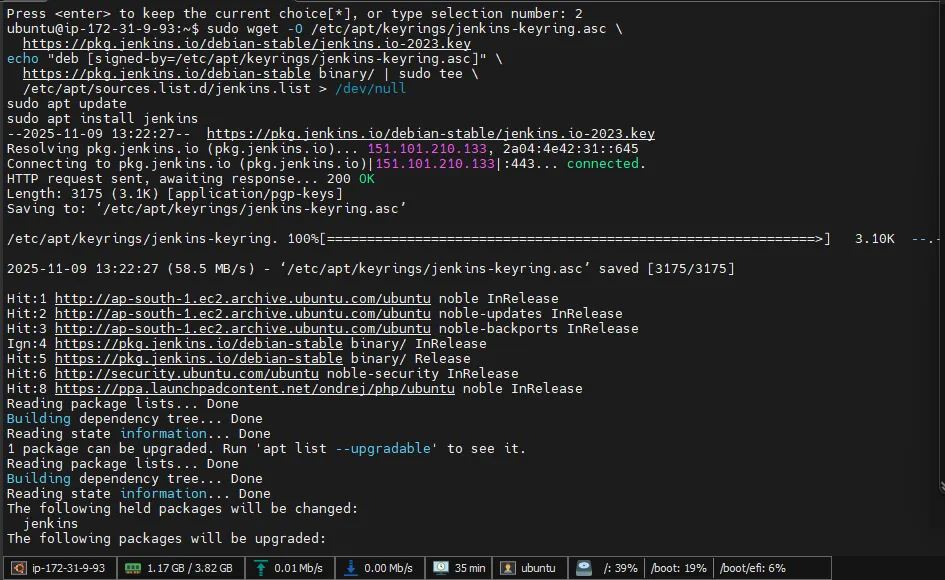
Explanation:
This adds the official Jenkins LTS repository, so your system installs the latest stable version of Jenkins.
Step 8: Upgrade Jenkins
Command:
sudo apt update
sudo apt install jenkins -y
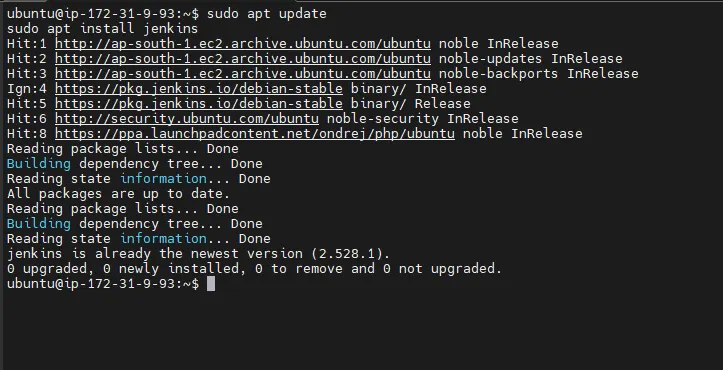
Explanation:
This upgrades Jenkins to the latest LTS version.
It automatically preserves existing configurations and data stored under /var/lib/jenkins.
Step 9: Restart Jenkins and Verify
Command:
sudo systemctl daemon-reload
sudo systemctl restart jenkins
sudo systemctl status jenkins
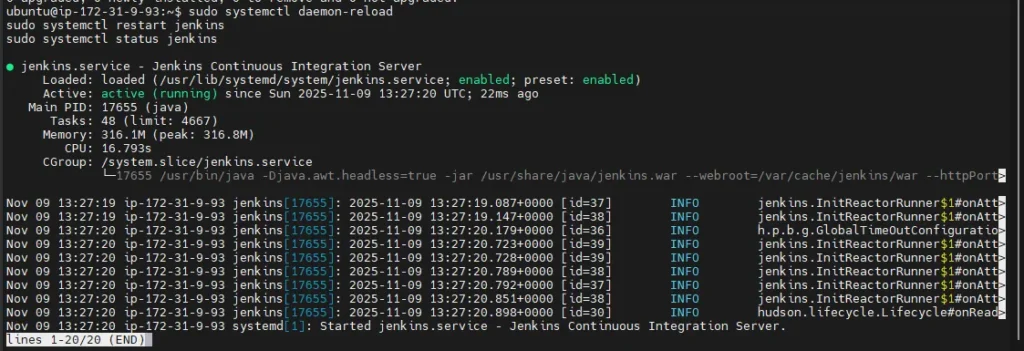
Explanation:
Restart Jenkins to apply the upgrade.
Then check its status and ensure it is active and running properly.
Step 10: Verify Jenkins Web Dashboard
Open:
http://<jenkins-master-ip>:8080
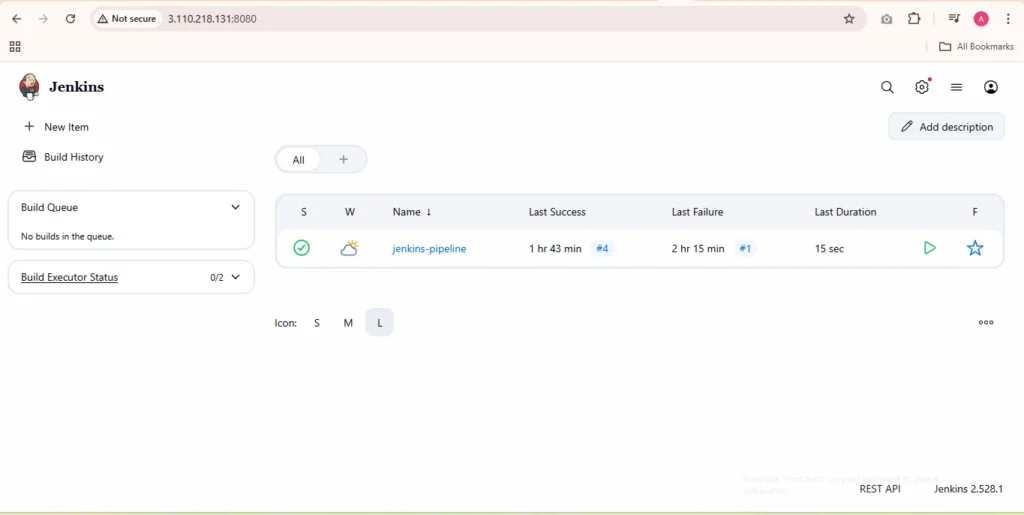
Explanation:
Access Jenkins UI and confirm:
- All jobs and pipelines are visible
- Plugins are active
- Credentials are intact
- Version has been updated successfully
Step 11: Validate Jenkins Agent Connectivity
In Jenkins UI:
Go to Manage Jenkins → Nodes → <your-agent-name>
Explanation:
Ensure the Jenkins agent (on the other server that runs EKS workloads) is still connected.
If disconnected, restart the agent:
sudo systemctl restart jenkins-agent
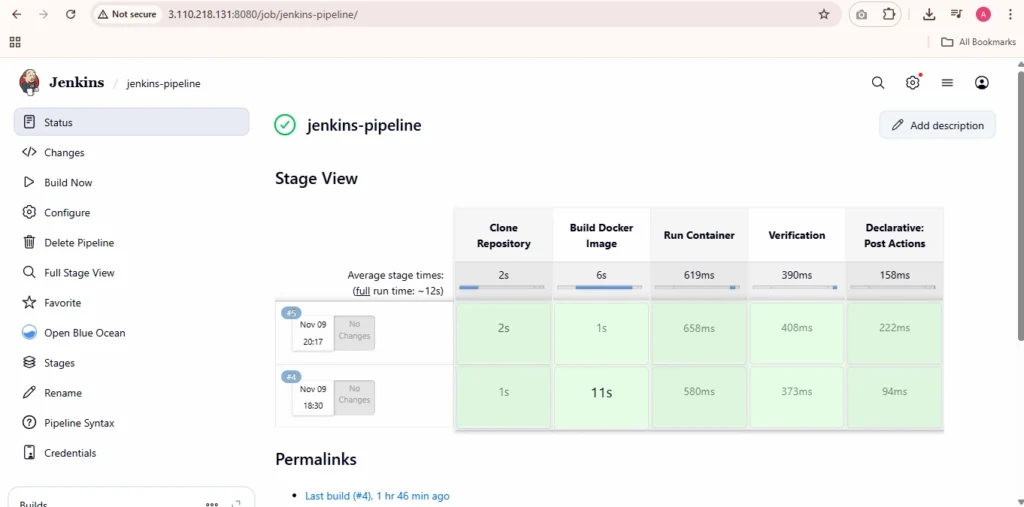
Step 12: Run a Test Pipeline
Explanation:
Run a simple pipeline job to confirm Jenkins Master and Agent communication is working and that Kubernetes deployments are unaffected.
Step 13: Clean Up Old Backups (After 1–2 Weeks of Stability)
Command:
sudo rm -f jenkins_backup_*.tar.gz
Explanation:
After confirming everything is stable, remove old backup files to save disk space.
Step 14: (Optional) Enable Automatic Updates
In Jenkins UI:Manage Jenkins → Manage Plugins → Advanced → Check for updates
Explanation:
Keeps Jenkins and plugins updated automatically for better security and performance.
Step 15: Shell script to automate entire above workflow if you want to avoid above all steps(Optional)
#!/bin/bash
# ==========================================================
# Jenkins Safe Upgrade Script (v2.54 → Latest LTS)
# Compatible with OpenJDK 21
# Author: Aditya Umesh Sirsam
# ==========================================================

set -e

echo "=========================================================="
echo "  Starting Jenkins Upgrade Process (v2.54 → Latest LTS)"
echo "=========================================================="

# --- STEP 1: Check Current Jenkins and Java Version ---
echo -e "\n[1/10] Checking current versions..."
if command -v java &>/dev/null; then
  java -version
else
  echo "  Java not found! It will be installed."
fi

if command -v jenkins &>/dev/null; then
  jenkins --version
else
  echo "  Jenkins CLI command not found, but service may exist."
fi

# --- STEP 2: Stop Jenkins Service ---
echo -e "\n[2/10] Stopping Jenkins service..."
sudo systemctl stop jenkins || echo "Jenkins service not running, continuing..."

# --- STEP 3: Backup Jenkins Data ---
echo -e "\n[3/10] Creating backup of Jenkins data..."
TIMESTAMP=$(date +%F_%H-%M-%S)
BACKUP_FILE="/var/lib/jenkins_backup_${TIMESTAMP}.tar.gz"
sudo tar -czf "$BACKUP_FILE" /var/lib/jenkins 2>/dev/null || echo "⚠️  Backup warning: Some files may have been skipped."
sudo cp -r /etc/default/jenkins /etc/default/jenkins.backup_${TIMESTAMP} 2>/dev/null || true
sudo cp -r /etc/init.d/jenkins /etc/init.d/jenkins.backup_${TIMESTAMP} 2>/dev/null || true
echo " Backup completed: $BACKUP_FILE"

# --- STEP 4: Install or Upgrade OpenJDK 21 ---
echo -e "\n[4/10] Installing OpenJDK 21..."
sudo apt update -y
sudo apt install openjdk-21-jdk -y
if ! java -version 2>/dev/null | grep -q "21"; then
  echo "⚙️  Configuring Java 21 as default..."
  sudo update-alternatives --install /usr/bin/java java /usr/lib/jvm/java-21-openjdk-amd64/bin/java 1
  sudo update-alternatives --set java /usr/lib/jvm/java-21-openjdk-amd64/bin/java
fi
java -version

# --- STEP 5: Add Jenkins LTS Repository ---
echo -e "\n[5/10] Adding Jenkins LTS repository..."
sudo mkdir -p /usr/share/keyrings
wget -q -O - https://pkg.jenkins.io/debian-stable/jenkins.io-2023.key | \
  sudo tee /usr/share/keyrings/jenkins-keyring.asc > /dev/null

echo "deb [signed-by=/usr/share/keyrings/jenkins-keyring.asc] https://pkg.jenkins.io/debian-stable binary/" | \
  sudo tee /etc/apt/sources.list.d/jenkins.list > /dev/null

# --- STEP 6: Upgrade Jenkins to Latest LTS ---
echo -e "\n[6/10] Upgrading Jenkins to latest LTS version..."
sudo apt update -y
sudo apt install jenkins -y

# --- STEP 7: Update JAVA_HOME for Jenkins ---
echo -e "\n[7/10] Updating JAVA_HOME in Jenkins configuration..."
if [ -f /etc/default/jenkins ]; then
  sudo sed -i '/JAVA_HOME/d' /etc/default/jenkins
  echo "JAVA_HOME=/usr/lib/jvm/java-21-openjdk-amd64" | sudo tee -a /etc/default/jenkins > /dev/null
fi

# --- STEP 8: Restart Jenkins Service ---
echo -e "\n[8/10] Restarting Jenkins service..."
sudo systemctl daemon-reload
sudo systemctl enable jenkins
sudo systemctl restart jenkins
sleep 10
sudo systemctl status jenkins --no-pager || echo "⚠️  Jenkins may still be starting up..."

# --- STEP 9: Verify Jenkins Web Interface ---
echo -e "\n[9/10] Checking Jenkins accessibility..."
MASTER_IP=$(hostname -I | awk '{print $1}')
echo "Jenkins should now be accessible at: http://$MASTER_IP:8080"

# --- STEP 10: Post-Upgrade Summary ---
echo -e "\n[10/10] Jenkins Upgrade Completed Successfully!"
echo "----------------------------------------------------------"
echo "✔ Jenkins upgraded to the latest LTS version."
echo "✔ Java updated to OpenJDK 21."
echo "✔ Backup stored at: $BACKUP_FILE"
echo "----------------------------------------------------------"
echo " Verify jobs, plugins, and agent connectivity via the Jenkins dashboard."
echo " Run a test pipeline to confirm everything works."
echo "=========================================================="
Benefits of This Jenkins Upgrade Process
This end-to-end Jenkins upgrade approach ensures zero data loss and no disruption to ongoing workloads. By backing up all Jenkins data and configurations before proceeding, administrators can safely upgrade to the latest LTS version while maintaining full control and rollback capability. The process also enhances security, performance, and compatibility by upgrading to the latest stable Jenkins and Java versions. Automating the entire workflow using the provided shell script minimizes manual errors and reduces downtime, ensuring a smooth, reliable upgrade experience for production environments.
Conclusion
By following this documented upgrade procedure, you can confidently upgrade your Jenkins Master on Ubuntu without impacting existing CI/CD pipelines or Kubernetes workloads. The process not only secures your Jenkins environment but also future-proofs it for upcoming releases. With proper backups, plugin checks, and agent validation, this approach provides a safe, automated, and repeatable method to keep Jenkins stable and up to date across enterprise or real-time production setups.
