
In modern DevOps practices, continuous integration and continuous delivery (CI/CD) are at the core of efficient software development. Jenkins, being one of the most popular automation servers, helps developers build, test, and deploy their code seamlessly. However, simply automating builds isn’t enough — teams also need real-time visibility into the results of these automated tasks. That’s where Jenkins email notifications come in. They play a crucial role in keeping developers and DevOps engineers updated about the build status — whether a build has succeeded, failed, or is unstable. With notifications, you don’t need to constantly monitor the Jenkins dashboard; instead, you get instant updates delivered right to your inbox.
Imagine pushing code to GitHub, triggering a Jenkins pipeline, and automatically receiving an email if something goes wrong. This saves time, reduces manual monitoring, and ensures faster issue resolution.
In this blog, we’ll go step-by-step through how to configure email notifications in Jenkins using Gmail SMTP, and demonstrate how to automatically send build result emails through a Declarative Pipeline. By the end, you’ll have a fully working setup that notifies your team after every Jenkins build — whether successful or failed — directly via email.
Prequisites
Before we start, make sure you have:
- Jenkins installed and running
- A Gmail account for sending notifications
- Basic understanding of Jenkins pipelines
- Jenkins Mailer and Email Extension plugins installed
Steps to configure Email Notification
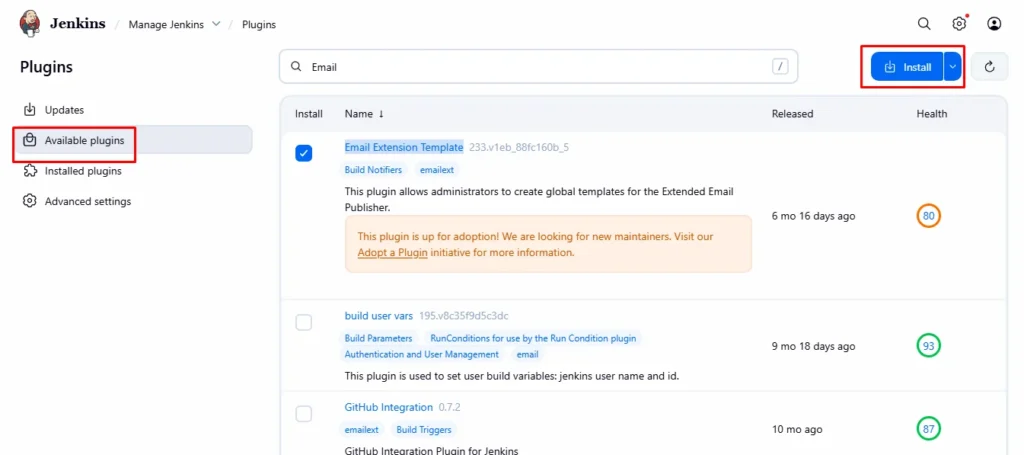
Step 1: Install Email Plugins in Jenkins
- Go to Jenkins Dashboard → Manage Jenkins → Plugins → Available plugins
- Search for and install the following:
- Mailer Plugin
- Email Extension Template Plugin (Email-ext)
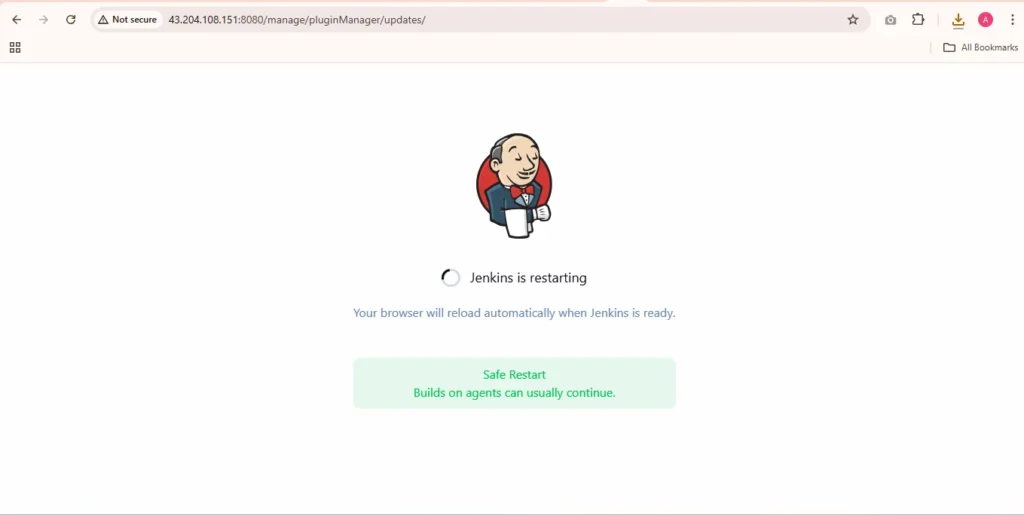
3.After installation, restart Jenkins.
Step 2: Configure Jenkins Email (SMTP Settings)
- Go to Manage Jenkins → Configure System
- Scroll to the section “Jenkins Location”
- Set your Jenkins URL (example:
http://localhost:8080/) - Add a valid System Admin e-mail address
- Set your Jenkins URL (example:
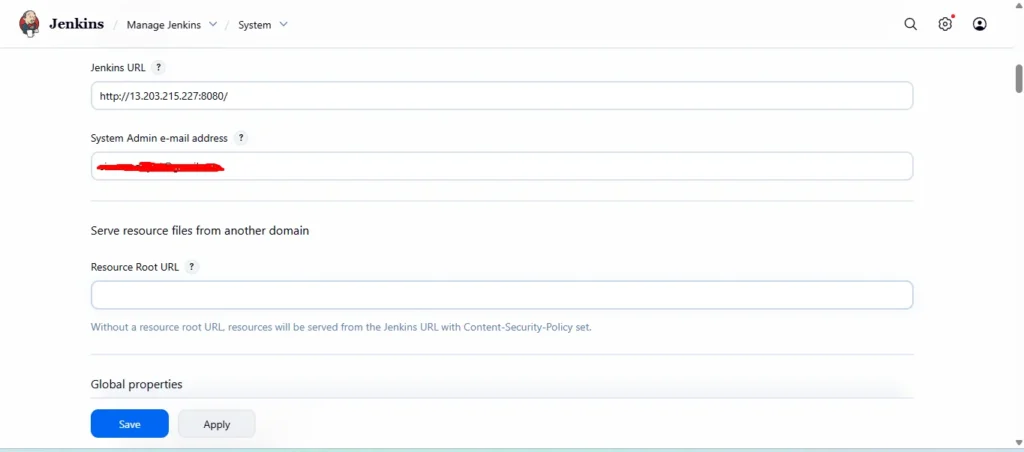
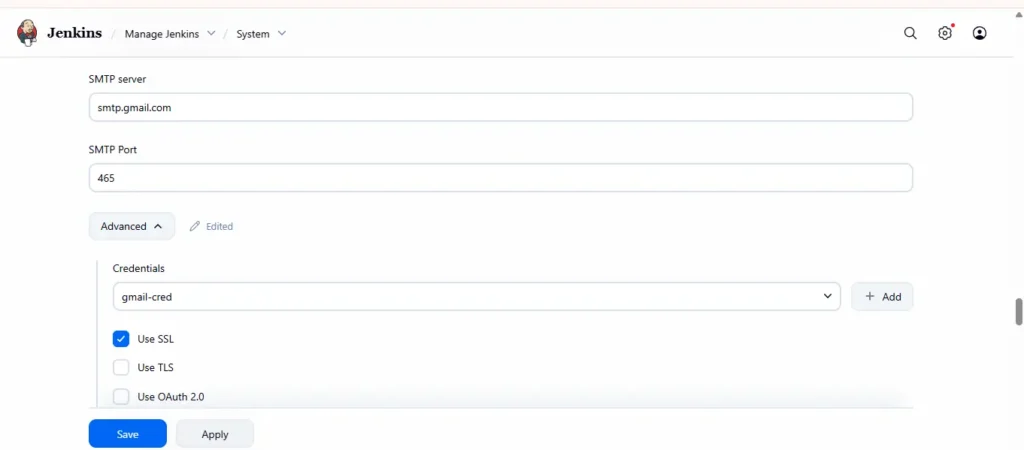
3. Scroll down to “Extended E-mail Notification” and configure the following:
- SMTP server:
smtp.gmail.com - Use SMTP Authentication:
- User name: your Gmail address (e.g.,
example@gmail.com) - Password: App Password (not your regular password; see below)
- Use SSL:
- SMTP Port:
465
Step 3: Generate Gmail App Password
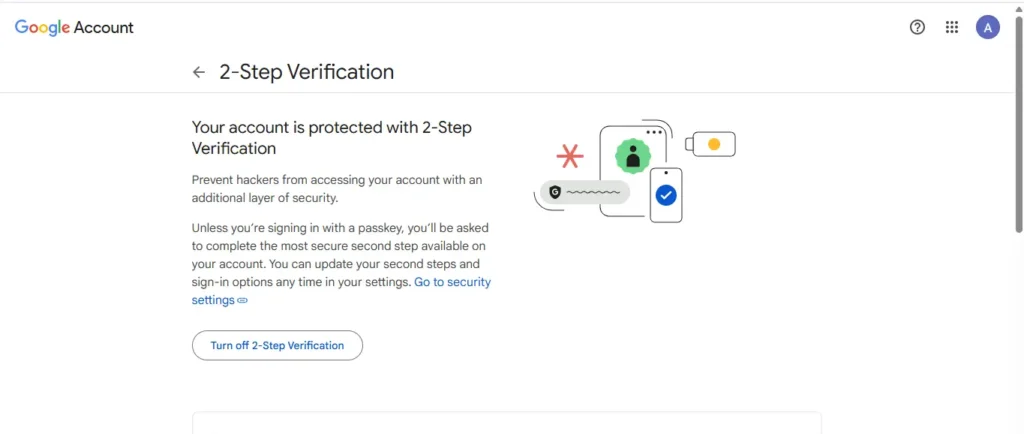
Gmail does not allow direct SMTP login with normal passwords if 2-Step Verification is enabled.
To generate an App Password:
- Go to your Google Account Security

2. Enable 2-Step Verification
3. Click App Passwords
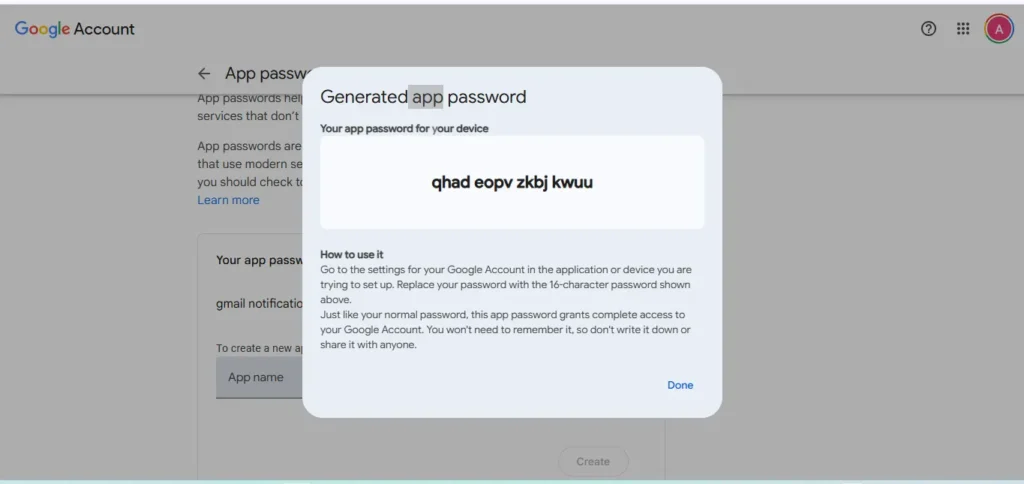
4. Choose “Mail” and “Other” → enter “Jenkins” → click Generate
5. Copy the 16-character password
6. Use this App Password in Jenkins’ SMTP configuration
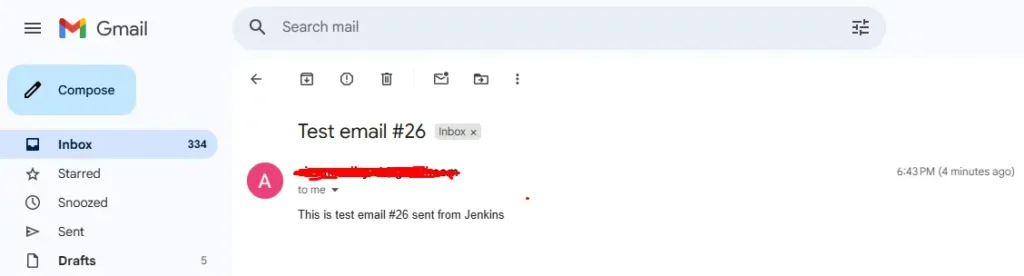
Click Test configuration to send a test email — you should receive it in your inbox.
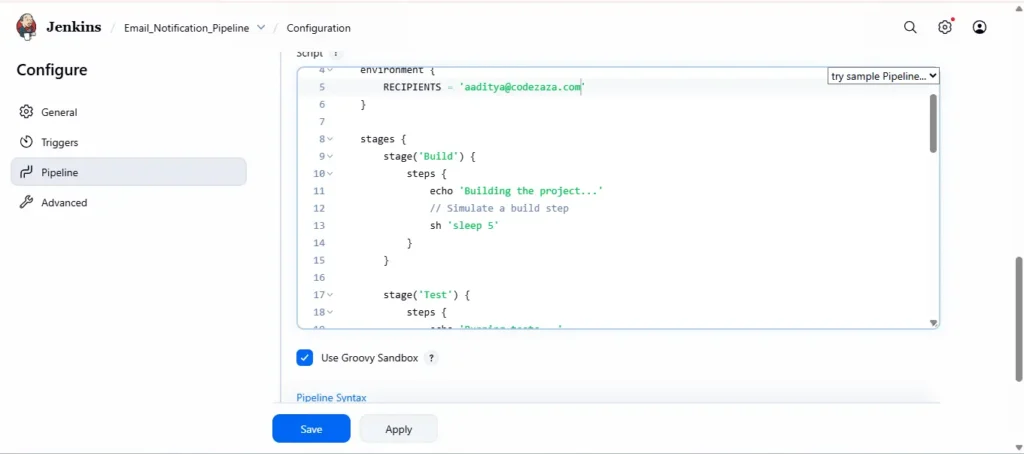
Step 4: Create Declarative Pipeline for Email Notifications
Now, let’s create a sample Jenkins Declarative Pipeline (Jenkinsfile) that sends emails after each build.
Example Jenkinsfile
pipeline {
    agent any

    environment {
        RECIPIENTS = 'team@codezaza.com'
    }

    stages {
        stage('Build') {
            steps {
                echo 'Building the project...'
                // Simulate a build step
                sh 'sleep 5'
            }
        }

        stage('Test') {
            steps {
                echo 'Running tests...'
                // Simulate test failure for demo
                sh 'exit 1'
            }
        }
    }

    post {
        success {
            emailext (
                to: "${RECIPIENTS}",
                subject: " Build SUCCESS: ${env.JOB_NAME} #${env.BUILD_NUMBER}",
                body: """
                <h3>Build Successful</h3>
                <p>Project: ${env.JOB_NAME}</p>
                <p>Build Number: ${env.BUILD_NUMBER}</p>
                <p>Check console output: <a href="${env.BUILD_URL}">${env.BUILD_URL}</a></p>
                """,
                mimeType: 'text/html'
            )
        }

        failure {
            emailext (
                to: "${RECIPIENTS}",
                subject: "❌ Build FAILED: ${env.JOB_NAME} #${env.BUILD_NUMBER}",
                body: """
                <h3>Build Failed</h3>
                <p>Project: ${env.JOB_NAME}</p>
                <p>Build Number: ${env.BUILD_NUMBER}</p>
                <p>Check console output: <a href="${env.BUILD_URL}">${env.BUILD_URL}</a></p>
                """,
                mimeType: 'text/html'
            )
        }

        always {
            echo 'Build finished — Email notification sent.'
        }
    }
}
Step 5: Create and Run Jenkins Pipeline Job
- Go to Jenkins Dashboard → New Item
- Choose Pipeline, give it a name (e.g.,
Email_Notification_Pipeline)
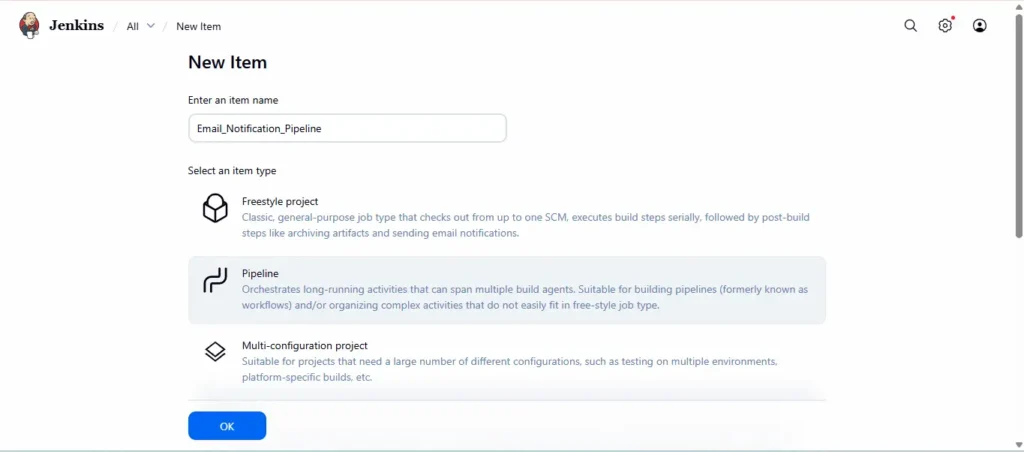
3. In the Pipeline section, paste the Jenkinsfile above
4. Click Save → Build Now
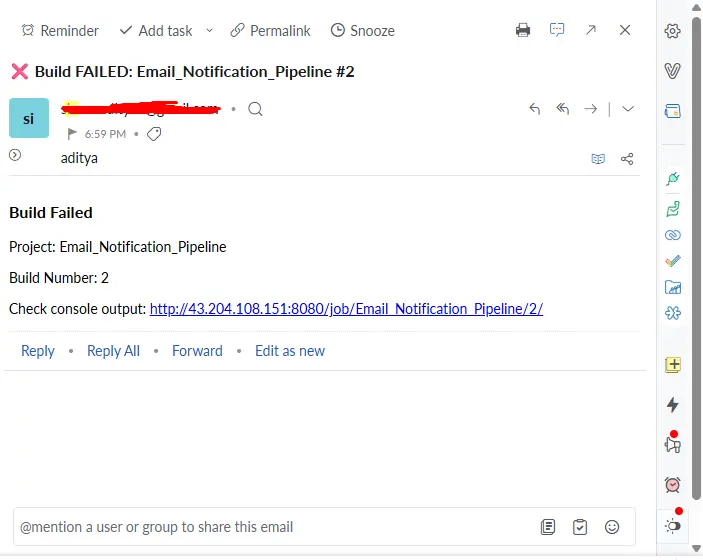
Once the build finishes, Jenkins will automatically send an email based on the build status (success or failure).
Step 6: Verify Email Notification
Open your Gmail inbox — you should see an email like this:
Benefits of Configuring Email Notifications in Jenkins
Integrating email notifications into your Jenkins CI/CD pipeline isn’t just a convenience — it’s a best practice that brings tangible benefits to your development and operations workflow. Here are the key advantages:
1. Immediate Feedback on Build Status
Email notifications keep your team informed in real-time about the results of builds. Whether a build succeeds, fails, or is unstable, developers don’t need to constantly check the Jenkins dashboard — they get instant updates directly in their inbox.
2. Faster Issue Resolution
By receiving alerts immediately after a build failure, developers can quickly investigate and resolve issues. This reduces downtime, prevents cascading failures, and ensures that production deployments remain stable.
3. Improved Team Collaboration
Automated emails serve as a central communication channel for the team. Everyone — from developers to QA engineers — stays on the same page regarding the current build status, which reduces misunderstandings and fosters smoother collaboration.
4. Enhanced Transparency and Accountability
Email notifications provide a clear record of build activities, including who triggered a build, which commit caused the failure, and when it happened. This helps in tracking progress, maintaining accountability, and auditing CI/CD processes.
5. Reduced Manual Monitoring
Manually checking Jenkins for build statuses is inefficient and prone to oversight. Email notifications automate this monitoring, allowing developers to focus on coding and testing rather than constantly refreshing Jenkins dashboards.
6. Customizable Alerts
Using the Email Extension plugin, you can customize notifications based on build outcomes, severity, or even specific branches. For example, you can configure emails to go only to the responsible developer if a build fails, making alerts more targeted and meaningful.
7. Integration with Other Tools
Email notifications can act as triggers for other workflows or tools. For example, an alert can prompt a Slack notification, a ticket in Jira, or a remediation script — creating an integrated DevOps ecosystem.
Conclusion
Configuring email notifications in Jenkins using Gmail SMTP and a Declarative Pipeline is one of the most effective ways to enhance visibility, communication, and accountability within your DevOps workflow. It transforms Jenkins from a simple automation tool into a proactive communication hub that keeps your team informed in real time.
By integrating Gmail SMTP and the Email Extension plugin, you can ensure that every build—whether successful or failed—triggers an automatic email with detailed insights. This helps developers and DevOps engineers act quickly on failures, reduce downtime, and maintain the reliability of the delivery pipeline.
Moreover, when you use Jenkins credentials management to securely store your Gmail App Password, you not only automate notifications but also follow best security practices. This keeps sensitive data safe while ensuring seamless communication.
In the long run, implementing automated email alerts brings measurable benefits: faster feedback loops, fewer manual checks, and better collaboration across the entire development lifecycle.
So, if you haven’t yet enabled email notifications in your Jenkins pipelines — now is the time! With just a few configuration steps and a properly designed Jenkinsfile, your CI/CD pipeline can become smarter, more transparent, and highly responsive to every build event.
