Argo CD is a tool that helps you automatically deliver applications to Kubernetes. It follows the GitOps method, which means it checks your Git repository and automatically updates your Kubernetes cluster whenever your code changes.
Kubernetes is used to run and manage containers. It:
- Starts your containers
- Restarts them if they fail
- Scales your application on different servers in your cluster
Kubernetes works best when it is part of a continuous delivery (CD) system. This means that whenever new code is merged, your application is automatically tested and deployed. This makes updates fast, consistent, and reliable.
In this blog, we will look at the main features of Argo CD and then use it to deploy a simple demo application.
What is Argo CD?
Argo CD is an open-source, declarative, GitOps-based continuous delivery tool for Kubernetes. It enables automated application deployment by syncing the desired state from a Git repository to a Kubernetes cluster.
Argo CD continuously monitors Git repositories and compares the actual cluster state to the declared configuration. When differences are detected, it can alert users or automatically apply changes to bring the system into the desired state.
Key features of Argo CD include:
- GitOps-based deployment – Uses Git as the single source of truth, enabling declarative configuration and automated syncing with Kubernetes clusters
- Declarative application definitions – Supports Helm, Kustomize, Jsonnet, and plain YAML to define and manage application manifests
- Automated synchronization – Automatically syncs Kubernetes resources with Git repositories, ensuring cluster state matches the desired state
- Real-time application status monitoring – Continuously monitors app health and sync status, with visual dashboards and diff views
- Role-based access control (RBAC) – Fine-grained access controls for managing user permissions across projects and environments
- Multi-cluster support – Manages deployments across multiple Kubernetes clusters from a single Argo CD instance
- Web UI and CLI– Provides a user-friendly web interface and CLI for managing applications, viewing diffs, and troubleshooting
Officially released in May 2019 by Intuit as part of the Argo project, Argo CD 1.0 was designed to enable GitOps-style continuous delivery on Kubernetes. Since then, it has become a core component in modern Kubernetes deployment workflows and is now part of the CNCF (Cloud Native Computing Foundation) ecosystem.
Argo CD core concepts
Argo CD is easy to learn once you understand its basic concepts. Here are the core elements of Argo CD architecture:
- Application controller – Argo’s Application Controller is the component you install in your cluster. It implements the Kubernetes controller pattern to monitor your applications and compare their state against their repositories.
- Application – An Argo application is a group of Kubernetes resources that collectively deploy your workload. Argo stores the details of applications in your cluster as instances of an included Custom Resource Definition (CRD).
- Live state – The live state is your application’s current state inside the cluster, such as the number of Pods created and the image they’re running.
- Target state – The target state is the version of the state declared by your Git repository. When the repository changes, Argo will apply actions that evolve the live state into the target state.
- Refresh – A refresh occurs when Argo fetches the target state from your repository. It compares the changes against the live state but doesn’t necessarily apply them at this stage.
- Sync – A Sync is the process of applying the changes discovered by a Refresh. Each Sync moves the cluster back toward the target state.
- API server – The Argo API server provides the REST and gRPC API interface used by the CLI, Web UI, and external integrations.
- Git repository – The Git repository acts as the single source of truth, storing declarative configurations for all applications and environments.
Now that we’ve covered the core concepts, we can deploy an example app to Kubernetes using Argo. The official docs explain Argo’s terminology and architecture
How does Argo CD work?
Argo CD is primarily used by DevOps engineers, platform teams, and Kubernetes administrators who need to manage application deployments in a GitOps-driven workflow.
The GitOps model is integral to Argo CD design. It makes the repository the single source of truth for your application’s desired state. Your repository should contain all the Kubernetes manifests, Kustomize templates, Helm charts, and config files your app needs. These resources “declare” what a successful deployment of your app looks like.
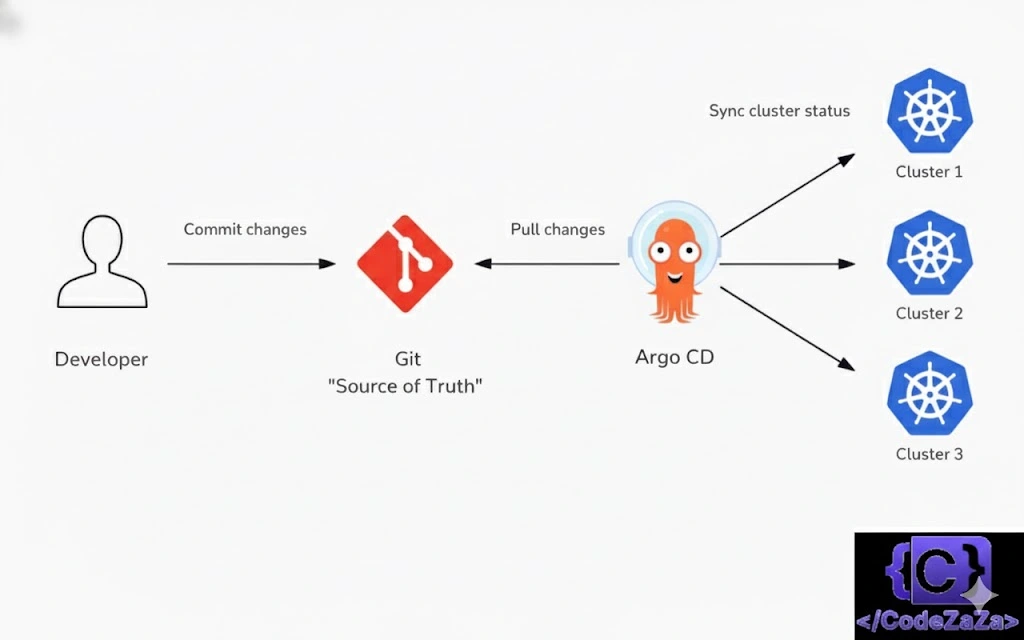
Argo compares the declared state with what’s actually running in your cluster and applies the correct changes to resolve any discrepancies. This process can be configured to run automatically, preventing your cluster from drifting away from your repository. Argo resynchronizes the state whenever differences occur, such as after you manually run Kubectl commands.
Argo comes with both a CLI and web UI. It supports multi-tenant and multi-cluster environments, integrates with SSO providers, produces an audit trail, and can implement complex rollout strategies such as canary deployments and blue/green upgrades. It also offers integrated rollbacks so you can recover quickly from deployment failures.
Push vs. pull-based CI/CD
Historically, most CI/CD implementations have relied on push-driven behavior. This requires connecting your cluster to your CI/CD platform and using tools like Kubectl and Helm within your pipeline to apply Kubernetes changes.
Argo CD is a pull-based CI/CD system. It runs inside your Kubernetes cluster and pulls source from your repositories. Argo then applies the changes for you without a manually configured pipeline.
This model is more secure than push-based workflows. You don’t have to expose your cluster’s API server or store Kubernetes credentials in your CI/CD platform. Compromising a source repository only gives an attacker access to your code instead of the code and a route to your live deployments.
Practical example: Using Argo CD to deploy to Kubernetes
Let’s use Argo to run a basic food application instance in Kubernetes. We’ll assume you already have access to a Kubernetes cluster and the Kubectl and Helm CLIs available on your machine.
Step 1. Create your app’s GitHub repository
First, head to GitHub and create a new repository for your app. Then, clone your repo to your machine, ready to commit your Kubernetes manifests:
$ git clone https://github.com/<username>/<repo>.gitCopy the following YAML and save it as deployment.yaml inside your repository:
apiVersion: apps/v1
kind: Deployment
metadata:
  name: food-app
  namespace: argo-demo
  labels:
    app.kubernetes.io/name: food-app
spec:
  replicas: 3
  selector:
    matchLabels:
      app.kubernetes.io/name: food-app
  template:
    metadata:
      labels:
        app.kubernetes.io/name: food-app
    spec:
      containers:
      - name: food-app
        image: aadityasirsam/foodapplication:v1
        ports:
          - name: tcp
            containerPort: 8000
~
It defines a basic Kubernetes Deployment object that runs three food-app replicas.
Next, copy this second YAML file and save it to service.yaml. It sets up a LoadBalancer service to expose your Deployment outside your cluster:
apiVersion: v1
kind: Service
metadata:
  name: food-app
  namespace: argo-demo
spec:
  type: LoadBalancer
  selector:
    app.kubernetes.io/name: food-app
  ports:
    - protocol: TCP
      port: 80
      targetPort: http
Finally, add a manifest that will create your application’s namespace:
apiVersion: v1
kind: Namespace
metadata:
  name: argo-demo
Commit your changes to your repository, then push them up to GitHub:
$ git add .
$ git commit -m "Added initial Kubernetes YAML files"
$ git push
You’re ready to install Argo and start deploying your app.

Step 2. Install the Argo CLI
Argo’s CLI lets you interact with your applications from your terminal. You’ll need it later to register your app with your Argo instance.
You can download the latest CLI release from GitHub. Select the right binary for your platform, then make it executable and move it to a location in your path. The following steps work for most Linux systems – substitute the latest version number instead of 2.6.1 below, first:
$wget https://github.com/argoproj/argo-cd/releases/download/$VERSION/argocd-linux-amd64
chmod +x argocd-linux-amd64
sudo mv argocd-linux-amd64 /usr/local/bin/argocd
Check you can now run argocd commands:
$ argocd version --client
argocd: v3.2.0+66b2f30
  BuildDate: 2025-11-04T15:21:01Z
  GitCommit: 66b2f302d91a42cc151808da0eec0846bbe1062c
  GitTreeState: clean
  GoVersion: go1.25.0
  Compiler: gc
  Platform: linux/amd64
The CLI’s also distributed in Homebrew’s package list. Use the brew install command to add argocd to your system using this method:
$ brew install argocdStep 3. Install Argo in your cluster
Next, install Argo in your Kubernetes cluster. This will add the Argo CD API, controller, and Custom Resource Definitions (CRDs).
Begin by creating a namespace for Argo:
$ kubectl create namespace argocd
namespace/argocd created
Next, use Kubectl to apply Argo CD’s YAML manifest to your cluster. You can inspect the manifest before you use it to see the resources that will be created.
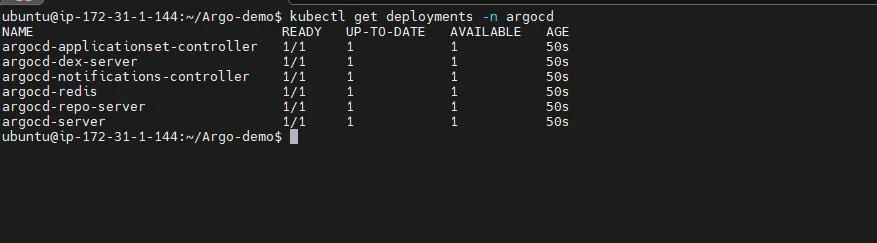
$ kubectl apply -n argocd -f https://raw.githubusercontent.com/argoproj/argo-cd/stable/manifests/install.yamlIt can take several seconds for all of Argo’s components to be running in your cluster. Monitor progress by using Kubectl to list the deployments in the argocd namespace.
You can continue once the deployments are ready:
Step 4. Connect to Argo
Argo CD doesn’t automatically expose its API server on an external IP. You can connect to it by starting a new Kubectl port-forwarding session instead. Open another terminal window and run the following command:
$ kubectl port-forward svc/argocd-server -n argocd 8080:443This redirects your local port 8080 to port 443 of Argo’s service. Visit localhost:8080 in your browser to access the Argo UI. You’ll be warned that the page is insecure because it uses a self-signed certificate.
You can continue with this setup while you’re experimenting, but you should follow the detailed steps in the Argo docs to configure TLS with an Ingress route before you move to production.

Before you can login, you need to retrieve the password for the default admin user. This is generated automatically during Argo’s installation process. You can access it by running the following argocd command:
$ argocd admin initial-password -n argocd
zHKv74zvDNtVMaOB
Use these credentials to log in to Argo.
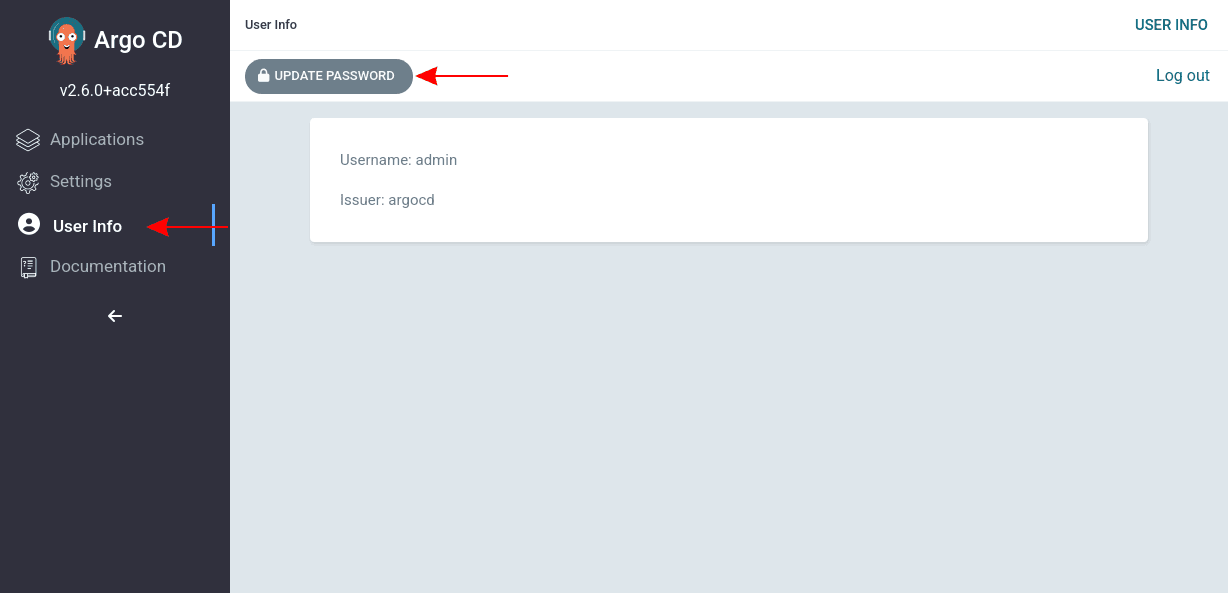
Once you’re in, head straight to the User Info item in the left sidebar, then click the “Update Password” button at the top of the screen. Follow the prompts to change your password to something unique.
Now you can delete the Kubernetes secret that contains the original password for the admin account:
$ kubectl delete secret argocd-initial-admin-secret -n argocd
secret "argocd-initial-admin-secret" deleted
Log in to the CLI
To log in to the Argo CLI, run argocd login and supply the API server’s URL as an argument:
$ argocd login localhost:8080Similar to the browser warning encountered above, you’ll be prompted to accept Argo’s built-in self-signed certificate if you haven’t configured your own TLS:
WARNING: server certificate had error: x509: certificate signed by unknown authority. Proceed insecurely (y/n)?Accept the prompt by typing y and pressing return. You’ll then be asked to enter your username and password. The CLI should successfully authenticate to your Argo instance:
'admin:login' logged in successfully
Context 'localhost:8080' updated
Step 5. Deploy your app
Everything’s ready to start deploying apps to Argo! First, run the following CLI command to register your app:
$ argocd app create argo-demo \
  --repo https://github.com/<username>/<repo>.git \
  --path . \
  --dest-server https://kubernetes.default.svc \
  --dest-namespace argo-demo
application 'argo-demo' created
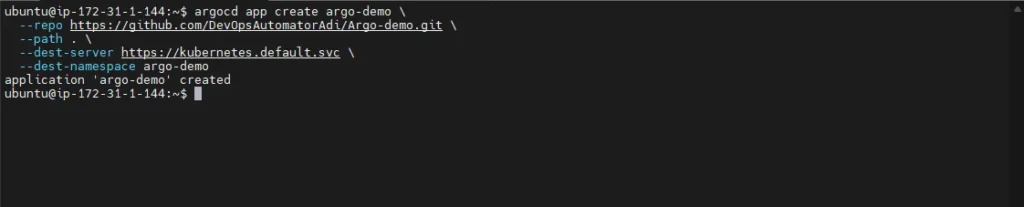
Let’s unpack what’s happening here:
- The
--repoflag specifies the URL of your Git repository. - The
--pathflag instructs Argo to search for Kubernetes manifests, Helm charts, and other deployable assets inside this path within your repo..is used here because the example manifests are stored in the repo’s root. - The
--dest-serverflag specifies the URL of the Kubernetes cluster to deploy to. You can usekubernetes.default.svcwhen you’re deploying to the same cluster that Argo’s running in. --dest-namespacesets the Kubernetes namespace that your app will be deployed into. This should match themetadata.namespacefields set on your resources.
Your app will now be registered with Argo. You can retrieve its details with the argocd app list command:
ubuntu@ip-172-31-1-144:~$ argocd app list
NAME              CLUSTER                         NAMESPACE  PROJECT  STATUS     HEALTH   SYNCPOLICY  CONDITIONS  REPO                                                 PATH  TARGET
argocd/argo-demo  https://kubernetes.default.svc  argo-demo  default  OutOfSync  Missing  Manual      <none>      https://github.com/<username>/Argo-demo.git  .
ubuntu@ip-172-31-1-144:~$
The app also shows up in the Argo UI:
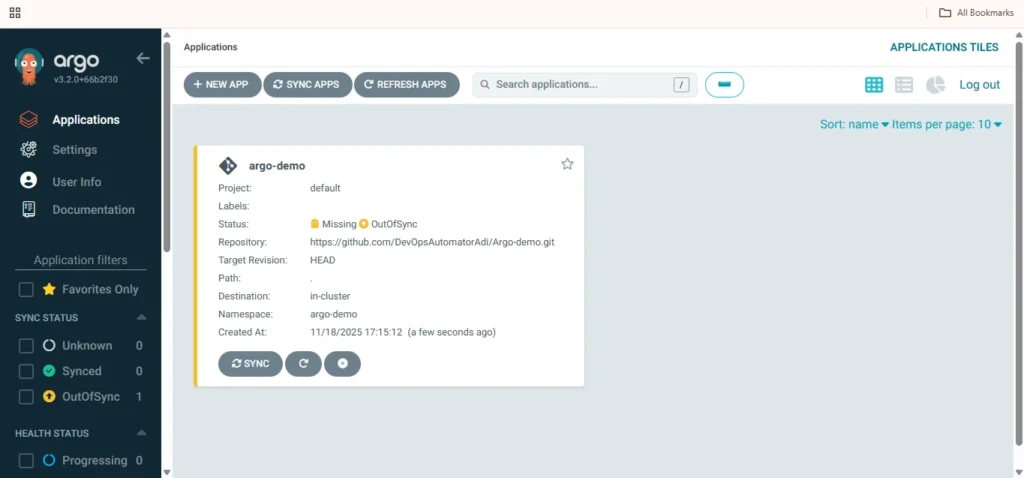
Your first sync
The app shows as “missing” and “out of sync.” Creating the app doesn’t automatically sync it into your cluster. Perform a sync now to have Argo apply the target state currently defined by your repo’s content:
ubuntu@ip-172-31-1-144:~$ argocd app sync argo-demo
TIMESTAMP                  GROUP                KIND   NAMESPACE                  NAME    STATUS    HEALTH        HOOK  MESSAGE
2025-11-18T11:56:52+00:00  kind.x-k8s.io     Cluster   argo-demo                        OutOfSync  Missing

Name:               argocd/argo-demo
Project:            default
Server:             https://kubernetes.default.svc
Namespace:          argo-demo
URL:                https://localhost:8080/applications/argo-demo
Source:
- Repo:             https://github.com/<username>/Argo-demo.git
  Target:
  Path:             .
SyncWindow:         Sync Allowed
Sync Policy:        Manual
Sync Status:        Synced to  (4ec1ec6)
Health Status:      Healthy

Operation:          Sync
Sync Revision:      4ec1ec6b229b3106fc0803255c6a9f4c5f8155c1
Phase:              Succeeded
Start:              2025-11-18 11:56:52 +0000 UTC
Finished:           2025-11-18 11:56:53 +0000 UTC
Duration:           1s
Message:            successfully synced (no more tasks)
ubuntu@ip-172-31-1-144:~$
The sync results display in your terminal. You should see the Namespace, Service, and Deployment objects all get synced into your cluster, as in the command output above. The messages for all three objects confirm they were created successfully.
Repeat the apps list command to check the app’s new status:
$ ubuntu@ip-172-31-1-144:~$ argocd app list
NAME              CLUSTER                         NAMESPACE  PROJECT  STATUS  HEALTH   SYNCPOLICY  CONDITIONS  REPO                                                 PATH  TARGET
argocd/argo-demo  https://kubernetes.default.svc  argo-demo  default  Synced  Healthy  Manual      <none>      https://github.com/<username>/Argo-demo.git  .
ubuntu@ip-172-31-1-144:~$
Now the app is Synced and Healthy! It’s also green in the Argo UI:

As a final proof, use Kubectl to inspect the deployments in the app’s namespace. This should confirm that food-app is up and running three replicas:
$  kubectl get deployment -n argo-demo
NAME       READY   UP-TO-DATE   AVAILABLE   AGE
food-app   3/3     3            3           3m5s
Step 6. Sync app updates
Now let’s make a change to our app. Modify the spec.replicas field in your deployment.yaml so there are now five Pods in the Deployment:
apiVersion: apps/v1
kind: Deployment
metadata:
  name: food-app
  namespace: argo-demo
  labels:
    app.kubernetes.io/name: food-app
spec:
  replicas: 5
  ...
Commit and push your changes:
$ git add .
$ git commit -m "Run 5 replicas"
$ git push
Next, repeat the argocd app sync command to apply your changes to your cluster.
Alternatively, you can click the “Sync” button within the user interface.
Argo refreshes your app’s target state from the repo, then takes action to transition the live state. The Deployment is reconfigured and now runs five Pods:
$  kubectl get deployment -n argo-demo
NAME       READY   UP-TO-DATE   AVAILABLE   AGE
food-app   7/7     7            7           9m49s
Enabling auto-sync
The change to five replicas didn’t apply until you repeated the sync command. Argo can automatically sync changes from your repo though, eliminating the need to issue the command each time. This fully automates your delivery workflow.
You can activate auto-sync for an app by clicking the “App Details” button within the user interface, scrolling down to the “Sync Policy” section, and clicking the “Enable Auto-Sync” button.
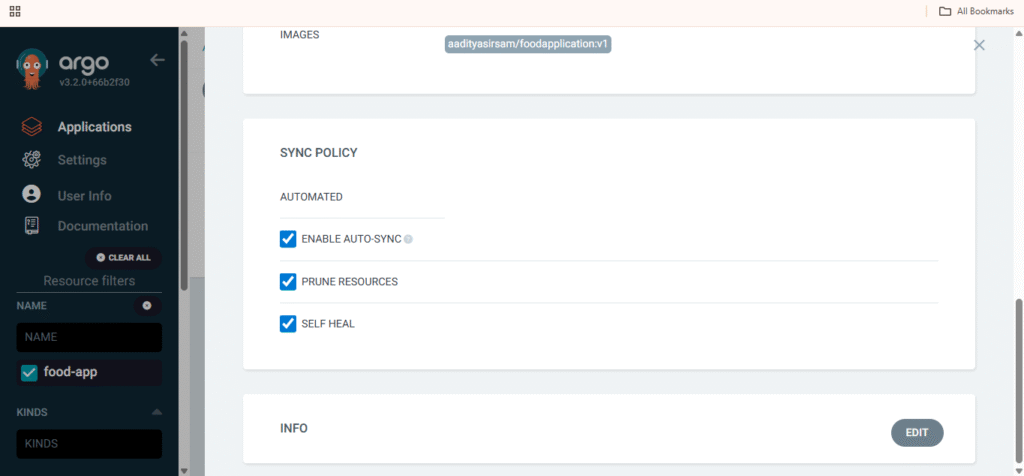
Auto-sync can also be enabled using the CLI by running the following command:
$ argocd app set argo-demo --sync-policy automatedTo test auto-sync out, revert the spec.replicas field back to three replicas:
apiVersion: apps/v1
kind: Deployment
metadata:
  name: food-app
  namespace: argo-demo
  labels:
    app.kubernetes.io/name: food-app
spec:
  replicas: 3
  ...
Commit and push the change:
$ git add .
$ git commit -m "Back to 3 replicas"
$ git push
This time Argo will automatically detect the repository’s state change. You should see your Deployment scale back to three replicas within a few minutes of pushing the commit:
$  kubectl get deployment -n argo-demo
NAME       READY   UP-TO-DATE   AVAILABLE   AGE
food-app   3/3     3            3           12m
Auto-sync runs every three minutes by default. If you need more frequent deployments, you can modify Argo’s config map to change this value.
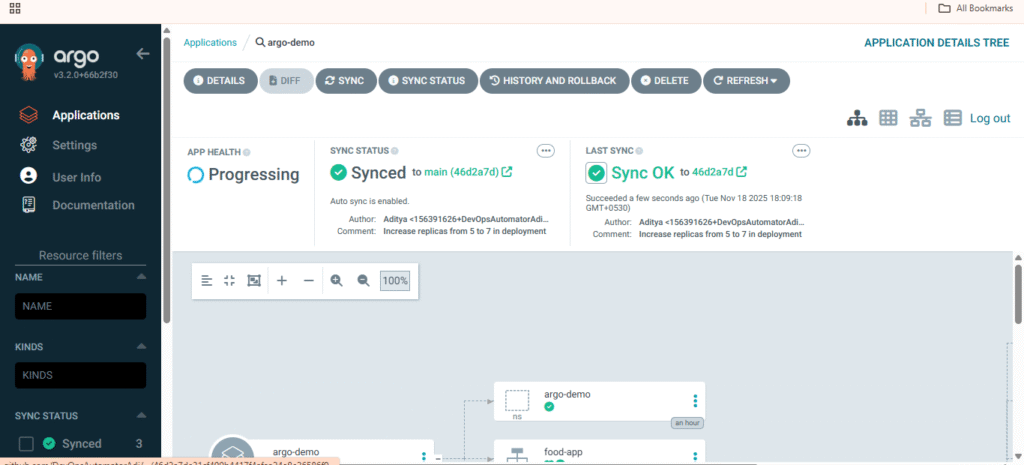
Step 7. Manage your app
Argo’s CLI and web app offer extensive options for managing and monitoring your deployments. These are outside the scope of this beginner’s tutorial, but you can start exploring the CLI commands and UI panels to take control of your app. Most features are implemented in both interfaces.
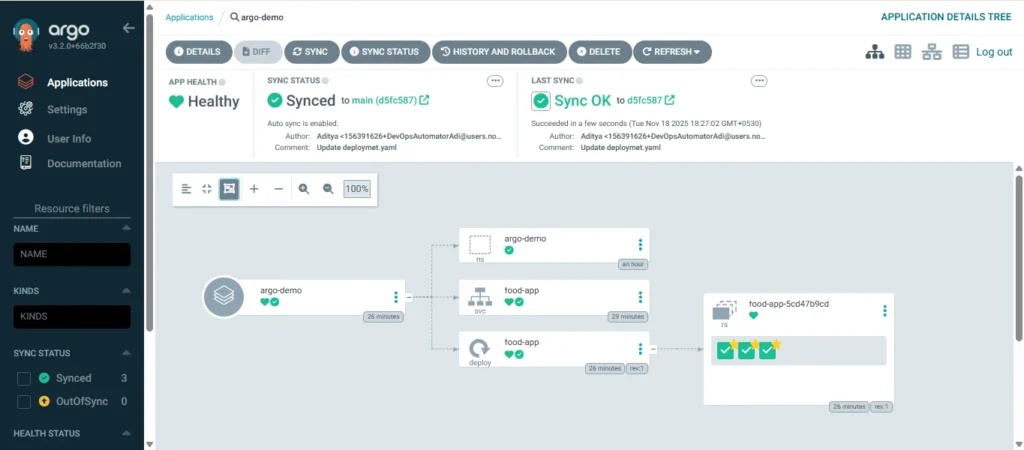
Clicking your app’s tile from the home screen displays an overview that visualizes its components with their current sync and health states. By clicking the “App Details” button at the top left, you can view the app’s details, edit its config, and view events that describe Argo’s activity.
You can access previous deployments via the “History and Rollback” button. This button lists all the syncs that Argo has performed, including an option to restore an older version. If a deployment introduces a bug, you can use this screen to roll back before pushing a fix to your repo.
Best practices for using Argo CD
Here are some of the best practices to keep in mind when working with Argo CD:
- Use ApplicationSets for dynamic app management – Leverage ApplicationSets to automate the deployment of multiple similar apps (e.g., per tenant or per cluster) from templates, reducing boilerplate and manual updates.
- Pin Argo CD versions and CRDs – Avoid auto-upgrading Argo CD or its custom resource definitions; pin versions explicitly to prevent breaking changes or unexpected behaviors in production.
Use the app-of-apps pattern for hierarchical management – Manage large-scale deployments using an “app of apps” model, where a root application defines and manages multiple child applications for better modularity. - Apply resource exclusions and ignore differences – Configure resource exclusions or diff settings (e.g., ignore
statusfields or ephemeral annotations) to prevent false-positive drift detections. - Tag and label applications for automation and auditing – Use consistent metadata (labels/annotations) on Argo CD apps to enable automated filtering, reporting, or lifecycle management.
- Run Argo CD in a dedicated namespace or cluster – Isolate Argo CD to a specific namespace or cluster to simplify access control, avoid conflicts, and improve operational clarity.
Conclusion:
Argo CD simplifies Kubernetes application deployment by implementing GitOps principles, ensuring your cluster’s state always matches your repository. With automated syncing, real-time monitoring, and multi-cluster support, it enables fast, reliable, and secure continuous delivery. By following best practices like using ApplicationSets, the app-of-apps pattern, and version pinning, teams can scale their deployments confidently while reducing manual errors. Whether you’re a DevOps engineer or Kubernetes administrator, Argo CD is a powerful tool to streamline deployment workflows and maintain robust application management.
