Introduction
Manual Docker builds often cause inconsistent image versions and deployment errors. Developers may forget to test containers before pushing them to a registry. As a result, production environments become unstable.
In this guide, you will learn how to automate Docker image building, testing, and pushing using GitLab CI/CD and an AWS EC2 instance.
By the end of this tutorial, you will have:
- A multi-stage Dockerfile
- A GitLab CI/CD pipeline
- Automated container testing
- Images pushed automatically to GitLab Container Registry
Let’s get started.
Launch an EC2 Instance
First, log in to your AWS account and launch a new EC2 instance.
Choose:
- Ubuntu 24.04 LTS
- t3.micro (recommended)
- At least 15GB storage
Next, configure the security group:
- Allow SSH (Port 22)
- Allow Port 3000 (for testing the app)
After that, connect to your server:
ssh -i your-key.pem ubuntu@your-ec2-public-ipInstall Docker on EC2
Now update the system and install Docker:
sudo apt update
sudo apt install docker.io -y
Then enable and start Docker:
sudo systemctl enable docker
sudo systemctl start docker
Finally, add the ubuntu user to the Docker group:
sudo usermod -aG docker ubuntuLog out and log back in. Then verify installation:
docker run hello-worldIf you see a success message, Docker is working correctly.
Install GitLab Runner
Next, install GitLab Runner on the EC2 instance:
curl -fsSL https://packages.gitlab.com/install/repositories/runner/gitlab-runner/script.deb.sh | sudo bash
sudo apt install gitlab-runner -y
Check the version:
gitlab-runner --versionRegister the Runner
Go to:
GitLab → Project → Settings → CI/CD → Runners
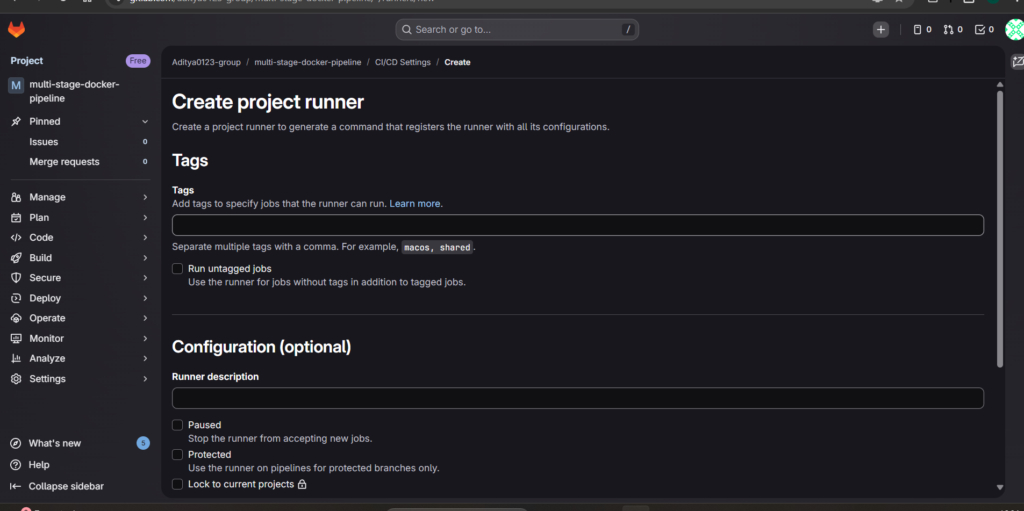
Create a new project runner. Copy the provided registration command.
Now run it on EC2:
sudo gitlab-runner registerWhen prompted:
- Enter GitLab URL:
https://gitlab.com - Write the authentication token
- Choose executor:
docker - Default image:
docker:latest
Install and start the runner service:
sudo gitlab-runner install --user=ubuntu --working-directory=/home/ubuntu
sudo gitlab-runner start
Make sure the runner shows Online in GitLab.
Make a Sample Node.js Application
Create a new project folder:
mkdir multi-stage-docker-pipeline
cd multi-stage-docker-pipeline
Make app.js:
const express = require("express");
const path = require("path");
const app = express();

app.use(express.static(path.join(__dirname, "public")));

app.listen(3000, () => {
  console.log("Server running on port 3000");
});
Create package.json:
{
  "name": "multi-stage-docker-pipeline",
  "version": "1.0.0",
  "scripts": {
    "start": "node app.js"
  },
  "dependencies": {
    "express": "^4.18.2"
  }
}
Then create a public/index.html file for the website UI.
Create a Multi-Stage Dockerfile
Create a file named Dockerfile:
# Stage 1: Build
FROM node:18-alpine AS build

WORKDIR /app
COPY package*.json ./
RUN npm install
COPY . .

# Stage 2: Production
FROM node:18-alpine

WORKDIR /app
COPY --from=build /app /app

EXPOSE 3000
CMD ["npm", "start"]
This Dockerfile reduces image size by separating build and production stages.
Test the Docker Image Manually
Build the image:
docker build -t test-app .
Run the container:
docker run -p 3000:3000 test-appVisit:
http://your-ec2-ip:3000
If the website loads, your Docker setup is correct.
Create the GitLab CI/CD Pipeline
Now create .gitlab-ci.yml:
image: docker:latest

services:
  - docker:dind

variables:
  DOCKER_TLS_CERTDIR: ""
  DOCKER_DRIVER: overlay2

stages:
  - build
  - test
  - push

build_image:
  stage: build
  script:
    - docker build -t my-app:$CI_COMMIT_SHORT_SHA .
    - docker save my-app:$CI_COMMIT_SHORT_SHA -o image.tar
  artifacts:
    paths:
      - image.tar

test_container:
  stage: test
  dependencies:
    - build_image
  script:
    - docker load -i image.tar
    - docker run -d --name test-container my-app:$CI_COMMIT_SHORT_SHA
    - sleep 5
    - docker stop test-container
    - docker rm test-container

push_image:
  stage: push
  dependencies:
    - build_image
  script:
    - docker load -i image.tar
    - docker tag my-app:$CI_COMMIT_SHORT_SHA $CI_REGISTRY_IMAGE:$CI_COMMIT_SHORT_SHA
    - echo "$CI_REGISTRY_PASSWORD" | docker login -u "$CI_REGISTRY_USER" --password-stdin $CI_REGISTRY
    - docker push $CI_REGISTRY_IMAGE:$CI_COMMIT_SHORT_SHA
Push the Code
Initialize Git and push the project:
git init
git add .
git commit -m "Initial commit"
git remote add origin https://gitlab.com/your-username/project.git
git push -u origin main
Once you push, GitLab automatically triggers the pipeline.
Verify Container Registry
After the pipeline succeeds:
Go to:
GitLab → Deploy → Container Registry
You should see your Docker image tagged with the commit SHA.
Conclusion
Automation improves reliability. Therefore, every modern DevOps workflow should include a CI/CD pipeline.
By combining Docker, GitLab CI/CD, and AWS EC2, you created a production-ready automated build system.
You can extend this project further by:
- Adding staging and production environments
- Implementing automatic deployment
- Using semantic versioning
- Adding monitoring and health checks
