
Managing infrastructure across multiple environments—development, staging, and production—is a fundamental challenge in modern DevOps. Organizations often struggle with maintaining separate infrastructure codebases for each environment, leading to code duplication, inconsistencies, and increased maintenance overhead. Terraform workspaces provide an elegant solution by enabling teams to manage multiple environments using a single configuration while maintaining complete isolation between them. This guide covers everything you need to know about Terraform workspaces, from basic concepts to production-ready implementation strategies.
Understanding Terraform Workspaces
Terraform workspaces allow you to maintain multiple instances of state data for the same configuration. Think of workspaces as separate “universes” for your infrastructure—each workspace operates independently with its own state file, yet they all share the same underlying infrastructure code. This approach follows the DRY (Don’t Repeat Yourself) principle, enabling you to write your infrastructure definition once and deploy it across multiple environments.
When you initialize any Terraform project using terraform init, you automatically start in a workspace called “default.” The real power emerges when you create additional workspaces for different environments. Each workspace maintains its own state file, which tracks what infrastructure currently exists. This separation ensures that actions taken in your development workspace have no impact on your production workspace.
The architectural beauty of workspaces lies in their simplicity. Instead of duplicating your entire Terraform codebase for each environment, you write a single set of configuration files that intelligently adapt based on the active workspace. Terraform provides a built-in variable called terraform.workspace that contains the current workspace name, allowing your code to make environment-specific decisions dynamically.
Key benefits of using workspaces:
- Eliminates code duplication: Maintain one codebase instead of multiple separate directories
- Ensures consistency: All environments use the same infrastructure patterns
- Reduces maintenance: Updates automatically apply across all environments
- Simplifies version control: Single repository tracks all environment configurations
- Accelerates deployment: New environments can be created instantly
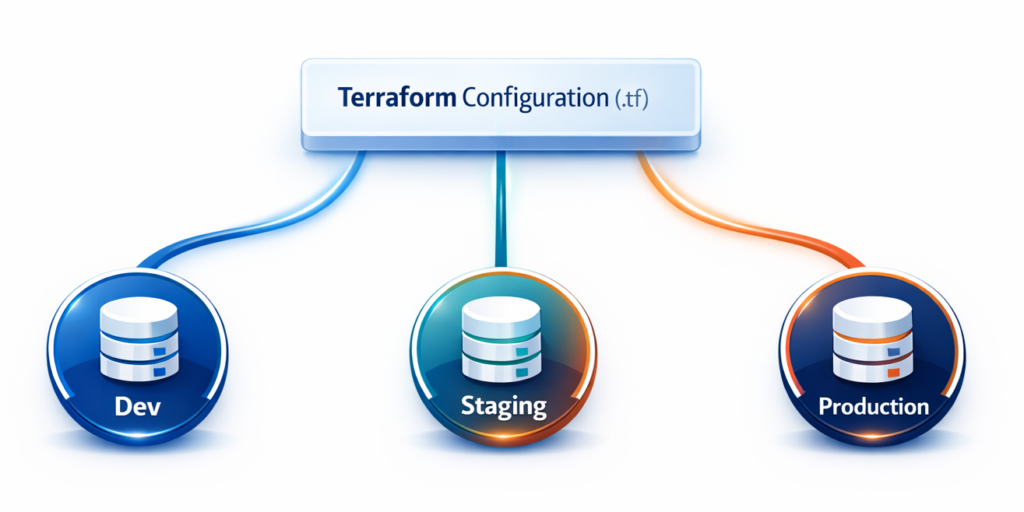
To illustrate with a real example: without workspaces, you would create three separate directories—terraform-dev/, terraform-staging/, and terraform-production/—each containing nearly identical code. Any infrastructure changes require updating all three directories, risking inconsistencies. With workspaces, you maintain a single terraform/ directory and switch between environments using simple commands, ensuring your infrastructure definitions remain consistent while environment-specific parameters adapt automatically.
Managing Development, Staging, and Production Environments
The journey from development to production involves multiple stages with distinct requirements. Development environments need to be cost-effective and quick to provision for testing. Staging environments must closely mirror production for realistic testing, though at reduced scale. Production environments demand high availability, robust monitoring, and enterprise-grade resources. Terraform workspaces excel at managing these varying requirements through intelligent configuration patterns.
The key to effective multi-environment management lies in using environment-specific configurations. Rather than scattering conditional logic throughout your code, define all environment configurations in a structured map, then select the appropriate configuration based on the current workspace. This keeps your code clean, maintainable, and easy to understand.
Consider an API server deployment where development needs minimal resources, staging requires moderate resources, and production demands robust infrastructure. Here’s a practical implementation:
# Define environment configurations
locals {
  environment_config = {
    dev = {
      instance_type     = "t3.micro"
      instance_count    = 1
      db_instance_class = "db.t3.micro"
      enable_monitoring = false
    }
    staging = {
      instance_type     = "t3.small"
      instance_count    = 2
      db_instance_class = "db.t3.small"
      enable_monitoring = true
    }
    prod = {
      instance_type     = "t3.large"
      instance_count    = 3
      db_instance_class = "db.r5.large"
      enable_monitoring = true
    }
  }

  config = local.environment_config[terraform.workspace]
}

# Use the configuration
resource "aws_instance" "app_server" {
  count         = local.config.instance_count
  instance_type = local.config.instance_type

  tags = {
    Name        = "${terraform.workspace}-api-server-${count.index + 1}"
    Environment = terraform.workspace
  }
}
This configuration centralizes all environment-specific values in the environment_config map. The code uses terraform.workspace to automatically select the appropriate configuration—no manual intervention when switching environments. Resource naming incorporates the workspace name, making resources immediately identifiable in your cloud console.
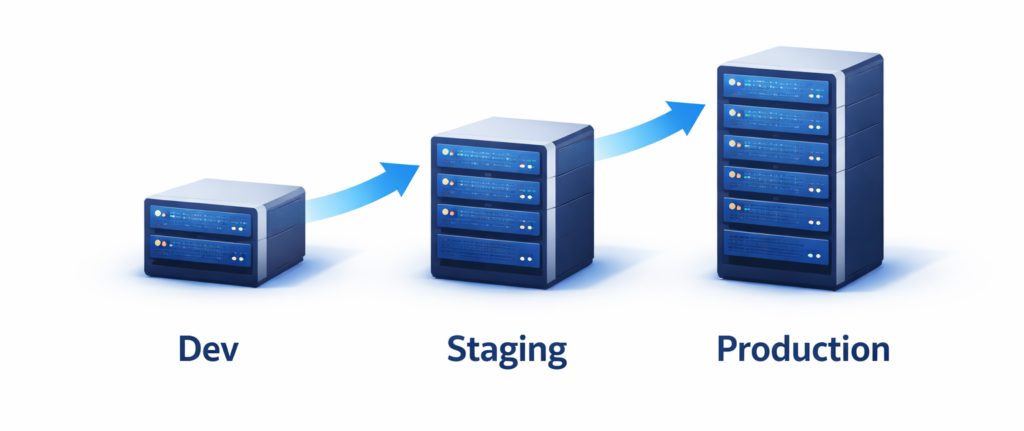
When working on a new feature, switch to the dev workspace and apply changes—the code deploys one small instance. After testing, switch to staging and apply the same code—two medium instances deploy automatically. Finally, after QA approval, switch to production and deploy three large instances. Same code, different scales, zero duplication.
Essential Workspace Commands and Operations
Understanding workspace commands is fundamental to your daily Terraform workflow. These commands enable you to seamlessly switch between environments, track your current location, and manage workspace lifecycles. While straightforward, understanding when and how to use them—and how to avoid common pitfalls—separates novice users from experienced practitioners.
Creating a new workspace initializes a fresh workspace with an empty state file:
terraform workspace new dev
# Output: Created and switched to workspace "dev"!

terraform workspace new staging
terraform workspace new prod
Listing workspaces shows all available workspaces with an asterisk marking your current workspace:
terraform workspace list
# Output:
#   default
# * dev
#   staging
#   prod
Switching between workspaces changes your active workspace. Always verify before making changes:
terraform workspace select staging
# Output: Switched to workspace "staging"
Viewing current workspace displays the active workspace—perfect for scripting:
terraform workspace show
# Output: staging
Deleting a workspace requires the workspace to be empty of resources:
terraform workspace select dev
terraform destroy  # First destroy all resources

terraform workspace select staging
terraform workspace delete dev
# Output: Deleted workspace "dev"!
Critical safety practice: Always verify your current workspace before running terraform apply. Many infrastructure disasters occur because someone deployed to the wrong environment:
# Safe workflow
echo "Current workspace: $(terraform workspace show)"
terraform plan
# Review the plan carefully
terraform apply
Many teams add workspace verification to their shell prompts or create wrapper scripts that prominently display the current workspace, preventing accidental deployments.
Environment Isolation and State Management
Environment isolation is the cornerstone of safe multi-environment infrastructure management. Without proper isolation, changes intended for development could accidentally affect production, causing outages or data loss. Terraform workspaces provide robust isolation through separate state files, but understanding how this works—and how to enhance it—is essential for production-grade management.
Workspace isolation operates through state file separation. Terraform’s state file tracks every resource it manages. When you switch workspaces, Terraform completely changes which state file it uses, meaning operations in one workspace cannot see or affect other workspaces’ resources.
In local setups, workspace state files are stored in a clear directory structure:
my-project/
├── main.tf
├── variables.tf
└── terraform.tfstate.d/
    ├── dev/terraform.tfstate
    ├── staging/terraform.tfstate
    └── prod/terraform.tfstate
With remote backends like S3, states are stored with workspace prefixes:
s3://my-terraform-state/
├── terraform.tfstate              # default workspace
├── env:/dev/terraform.tfstate
├── env:/staging/terraform.tfstate
└── env:/prod/terraform.tfstate
Configure S3 backend for workspace state management:
terraform {
  backend "s3" {
    bucket = "mycompany-terraform-state"
    key    = "infrastructure/terraform.tfstate"
    region = "us-east-1"

    dynamodb_table = "terraform-state-locks"
    encrypt        = true
  }
}
Enhanced isolation strategies for production:
Separate cloud accounts: Use different AWS accounts for each environment. This provides the strongest isolation—development access cannot affect production:
provider "aws" {
  region = "us-east-1"
  assume_role {
    role_arn = terraform.workspace == "prod" ?
      "arn:aws:iam::999999999999:role/TerraformRole" :
      "arn:aws:iam::111111111111:role/TerraformRole"
  }
}
Distinct backends for critical environments: Use separate S3 buckets for maximum production isolation:
terraform {
  backend "s3" {
    bucket = "mycompany-terraform-prod-state"
    key    = "terraform.tfstate"
    region = "us-east-1"
    encrypt = true
    kms_key_id = "arn:aws:kms:us-east-1:999:key/prod-key"
  }
}
Access controls: Configure CI/CD pipelines with workspace-based permissions requiring manual approval for production deployments.
The combination of workspace state isolation with these enhanced strategies creates defense-in-depth for environment management. Even if one isolation layer fails, others remain to protect production.
Best Practices for Multi-Environment Setups
Building robust multi-environment infrastructure requires following proven patterns that prevent pitfalls and scale effectively. These practices represent collective wisdom from production experience across thousands of organizations.
Use Environment-Specific Variable Files
Extract all environment-specific values into dedicated .tfvars files rather than embedding them in your Terraform code. This makes environment differences immediately visible and allows non-experts to review configurations:
# dev.tfvars
aws_region        = "us-west-2"
instance_type     = "t3.micro"
instance_count    = 1
enable_monitoring = false

# staging.tfvars
aws_region        = "us-east-1"
instance_type     = "t3.small"
instance_count    = 2
enable_monitoring = true

# prod.tfvars
aws_region        = "us-east-1"
instance_type     = "t3.large"
instance_count    = 3
enable_monitoring = true
Deploy using the appropriate file:
terraform workspace select dev
terraform apply -var-file="dev.tfvars"
Implement Consistent Resource Naming
Prefix all resource names with the workspace name for instant identification:
resource "aws_instance" "web_server" {
  instance_type = var.instance_type

  tags = {
    Name        = "${terraform.workspace}-web-server-${count.index + 1}"
    Environment = terraform.workspace
  }
}

resource "aws_s3_bucket" "data" {
  bucket = "${terraform.workspace}-myapp-data"
}
This creates resources like dev-web-server-1, staging-web-server-1, prod-web-server-1, making the environment immediately obvious.
Add Workspace Validation
Prevent accidents by validating the workspace before operations:
locals {
  valid_workspaces = ["dev", "staging", "prod"]
}

resource "null_resource" "workspace_validation" {
  count = contains(local.valid_workspaces, terraform.workspace) ? 0 : 1

  provisioner "local-exec" {
    command = "echo 'Invalid workspace: ${terraform.workspace}' && exit 1"
  }
}
Automate Workspace Selection in CI/CD
Never trust manual workspace selection. Automate it based on Git branches:
# GitHub Actions example
- name: Determine Workspace
  id: workspace
  run: |
    if [[ "${{ github.ref }}" == "refs/heads/main" ]]; then
      echo "workspace=prod" >> $GITHUB_OUTPUT
    elif [[ "${{ github.ref }}" == "refs/heads/staging" ]]; then
      echo "workspace=staging" >> $GITHUB_OUTPUT
    else
      echo "workspace=dev" >> $GITHUB_OUTPUT
    fi

- name: Select Workspace
  run: |
    terraform workspace select ${{ steps.workspace.outputs.workspace }} || \
    terraform workspace new ${{ steps.workspace.outputs.workspace }}

- name: Verify Workspace
  run: |
    CURRENT=$(terraform workspace show)
    EXPECTED="${{ steps.workspace.outputs.workspace }}"
    if [ "$CURRENT" != "$EXPECTED" ]; then
      echo "ERROR: Workspace mismatch!"
      exit 1
    fi
Document Your Strategy
Create a WORKSPACES.md file documenting your approach:
# Workspace Strategy

## Workspaces
- **dev**: Development environment, deploys automatically from `develop` branch
- **staging**: Pre-production testing, deploys from `staging` branch
- **prod**: Production, deploys from `main` with manual approval

## State Locations
- S3 bucket: s3://mycompany-terraform-state/
- Dev: env:/dev/terraform.tfstate
- Staging: env:/staging/terraform.tfstate
- Prod: env:/prod/terraform.tfstate

## Manual Deployment
```bash
terraform workspace select <workspace>
terraform plan -var-file="<workspace>.tfvars"
terraform apply -var-file="<workspace>.tfvars"
### Know When NOT to Use Workspaces

Avoid workspaces when:
- Managing completely different applications (use separate directories)
- Environments need drastically different infrastructure (code becomes too complex)
- You need different backend configurations per environment (use separate root modules)

## Real-World Implementation Example

Here's a complete, production-ready example bringing everything together:

```hcl
# variables.tf
variable "environment_config" {
  default = {
    dev = {
      instance_type    = "t3.micro"
      instance_count   = 1
      db_instance_class = "db.t3.micro"
      domain_suffix    = "dev.myapp.com"
      backup_retention = 1
    }
    staging = {
      instance_type    = "t3.small"
      instance_count   = 2
      db_instance_class = "db.t3.small"
      domain_suffix    = "staging.myapp.com"
      backup_retention = 3
    }
    prod = {
      instance_type    = "t3.large"
      instance_count   = 3
      db_instance_class = "db.r5.xlarge"
      domain_suffix    = "myapp.com"
      backup_retention = 7
    }
  }
}

locals {
  config = var.environment_config[terraform.workspace]
}

# main.tf
resource "aws_instance" "web" {
  count         = local.config.instance_count
  instance_type = local.config.instance_type
  ami           = data.aws_ami.ubuntu.id

  tags = {
    Name        = "${terraform.workspace}-web-${count.index + 1}"
    Environment = terraform.workspace
  }
}

resource "aws_db_instance" "main" {
  identifier              = "${terraform.workspace}-db"
  instance_class          = local.config.db_instance_class
  engine                  = "postgres"
  backup_retention_period = local.config.backup_retention

  tags = {
    Environment = terraform.workspace
  }
}

resource "aws_s3_bucket" "data" {
  bucket = "${terraform.workspace}-myapp-data"
}

# outputs.tf
output "application_url" {
  value = "https://${local.config.domain_suffix}"
}

output "web_servers" {
  value = aws_instance.web[*].public_ip
}
Deployment workflow:
# Deploy to development
terraform workspace select dev
terraform apply -var-file="dev.tfvars"
# Creates: 1 small instance, basic RDS, simple S3

# Deploy to staging after testing
terraform workspace select staging
terraform apply -var-file="staging.tfvars"
# Creates: 2 medium instances, better RDS, versioned S3

# Deploy to production after QA approval
terraform workspace select prod
terraform plan -var-file="prod.tfvars"  # Review carefully
terraform apply -var-file="prod.tfvars"
# Creates: 3 large instances, HA RDS, production S3
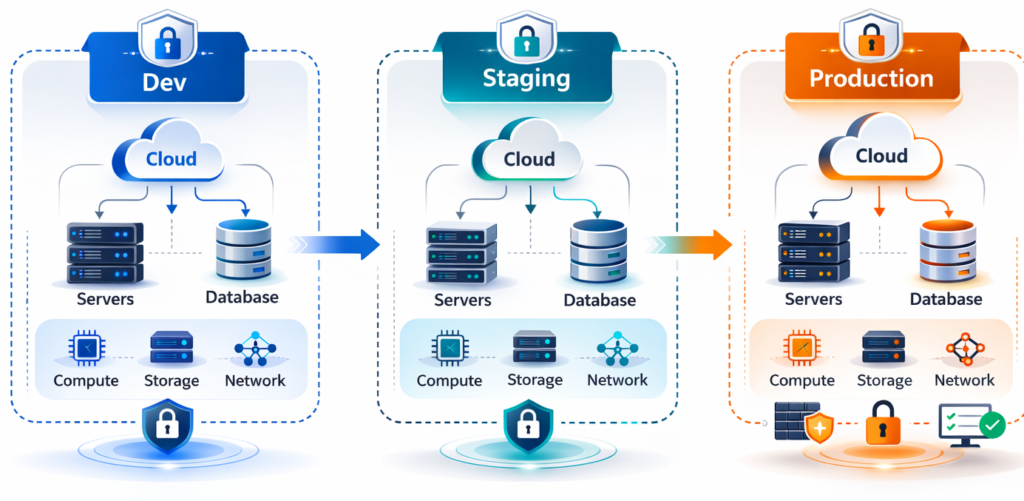
The same code deploys different infrastructure scales across environments. Development gets minimal resources for cost efficiency, staging mirrors production for realistic testing, and production receives enterprise-grade resources—all from a single codebase.
Conclusion
Terraform workspaces transform multi-environment infrastructure management by eliminating code duplication and ensuring consistency across environments. By maintaining one configuration with multiple isolated states, you achieve both flexibility and safety.
The key benefits: reduced code duplication, simplified maintenance, and enhanced safety through state isolation. Start with basic dev and prod workspaces, then expand as your needs grow. Establish clear conventions early, document them thoroughly, and enforce them through automation.
With workspaces, your infrastructure becomes more maintainable, your team more productive, and your deployments more reliable. Development experiments stay isolated from production, giving you confidence to iterate rapidly without risk. The investment you make today in learning workspace-based environment management will serve you throughout your DevOps career.
Ready to get started? Convert an existing single-environment project to use workspaces. Create a dev workspace, test the deployment, and gradually expand to production once comfortable with the workflow. Remember: start simple, automate progressively, and always verify your workspace before applying changes.
Written by Deekshitha R
LinkedIn: www.linkedin.com/in/deekshitha-raveendran-31581527b
