Introduction
Infrastructure as Code (IaC) has changed the way we manage cloud resources. Instead of manually clicking through the AWS console, we can define our entire infrastructure in code, version it with Git, and deploy it consistently every time. Terraform, developed by HashiCorp, is one of the most popular IaC tools used by DevOps engineers worldwide.
In this post, we are going to build a complete AWS VPC infrastructure using Terraform — without any modules. That means every single resource is written directly in plain Terraform configuration files. No abstractions, no reusable modules — just raw, straightforward Terraform code.
This approach is perfect for beginners because you can clearly see how each AWS resource is defined, how they reference each other, and how everything connects together to form a working network. Once you understand this, refactoring into modules becomes much easier.
By the end of this post, you will have a fully working AWS VPC with public and private subnets, an internet gateway, route tables, a security group, and a running EC2 instance — all deployed with just a few Terraform commands.
In the next post, we will take this exact infrastructure and refactor it using Terraform modules to make it cleaner and reusable.
What is Terraform?
Terraform is an open-source Infrastructure as Code tool that lets you define cloud resources using a simple configuration language called HCL (HashiCorp Configuration Language). Instead of logging into AWS and manually creating resources one by one, you write .tf files that describe what you want, and Terraform figures out how to create it.
The main benefits of Terraform are:
- Consistency — same infrastructure every time you deploy
- Version control — your infrastructure lives in Git just like your code
- Speed — spin up or destroy entire environments in minutes
- Multi-cloud — works with AWS, Azure, GCP, and more
What is a VPC?
A VPC (Virtual Private Cloud) is your own isolated network inside AWS. Think of it like a private data center that you fully control — you decide the IP ranges, subnets, routing, and security rules. Every resource you create inside AWS (like EC2 instances) lives inside a VPC.
What Are We Building?
Here is a breakdown of everything we will create:
- VPC — our private network with CIDR block 10.0.0.0/16
- 2 Public Subnets — in availability zones ap-south-1a and ap-south-1b, these have internet access
- 2 Private Subnets — in availability zones ap-south-1a and ap-south-1b, these do not have direct internet access
- Internet Gateway — connects our VPC to the internet
- Public Route Table — routes outbound traffic from public subnets to the internet gateway
- Private Route Table — used by private subnets, no internet route
- Route Table Associations — links each subnet to the correct route table
- Security Group — acts as a firewall, allows SSH (port 22) and HTTP (port 80)
- EC2 Instance — a virtual server launched in the public subnet
Prerequisites
Before getting started, make sure you have the following:
- An AWS account with IAM user credentials (Access Key + Secret Key)
- Terraform installed on your machine — Download here
- AWS CLI installed and configured by running aws configure
- An existing AWS Key Pair for SSH access to EC2
- VS Code or any code editor
Project Structure
terraform-infra-no-modules/
├── main.tf
├── variables.tf
├── outputs.tf
└── terraform.tfvars
What We’re Building
Here’s a quick overview of all the resources:
- 1 custom VPC (10.0.0.0/16)
- 2 public subnets in ap-south-1a and ap-south-1b
- 2 private subnets in ap-south-1a and ap-south-1b
- 1 Internet Gateway
- 1 public route table (routes traffic to IGW)
- 1 private route table (no internet access)
- Route table associations for all 4 subnets
- 1 security group (allows SSH port 22 and HTTP port 80)
- 1 EC2 instance in the public subnet
Project Structure
First, open your terminal and create a new project folder:
powershell
mkdir terraform-infra-no-modules
cd terraform-infra-no-modules
Then create all the required files inside the folder:
powershell
New-Item main.tf, variables.tf, outputs.tf, terraform.tfvarsYour folder structure will look like this:
terraform-infra-no-modules/
├── main.tf          # All AWS resources are defined here
├── variables.tf     # Variable declarations
├── outputs.tf       # Output values printed after apply
└── terraform.tfvars # Your actual values (region, CIDR, key pair etc.)
Now open these files in any code editor you prefer — VS Code, Notepad++, Sublime Text, or even the default Notepad on Windows. Just make sure you save each file with the correct name and `.tf` extension.
All Terraform code lives inside this single folder. There are no subfolders or modules — everything is flat, which makes it easy to read and understand as a beginner.
Writing the Terraform Configuration
main.tf
This is the most important file. All your AWS resources are defined here. Let’s go through each section.
Provider Block
This tells Terraform we are using AWS and which version of the AWS provider to use.
terraform {
  required_providers {
    aws = {
      source  = "hashicorp/aws"
      version = "~> 5.0"
    }
  }
}

provider "aws" {
  region = var.aws_region
}
VPC
We create a custom VPC with a /16 CIDR block which gives us 65,536 IP addresses to work with. We also enable DNS support and DNS hostnames so our EC2 instances can resolve domain names.
resource "aws_vpc" "main" {
  cidr_block           = var.vpc_cidr
  enable_dns_support   = true
  enable_dns_hostnames = true

  tags = {
    Name = "${var.project_name}-vpc"
  }
}
Internet Gateway
The Internet Gateway is what connects our VPC to the public internet. Without this, nothing inside our VPC can reach the internet or be reached from outside.
resource "aws_internet_gateway" "main" {
  vpc_id = aws_vpc.main.id

  tags = {
    Name = "${var.project_name}-igw"
  }
}
Public Subnets
We create two public subnets in different availability zones. Setting map_public_ip_on_launch = true means any EC2 instance launched here automatically gets a public IP address.
resource "aws_subnet" "public_1" {
  vpc_id                  = aws_vpc.main.id
  cidr_block              = var.public_subnet_1_cidr
  availability_zone       = "${var.aws_region}a"
  map_public_ip_on_launch = true

  tags = {
    Name = "${var.project_name}-public-subnet-1"
  }
}

resource "aws_subnet" "public_2" {
  vpc_id                  = aws_vpc.main.id
  cidr_block              = var.public_subnet_2_cidr
  availability_zone       = "${var.aws_region}b"
  map_public_ip_on_launch = true

  tags = {
    Name = "${var.project_name}-public-subnet-2"
  }
}
Private Subnets
Private subnets do not have direct internet access. They are typically used for databases or backend servers that should not be exposed to the public internet.
resource "aws_subnet" "private_1" {
  vpc_id            = aws_vpc.main.id
  cidr_block        = var.private_subnet_1_cidr
  availability_zone = "${var.aws_region}a"

  tags = {
    Name = "${var.project_name}-private-subnet-1"
  }
}

resource "aws_subnet" "private_2" {
  vpc_id            = aws_vpc.main.id
  cidr_block        = var.private_subnet_2_cidr
  availability_zone = "${var.aws_region}b"

  tags = {
    Name = "${var.project_name}-private-subnet-2"
  }
}
Route Tables
A route table controls where network traffic is directed. The public route table sends all outbound traffic (0.0.0.0/0) to the Internet Gateway. The private route table has no internet route, keeping those subnets isolated.
resource "aws_route_table" "public" {
  vpc_id = aws_vpc.main.id

  route {
    cidr_block = "0.0.0.0/0"
    gateway_id = aws_internet_gateway.main.id
  }

  tags = {
    Name = "${var.project_name}-public-rt"
  }
}

resource "aws_route_table" "private" {
  vpc_id = aws_vpc.main.id

  tags = {
    Name = "${var.project_name}-private-rt"
  }
}
Route Table Associations
Now we link each subnet to its correct route table. Public subnets get the public route table, private subnets get the private route table.
resource "aws_route_table_association" "public_1" {
  subnet_id      = aws_subnet.public_1.id
  route_table_id = aws_route_table.public.id
}

resource "aws_route_table_association" "public_2" {
  subnet_id      = aws_subnet.public_2.id
  route_table_id = aws_route_table.public.id
}

resource "aws_route_table_association" "private_1" {
  subnet_id      = aws_subnet.private_1.id
  route_table_id = aws_route_table.private.id
}

resource "aws_route_table_association" "private_2" {
  subnet_id      = aws_subnet.private_2.id
  route_table_id = aws_route_table.private.id
}
Security Group
A security group acts as a virtual firewall for your EC2 instance. We allow inbound SSH on port 22 so we can connect to the server, and HTTP on port 80 so the server can serve web traffic. We allow all outbound traffic.
resource "aws_security_group" "main" {
  name        = "${var.project_name}-sg"
  description = "Allow SSH and HTTP"
  vpc_id      = aws_vpc.main.id

  ingress {
    description = "SSH"
    from_port   = 22
    to_port     = 22
    protocol    = "tcp"
    cidr_blocks = ["0.0.0.0/0"]
  }

  ingress {
    description = "HTTP"
    from_port   = 80
    to_port     = 80
    protocol    = "tcp"
    cidr_blocks = ["0.0.0.0/0"]
  }

  egress {
    from_port   = 0
    to_port     = 0
    protocol    = "-1"
    cidr_blocks = ["0.0.0.0/0"]
  }

  tags = {
    Name = "${var.project_name}-sg"
  }
}
EC2 Instance
Finally we launch an EC2 instance inside our public subnet. We attach the security group and key pair so we can SSH into it after deployment.
resource "aws_instance" "main" {
  ami                    = var.ami_id
  instance_type          = var.instance_type
  subnet_id              = aws_subnet.public_1.id
  vpc_security_group_ids = [aws_security_group.main.id]
  key_name               = var.key_pair_name

  tags = {
    Name = "${var.project_name}-ec2"
  }
}
variables.tf
This file declares all the variables used in main.tf . Instead of hardcoding values directly in the resource blocks, we use variables to make the configuration flexible and reusable. Copy the following into variables.tf:
variable "aws_region" {
  description = "AWS region to deploy resources"
  type        = string
  default     = "ap-south-1"
}

variable "project_name" {
  description = "Project name used for tagging resources"
  type        = string
  default     = "my-infra"
}

variable "vpc_cidr" {
  description = "CIDR block for the VPC"
  type        = string
  default     = "10.0.0.0/16"
}

variable "public_subnet_1_cidr" {
  description = "CIDR block for public subnet 1"
  type        = string
  default     = "10.0.1.0/24"
}

variable "public_subnet_2_cidr" {
  description = "CIDR block for public subnet 2"
  type        = string
  default     = "10.0.2.0/24"
}

variable "private_subnet_1_cidr" {
  description = "CIDR block for private subnet 1"
  type        = string
  default     = "10.0.3.0/24"
}

variable "private_subnet_2_cidr" {
  description = "CIDR block for private subnet 2"
  type        = string
  default     = "10.0.4.0/24"
}

variable "ami_id" {
  description = "AMI ID for EC2 instance (Amazon Linux 2 ap-south-1)"
  type        = string
  default     = "ami-0f58b397bc5c1f2e8"
}

variable "instance_type" {
  description = "EC2 instance type"
  type        = string
  default     = "t3.micro"
}

variable "key_pair_name" {
  description = "Name of your existing AWS key pair"
  type        = string
}
outputs.tf
After terraform apply completes, Terraform prints output values to your terminal. This is useful to quickly grab your EC2 public IP, VPC ID, and subnet IDs without having to log into the AWS console. Copy the following into outputs.tf:
output "vpc_id" {
  description = "VPC ID"
  value       = aws_vpc.main.id
}

output "public_subnet_1_id" {
  description = "Public Subnet 1 ID"
  value       = aws_subnet.public_1.id
}

output "public_subnet_2_id" {
  description = "Public Subnet 2 ID"
  value       = aws_subnet.public_2.id
}

output "private_subnet_1_id" {
  description = "Private Subnet 1 ID"
  value       = aws_subnet.private_1.id
}

output "private_subnet_2_id" {
  description = "Private Subnet 2 ID"
  value       = aws_subnet.private_2.id
}

output "internet_gateway_id" {
  description = "Internet Gateway ID"
  value       = aws_internet_gateway.main.id
}

output "security_group_id" {
  description = "Security Group ID"
  value       = aws_security_group.main.id
}

output "ec2_public_ip" {
  description = "Public IP of EC2 instance"
  value       = aws_instance.main.public_ip
}

output "ec2_instance_id" {
  description = "EC2 Instance ID"
  value       = aws_instance.main.id
}
terraform.tfvars
This is where you provide the actual values for your variables. Terraform automatically reads this file when you run terraform apply. Copy the following into terraform.tfvars and replace your-key-pair-name with your actual AWS key pair name:
aws_region            = "ap-south-1"
project_name          = "my-infra"
vpc_cidr              = "10.0.0.0/16"
public_subnet_1_cidr  = "10.0.1.0/24"
public_subnet_2_cidr  = "10.0.2.0/24"
private_subnet_1_cidr = "10.0.3.0/24"
private_subnet_2_cidr = "10.0.4.0/24"
ami_id                = "ami-0f58b397bc5c1f2e8"
instance_type         = "t3.micro"
key_pair_name         = "your-key-pair-name"  # ← Replace this!
Deploying the Infrastructure
Once all four files are ready, run the following commands in your terminal from inside the project folder.
Step 1 — Initialize Terraform
This downloads the AWS provider plugin and sets up the working directory.
terraform init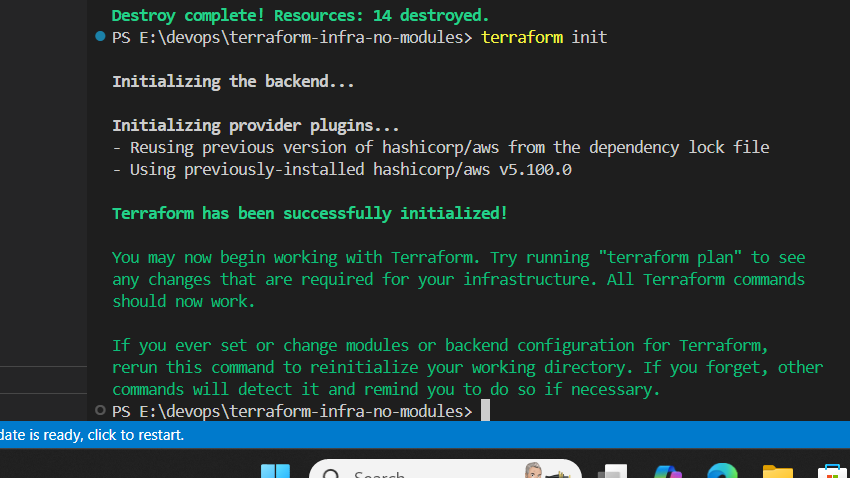
Step 2 — Preview the Plan
This shows you exactly what Terraform is going to create before actually creating anything. Always run this before apply.
terraform plan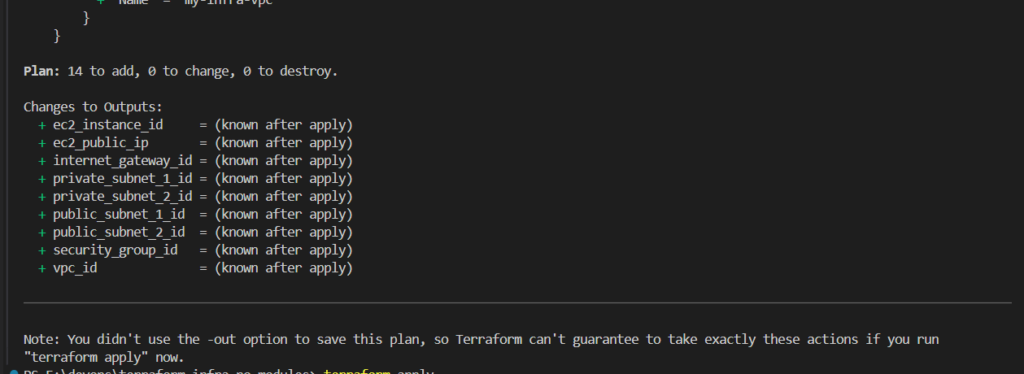
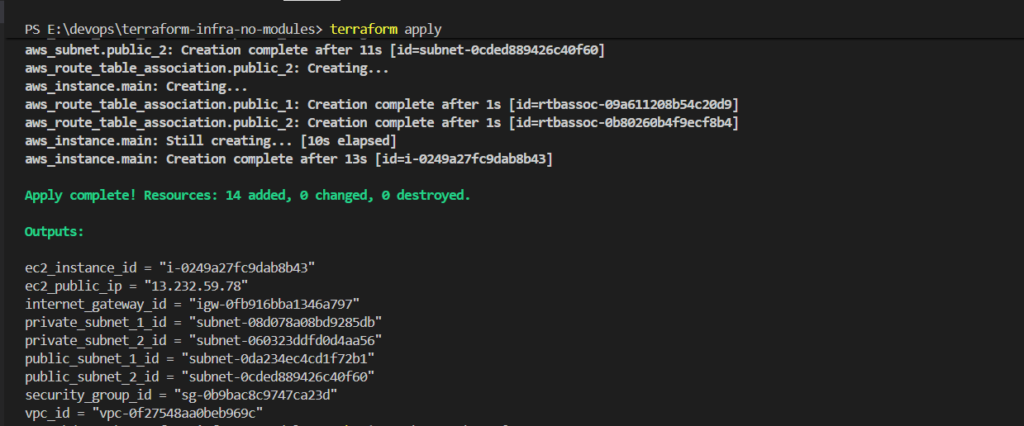
Step 3 — Apply the Configuration
terraform applyThis creates all the resources in AWS. Type yes when prompted.
After a successful apply, you will see output like this:
Verifying Resources in AWS Console
After a successful terraform apply, it is always a good practice to verify that all resources were actually created in the AWS Console. Let’s go through each one.
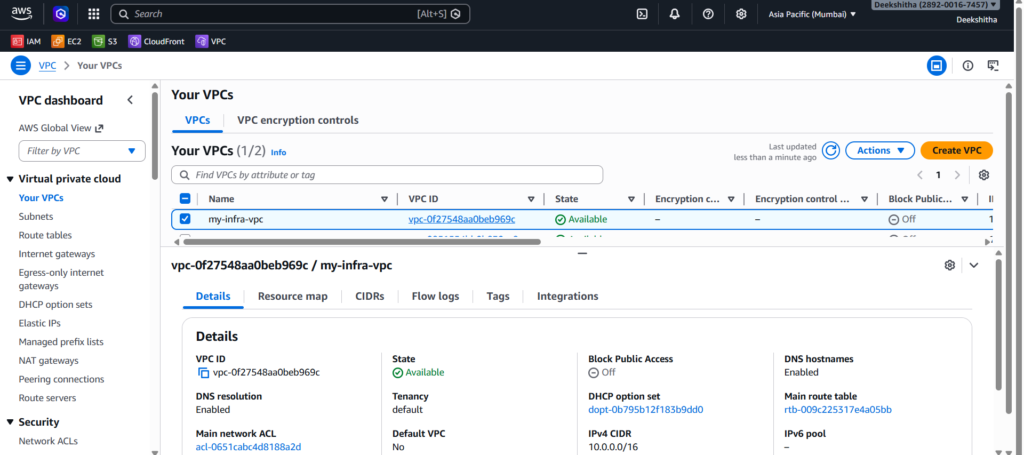
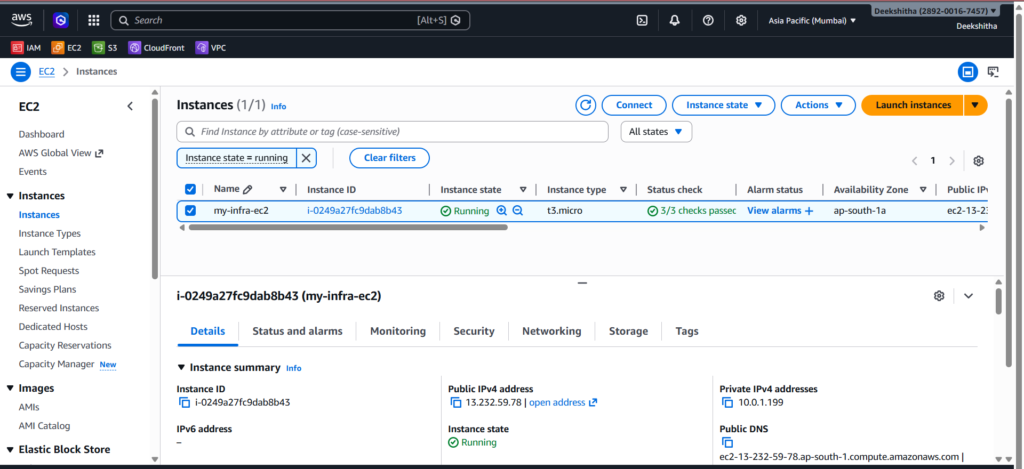
1. VPC Go to AWS Console → VPC → Your VPCs. You should see your newly created VPC with the CIDR block 10.0.0.0/16.
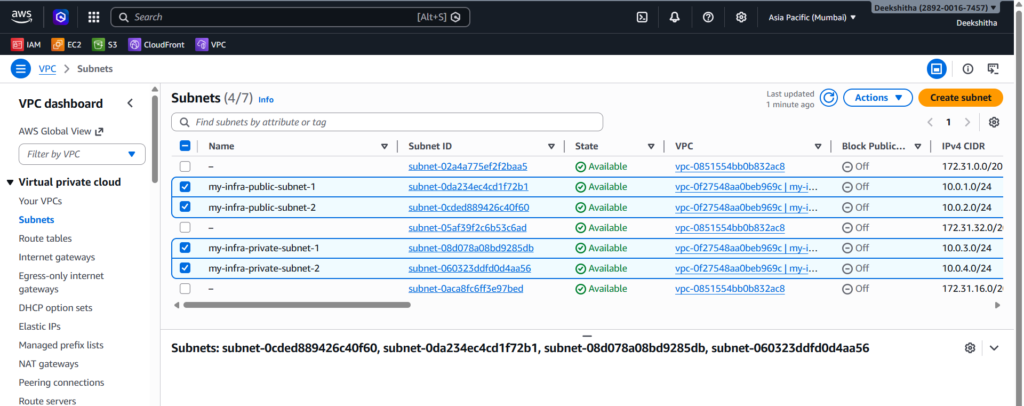
2. Subnets Go to VPC → Subnets. You should see all 4 subnets — 2 public and 2 private, each in a different availability zone.
3. Internet Gateway Go to VPC → Internet Gateways. You should see your IGW with the state Attached to your VPC.

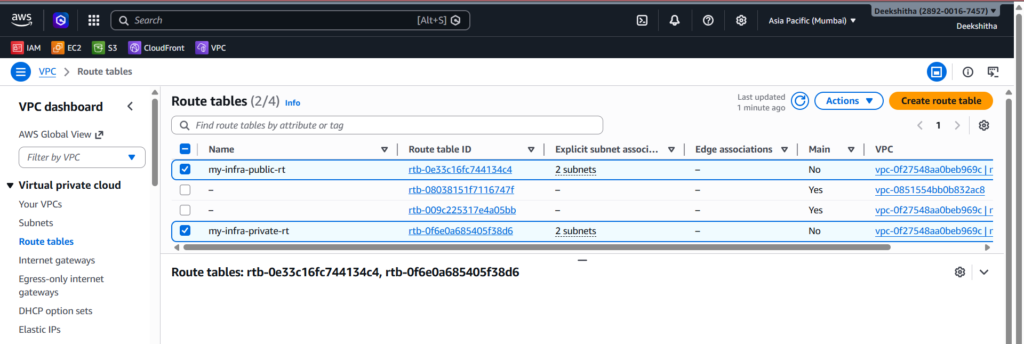
4. Route Tables Go to VPC → Route Tables. You should see two route tables — one public with a route to the Internet Gateway, and one private with no internet route.
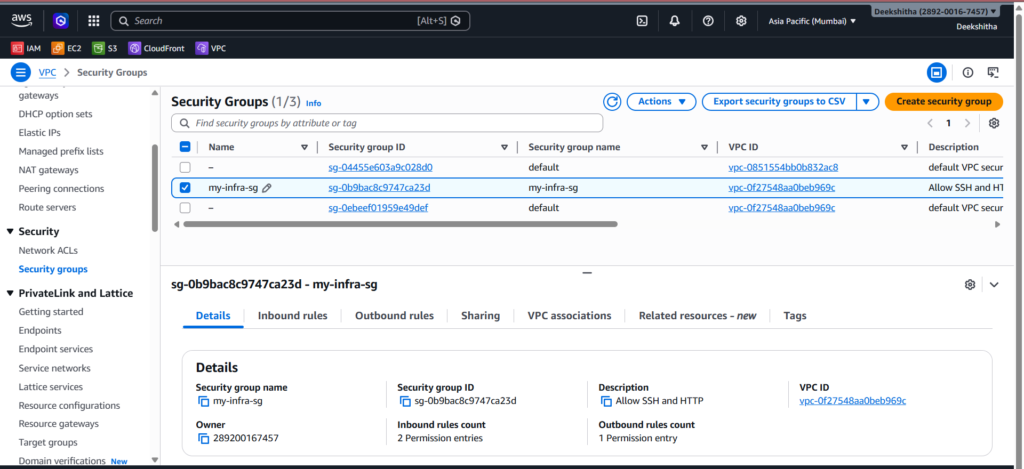
5. Security Group Go to EC2 → Security Groups. Click on your security group and check the inbound rules — you should see port 22 (SSH) and port 80 (HTTP) allowed.
6. EC2 Instance Go to EC2 → Instances. You should see your instance in running state with a public IP assigned.
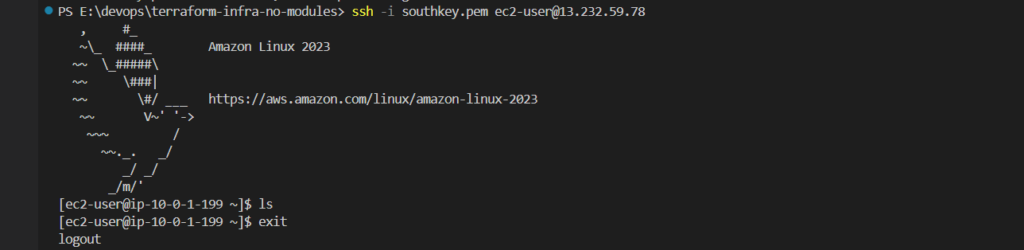
SSH Into Your EC2 Instance
Now that your EC2 instance is running, you can SSH into it using the public IP from the output:
ssh -i your-key.pem ec2-user@<ec2_public_ip>If you get a bad permissions error on Windows, fix it by running:
icacls your-key.pem /inheritance:r
icacls your-key.pem /grant:r "${env:USERNAME}:(R)"
Then try SSH again.
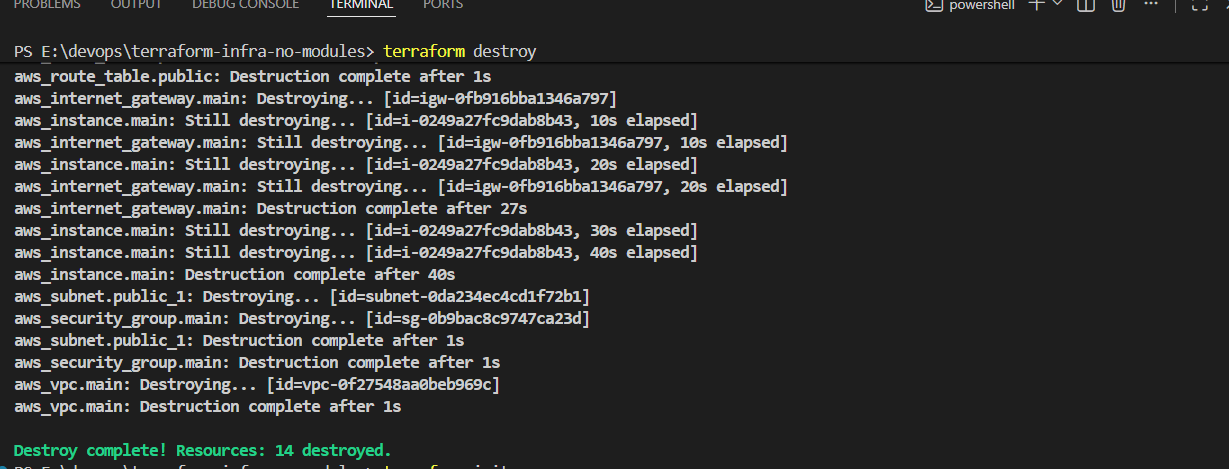
Cleanup
When you are done, always destroy the infrastructure to avoid unnecessary AWS charges:
terraform destroyType yes when prompted. Terraform will remove all 14 resources it created.
Conclusion
In this post we built a complete AWS VPC infrastructure from scratch using Terraform — without any modules. We covered how to create a VPC, public and private subnets, an internet gateway, route tables, route table associations, a security group, and an EC2 instance. We also saw how Terraform organizes code across four files — main.tf, variables.tf, outputs.tf, and terraform.tfvars.
Building infrastructure without modules first is the best way to understand how every piece connects. Once you are comfortable with this, moving to modules makes a lot more sense.
In the next post, we will refactor this exact setup using Terraform modules to make it cleaner, reusable, and production-ready.
