This guide walks you through deploying a complete, production-ready two-tier architecture on AWS using Terraform. The setup includes a custom VPC, Application Load Balancer, Auto Scaling Group, NAT Gateway, and RDS MySQL 8.0 database. In addition, a Node.js application deploys automatically on every EC2 instance via User Data. Furthermore, three Terraform commands provision all 24 resources automatically.
What Is a Two-Tier Architecture?
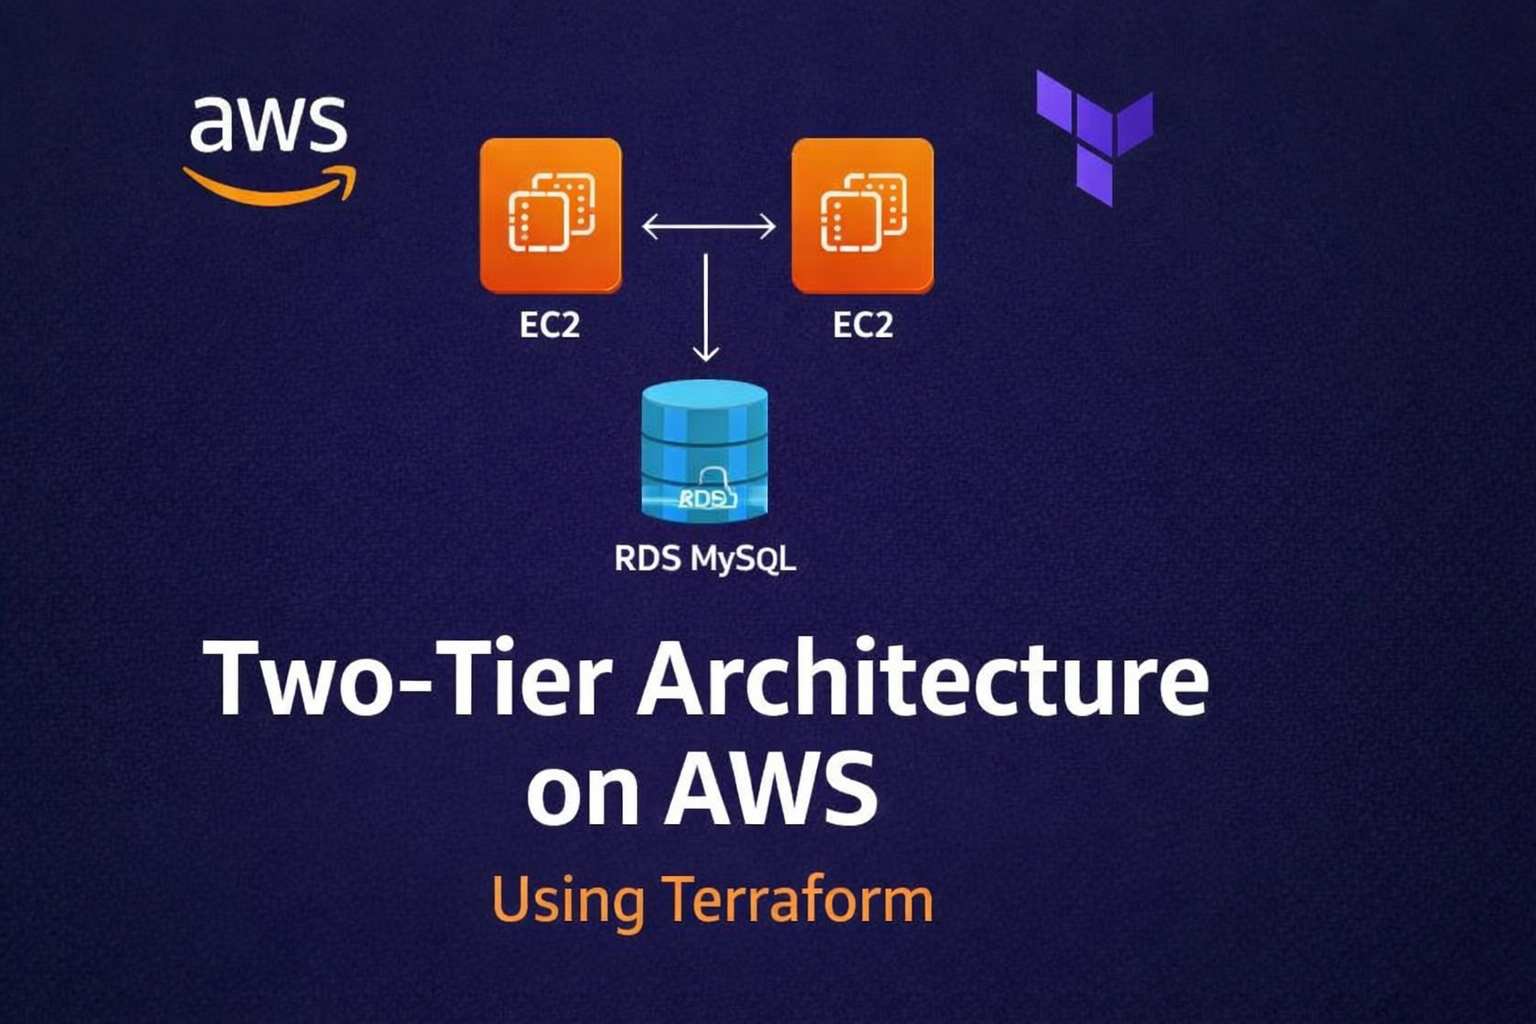
A two-tier architecture separates cloud infrastructure into two distinct, isolated layers:
- Application Tier — EC2 instances running a web application, placed behind an Application Load Balancer inside an Auto Scaling Group, deployed in private subnets with no direct internet exposure.
- Database Tier — Amazon RDS MySQL running in isolated private subnets, accessible only from the application tier via security group rules.
Therefore, this separation provides three major benefits. First, security — each layer is independently isolated. Second, scalability — each layer scales without affecting the other. Third, maintainability — you can update or replace each layer without any downtime to the rest of the system.
Architecture Overview
| Component | AWS Resource |
|---|---|
| Custom Network | VPC (10.0.0.0/16) — 4 subnets across 2 AZs |
| Internet Access | Internet Gateway + Public Route Table |
| Outbound for Private Instances | NAT Gateway + Elastic IP |
| Secure SSH | Bastion Host EC2 in public subnet |
| Traffic Distribution | Application Load Balancer |
| App Servers | Auto Scaling Group — min 2, desired 2, max 4 |
| App Deployment | EC2 User Data — Node.js + Express + MySQL2 |
| Database | RDS MySQL 8.0 in private subnet |
| Region | ap-south-1 Mumbai |
| Total Resources | 24 AWS resources |
Project Structure
terraform-two-tier-app/
├── main.tf
├── variables.tf
├── outputs.tf
├── terraform.tfvars
└── modules/
    ├── vpc/
    │   ├── main.tf
    │   ├── variables.tf
    │   └── outputs.tf
    ├── bastion/
    │   ├── main.tf
    │   ├── variables.tf
    │   └── outputs.tf
    ├── alb/
    │   ├── main.tf
    │   ├── variables.tf
    │   └── outputs.tf
    ├── autoscaling/
    │   ├── main.tf
    │   ├── variables.tf
    │   ├── outputs.tf
    │   └── userdata.sh
    └── rds/
        ├── main.tf
        ├── variables.tf
        └── outputs.tf
Step 1 – Root Files
main.tf
terraform {
  required_version = ">= 1.3.0"
  required_providers {
    aws = {
      source  = "hashicorp/aws"
      version = "~> 5.0"
    }
  }
}

provider "aws" {
  region = var.aws_region
}

module "vpc" {
  source   = "./modules/vpc"
  vpc_cidr = var.vpc_cidr
  az_1     = var.az_1
  az_2     = var.az_2
  project  = var.project
}

module "bastion" {
  source           = "./modules/bastion"
  project          = var.project
  vpc_id           = module.vpc.vpc_id
  public_subnet_id = module.vpc.public_subnet_1_id
  ami_id           = var.ami_id
  instance_type    = var.bastion_instance_type
  key_name         = var.key_name
  my_ip            = var.my_ip
}

module "alb" {
  source            = "./modules/alb"
  project           = var.project
  vpc_id            = module.vpc.vpc_id
  public_subnet_ids = [module.vpc.public_subnet_1_id, module.vpc.public_subnet_2_id]
}

module "autoscaling" {
  source             = "./modules/autoscaling"
  project            = var.project
  vpc_id             = module.vpc.vpc_id
  private_subnet_ids = [module.vpc.private_subnet_1_id, module.vpc.private_subnet_2_id]
  ami_id             = var.ami_id
  instance_type      = var.app_instance_type
  key_name           = var.key_name
  alb_sg_id          = module.alb.alb_sg_id
  bastion_sg_id      = module.bastion.bastion_sg_id
  target_group_arn   = module.alb.target_group_arn
  db_host            = module.rds.rds_endpoint
  db_name            = var.db_name
  db_username        = var.db_username
  db_password        = var.db_password
}

module "rds" {
  source             = "./modules/rds"
  project            = var.project
  vpc_id             = module.vpc.vpc_id
  private_subnet_ids = [module.vpc.private_subnet_1_id, module.vpc.private_subnet_2_id]
  app_sg_id          = module.autoscaling.app_sg_id
  db_name            = var.db_name
  db_username        = var.db_username
  db_password        = var.db_password
  db_instance_class  = var.db_instance_class
}
variables.tf
variable "aws_region" {
  description = "AWS region"
  type        = string
  default     = "ap-south-1"
}

variable "project" {
  description = "Project name prefix for all resources"
  type        = string
  default     = "two-tier"
}

variable "vpc_cidr" {
  description = "CIDR block for VPC"
  type        = string
  default     = "10.0.0.0/16"
}

variable "az_1" {
  description = "First availability zone"
  type        = string
  default     = "ap-south-1a"
}

variable "az_2" {
  description = "Second availability zone"
  type        = string
  default     = "ap-south-1b"
}

variable "ami_id" {
  description = "Ubuntu AMI ID for ap-south-1"
  type        = string
  default     = "ami-0f58b397bc5c1f2e8"
}

variable "bastion_instance_type" {
  description = "Instance type for bastion host"
  type        = string
  default     = "t3.micro"
}

variable "app_instance_type" {
  description = "Instance type for app servers"
  type        = string
  default     = "t3.micro"
}

variable "key_name" {
  description = "EC2 key pair name"
  type        = string
}

variable "my_ip" {
  description = "Your public IP in CIDR format e.g. 1.2.3.4/32"
  type        = string
}

variable "db_name" {
  description = "Database name"
  type        = string
  default     = "appdb"
}

variable "db_username" {
  description = "Database master username"
  type        = string
  default     = "admin"
}

variable "db_password" {
  description = "Database master password"
  type        = string
  sensitive   = true
}

variable "db_instance_class" {
  description = "RDS instance class"
  type        = string
  default     = "db.t3.micro"
}
outputs.tf
output "alb_dns_name" {
  description = "Open this URL in your browser to see the app"
  value       = module.alb.alb_dns_name
}

output "bastion_public_ip" {
  description = "SSH into bastion: ssh -i key.pem ubuntu@<this_ip>"
  value       = module.bastion.bastion_public_ip
}

output "autoscaling_group_name" {
  description = "Auto Scaling Group name"
  value       = module.autoscaling.asg_name
}

output "rds_endpoint" {
  description = "RDS MySQL endpoint"
  value       = module.rds.rds_endpoint
}
terraform.tfvars
aws_region            = "ap-south-1"
project               = "two-tier"
vpc_cidr              = "10.0.0.0/16"
az_1                  = "ap-south-1a"
az_2                  = "ap-south-1b"
ami_id                = "ami-0f58b397bc5c1f2e8"
bastion_instance_type = "t3.micro"
app_instance_type     = "t3.micro"
key_name              = "your-key-pair-name"
my_ip                 = "YOUR.IP.ADDRESS/32"
db_name               = "appdb"
db_username           = "admin"
db_password           = "YourStrongPassword123!"
db_instance_class     = "db.t3.micro"
Step 2 – VPC Module
modules/vpc/main.tf
resource "aws_vpc" "main" {
  cidr_block           = var.vpc_cidr
  enable_dns_support   = true
  enable_dns_hostnames = true
  tags = { Name = "${var.project}-vpc" }
}

resource "aws_subnet" "public_1" {
  vpc_id                  = aws_vpc.main.id
  cidr_block              = "10.0.1.0/24"
  availability_zone       = var.az_1
  map_public_ip_on_launch = true
  tags = { Name = "${var.project}-public-subnet-1" }
}

resource "aws_subnet" "public_2" {
  vpc_id                  = aws_vpc.main.id
  cidr_block              = "10.0.2.0/24"
  availability_zone       = var.az_2
  map_public_ip_on_launch = true
  tags = { Name = "${var.project}-public-subnet-2" }
}

resource "aws_subnet" "private_1" {
  vpc_id            = aws_vpc.main.id
  cidr_block        = "10.0.3.0/24"
  availability_zone = var.az_1
  tags = { Name = "${var.project}-private-subnet-1" }
}

resource "aws_subnet" "private_2" {
  vpc_id            = aws_vpc.main.id
  cidr_block        = "10.0.4.0/24"
  availability_zone = var.az_2
  tags = { Name = "${var.project}-private-subnet-2" }
}

resource "aws_internet_gateway" "igw" {
  vpc_id = aws_vpc.main.id
  tags = { Name = "${var.project}-igw" }
}

resource "aws_eip" "nat" {
  domain = "vpc"
  tags = { Name = "${var.project}-nat-eip" }
}

resource "aws_nat_gateway" "main" {
  allocation_id = aws_eip.nat.id
  subnet_id     = aws_subnet.public_1.id
  tags = { Name = "${var.project}-nat-gw" }
  depends_on = [aws_internet_gateway.igw]
}

resource "aws_route_table" "public" {
  vpc_id = aws_vpc.main.id
  route {
    cidr_block = "0.0.0.0/0"
    gateway_id = aws_internet_gateway.igw.id
  }
  tags = { Name = "${var.project}-public-rt" }
}

resource "aws_route_table_association" "public_1" {
  subnet_id      = aws_subnet.public_1.id
  route_table_id = aws_route_table.public.id
}

resource "aws_route_table_association" "public_2" {
  subnet_id      = aws_subnet.public_2.id
  route_table_id = aws_route_table.public.id
}

resource "aws_route_table" "private" {
  vpc_id = aws_vpc.main.id
  tags = { Name = "${var.project}-private-rt" }
}

resource "aws_route" "private_nat" {
  route_table_id         = aws_route_table.private.id
  destination_cidr_block = "0.0.0.0/0"
  nat_gateway_id         = aws_nat_gateway.main.id
}

resource "aws_route_table_association" "private_1" {
  subnet_id      = aws_subnet.private_1.id
  route_table_id = aws_route_table.private.id
}

resource "aws_route_table_association" "private_2" {
  subnet_id      = aws_subnet.private_2.id
  route_table_id = aws_route_table.private.id
}
modules/vpc/variables.tf
variable "vpc_cidr" {
  description = "CIDR block for the VPC"
  type        = string
}

variable "az_1" {
  description = "First availability zone"
  type        = string
}

variable "az_2" {
  description = "Second availability zone"
  type        = string
}

variable "project" {
  description = "Project name prefix"
  type        = string
}
modules/vpc/outputs.tf
output "vpc_id"              { value = aws_vpc.main.id }
output "public_subnet_1_id"  { value = aws_subnet.public_1.id }
output "public_subnet_2_id"  { value = aws_subnet.public_2.id }
output "private_subnet_1_id" { value = aws_subnet.private_1.id }
output "private_subnet_2_id" { value = aws_subnet.private_2.id }
Step 3 – Bastion Module
modules/bastion/main.tf
resource "aws_security_group" "bastion" {
  name        = "${var.project}-bastion-sg"
  description = "Allow SSH from my IP only"
  vpc_id      = var.vpc_id

  ingress {
    description = "SSH from my IP only"
    from_port   = 22
    to_port     = 22
    protocol    = "tcp"
    cidr_blocks = [var.my_ip]
  }

  egress {
    from_port   = 0
    to_port     = 0
    protocol    = "-1"
    cidr_blocks = ["0.0.0.0/0"]
  }

  tags = { Name = "${var.project}-bastion-sg" }
}

resource "aws_instance" "bastion" {
  ami                    = var.ami_id
  instance_type          = var.instance_type
  subnet_id              = var.public_subnet_id
  key_name               = var.key_name
  vpc_security_group_ids = [aws_security_group.bastion.id]
  tags = { Name = "${var.project}-bastion" }
}
modules/bastion/variables.tf
variable "project"          { type = string }
variable "vpc_id"           { type = string }
variable "public_subnet_id" { type = string }
variable "ami_id"           { type = string }
variable "instance_type"    { type = string }
variable "key_name"         { type = string }
variable "my_ip"            { type = string }
modules/bastion/outputs.tf
output "bastion_public_ip" { value = aws_instance.bastion.public_ip }
output "bastion_sg_id"     { value = aws_security_group.bastion.id }
Step 4 – ALB Module
modules/alb/main.tf
resource "aws_security_group" "alb" {
  name        = "${var.project}-alb-sg"
  description = "Allow HTTP from internet"
  vpc_id      = var.vpc_id

  ingress {
    description = "HTTP from internet"
    from_port   = 80
    to_port     = 80
    protocol    = "tcp"
    cidr_blocks = ["0.0.0.0/0"]
  }

  egress {
    from_port   = 0
    to_port     = 0
    protocol    = "-1"
    cidr_blocks = ["0.0.0.0/0"]
  }

  tags = { Name = "${var.project}-alb-sg" }
}

resource "aws_lb" "main" {
  name               = "${var.project}-alb"
  internal           = false
  load_balancer_type = "application"
  security_groups    = [aws_security_group.alb.id]
  subnets            = var.public_subnet_ids
  tags = { Name = "${var.project}-alb" }
}

resource "aws_lb_target_group" "app" {
  name     = "${var.project}-tg"
  port     = 80
  protocol = "HTTP"
  vpc_id   = var.vpc_id

  health_check {
    path                = "/"
    protocol            = "HTTP"
    matcher             = "200"
    interval            = 30
    timeout             = 5
    healthy_threshold   = 2
    unhealthy_threshold = 2
  }

  tags = { Name = "${var.project}-tg" }
}

resource "aws_lb_listener" "http" {
  load_balancer_arn = aws_lb.main.arn
  port              = 80
  protocol          = "HTTP"

  default_action {
    type             = "forward"
    target_group_arn = aws_lb_target_group.app.arn
  }
}
modules/alb/variables.tf
variable "project"           { type = string }
variable "vpc_id"            { type = string }
variable "public_subnet_ids" { type = list(string) }
modules/alb/outputs.tf
output "alb_dns_name"     { value = aws_lb.main.dns_name }
output "alb_sg_id"        { value = aws_security_group.alb.id }
output "target_group_arn" { value = aws_lb_target_group.app.arn }
Step 5 – Auto Scaling Module
modules/autoscaling/main.tf
resource "aws_security_group" "app" {
  name        = "${var.project}-app-sg"
  description = "Allow HTTP from ALB and SSH from Bastion"
  vpc_id      = var.vpc_id

  ingress {
    description     = "HTTP from ALB"
    from_port       = 80
    to_port         = 80
    protocol        = "tcp"
    security_groups = [var.alb_sg_id]
  }

  ingress {
    description     = "SSH from Bastion"
    from_port       = 22
    to_port         = 22
    protocol        = "tcp"
    security_groups = [var.bastion_sg_id]
  }

  egress {
    from_port   = 0
    to_port     = 0
    protocol    = "-1"
    cidr_blocks = ["0.0.0.0/0"]
  }

  tags = { Name = "${var.project}-app-sg" }
}

resource "aws_launch_template" "app" {
  name_prefix   = "${var.project}-lt-"
  image_id      = var.ami_id
  instance_type = var.instance_type
  key_name      = var.key_name

  network_interfaces {
    associate_public_ip_address = false
    security_groups             = [aws_security_group.app.id]
  }

  user_data = base64encode(templatefile("${path.module}/userdata.sh", {
    db_host     = var.db_host
    db_name     = var.db_name
    db_username = var.db_username
    db_password = var.db_password
  }))

  tag_specifications {
    resource_type = "instance"
    tags = { Name = "${var.project}-app-server" }
  }
}

resource "aws_autoscaling_group" "app" {
  name                      = "${var.project}-asg"
  desired_capacity          = 2
  min_size                  = 2
  max_size                  = 4
  vpc_zone_identifier       = var.private_subnet_ids
  target_group_arns         = [var.target_group_arn]
  health_check_type         = "ELB"
  health_check_grace_period = 120

  launch_template {
    id      = aws_launch_template.app.id
    version = "$Latest"
  }

  tag {
    key                 = "Name"
    value               = "${var.project}-app-server"
    propagate_at_launch = true
  }
}
modules/autoscaling/variables.tf
variable "project"            { type = string }
variable "vpc_id"             { type = string }
variable "private_subnet_ids" { type = list(string) }
variable "ami_id"             { type = string }
variable "instance_type"      { type = string }
variable "key_name"           { type = string }
variable "alb_sg_id"          { type = string }
variable "bastion_sg_id"      { type = string }
variable "target_group_arn"   { type = string }
variable "db_host"            { type = string }
variable "db_name"            { type = string }
variable "db_username"        { type = string }
variable "db_password" {
  type      = string
  sensitive = true
}
modules/autoscaling/outputs.tf
output "asg_name"  { value = aws_autoscaling_group.app.name }
output "app_sg_id" { value = aws_security_group.app.id }
modules/autoscaling/userdata.sh
#!/bin/bash
apt-get update -y
curl -fsSL https://deb.nodesource.com/setup_18.x | bash -
apt-get install -y nodejs

mkdir -p /app

cat > /app/package.json <<PKGJSON
{
  "name": "two-tier-app",
  "version": "1.0.0",
  "dependencies": {
    "express": "^4.18.2",
    "mysql2": "^3.6.0"
  }
}
PKGJSON

cd /app && npm install

cat > /app/index.js <<APPJS
const express = require('express');
const mysql = require('mysql2');

const app = express();

const db = mysql.createConnection({
  host: '${db_host}',
  user: '${db_username}',
  password: '${db_password}',
  database: '${db_name}'
});

db.connect((err) => {
  if (err) {
    console.error('DB connection failed:', err);
  } else {
    console.log('DB connected successfully!');
  }
});

app.get('/', (req, res) => {
  db.query('SELECT NOW() AS \`current_time\`', (err, results) => {
    if (err) {
      console.error('Query error:', err);
      res.status(500).send(
        '<h1>Two-Tier App</h1><p style="color:red;">DB Query Failed: ' + err.message + '</p>'
      );
    } else {
      res.send(
        '<html><head><title>Two-Tier App</title></head>' +
        '<body style="font-family:Arial;text-align:center;margin-top:100px;">' +
        '<h1>Two-Tier Architecture on AWS</h1>' +
        '<h2 style="color:green;">Database Connected Successfully!</h2>' +
        '<p>DB Server Time: ' + results[0].current_time + '</p>' +
        '<p>Deployed via Terraform | Auto Scaling | RDS MySQL</p>' +
        '</body></html>'
      );
    }
  });
});

app.listen(80, () => {
  console.log('App running on port 80');
});
APPJS

node /app/index.js &
Step 6 – RDS Module
modules/rds/main.tf
resource "aws_security_group" "db" {
  name        = "${var.project}-db-sg"
  description = "Allow MySQL from app servers only"
  vpc_id      = var.vpc_id

  ingress {
    description     = "MySQL from app servers only"
    from_port       = 3306
    to_port         = 3306
    protocol        = "tcp"
    security_groups = [var.app_sg_id]
  }

  egress {
    from_port   = 0
    to_port     = 0
    protocol    = "-1"
    cidr_blocks = ["0.0.0.0/0"]
  }

  tags = { Name = "${var.project}-db-sg" }
}

resource "aws_db_subnet_group" "main" {
  name       = "${var.project}-db-subnet-group"
  subnet_ids = var.private_subnet_ids
  tags = { Name = "${var.project}-db-subnet-group" }
}

resource "aws_db_instance" "mysql" {
  identifier             = "${var.project}-mysql"
  engine                 = "mysql"
  engine_version         = "8.0"
  instance_class         = var.db_instance_class
  allocated_storage      = 20
  storage_type           = "gp2"
  db_name                = var.db_name
  username               = var.db_username
  password               = var.db_password
  db_subnet_group_name   = aws_db_subnet_group.main.name
  vpc_security_group_ids = [aws_security_group.db.id]
  publicly_accessible    = false
  skip_final_snapshot    = true
  multi_az               = false
  tags = { Name = "${var.project}-mysql" }
}
modules/rds/variables.tf
variable "project"            { type = string }
variable "vpc_id"             { type = string }
variable "private_subnet_ids" { type = list(string) }
variable "app_sg_id"          { type = string }
variable "db_name"            { type = string }
variable "db_username"        { type = string }
variable "db_password"        { type = string }
variable "db_instance_class"  { type = string }
modules/rds/outputs.tf
output "rds_endpoint" {
  description = "RDS MySQL endpoint"
  value       = aws_db_instance.mysql.address
}

output "rds_port" {
  description = "RDS MySQL port"
  value       = aws_db_instance.mysql.port
}
Deployment Commands
terraform init # Download providers and initialize modules
terraform plan # Preview all 24 resources to be created
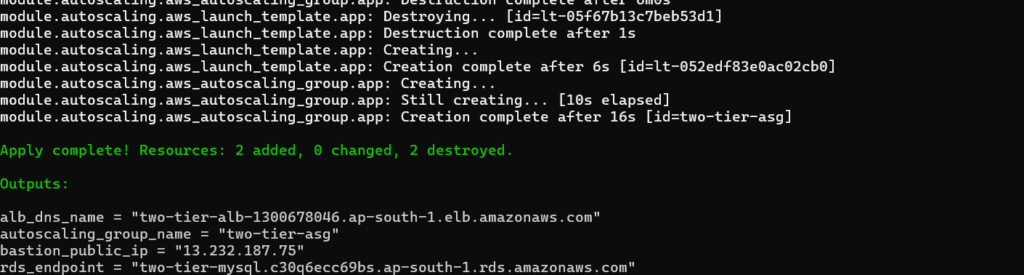
terraform apply # Deploy everything to AWSAfter terraform apply completes, you will see:
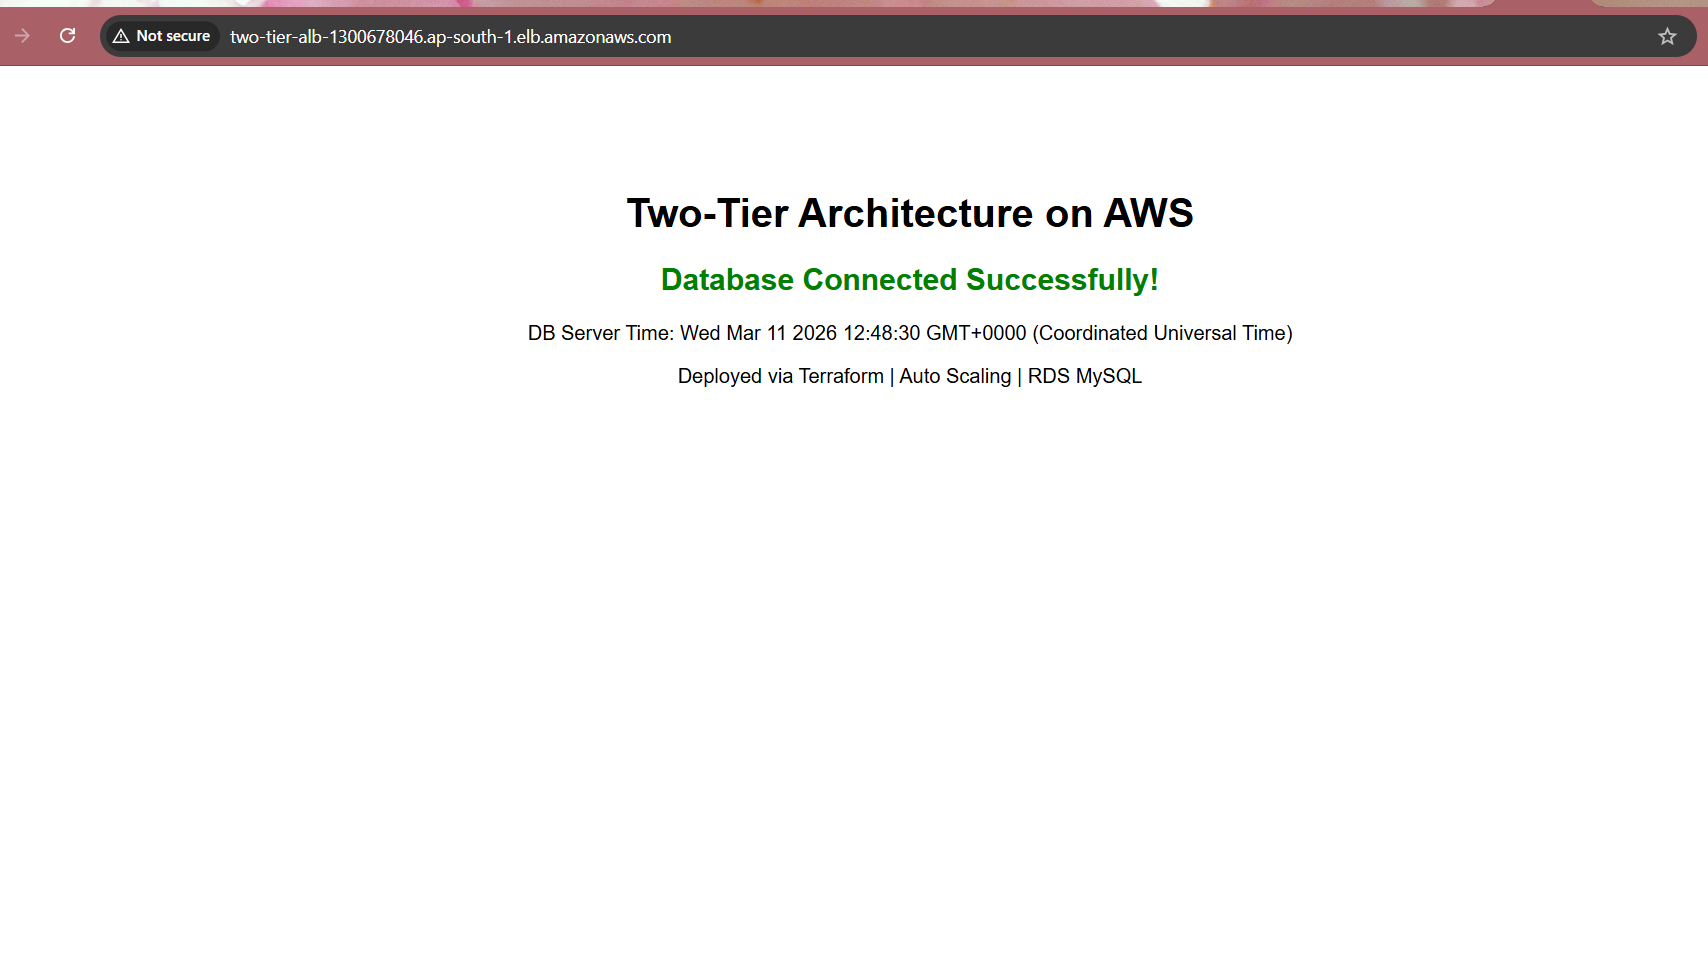
Open the ALB DNS name in your browser and you will see:
AWS Console Verification
After terraform apply completes, here is the verification of all key resources running successfully in AWS.
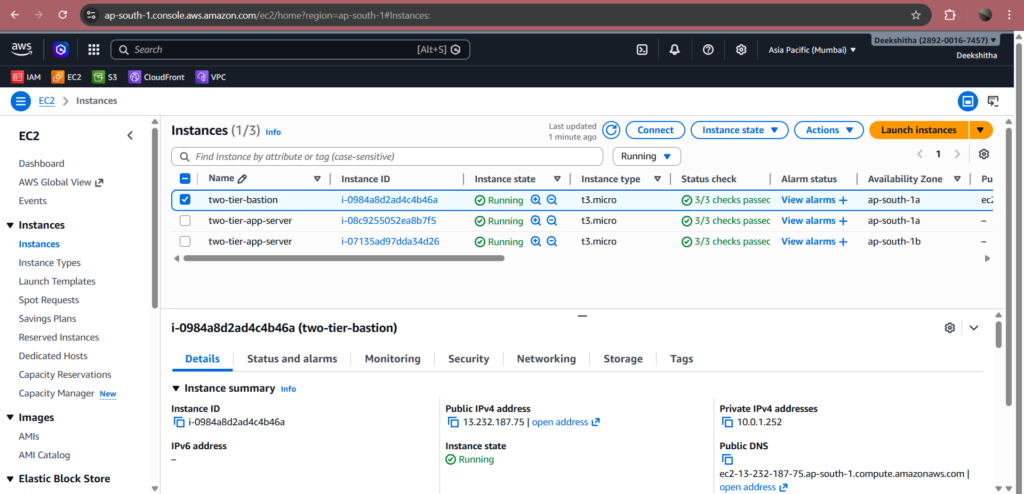
2. EC2 Instances Running
The AWS Console shows 3 running instances — two-tier-bastion in the public subnet with a public IP, and two two-tier-app-server instances in the private subnets with private IPs only. All instances were launched automatically by Terraform.
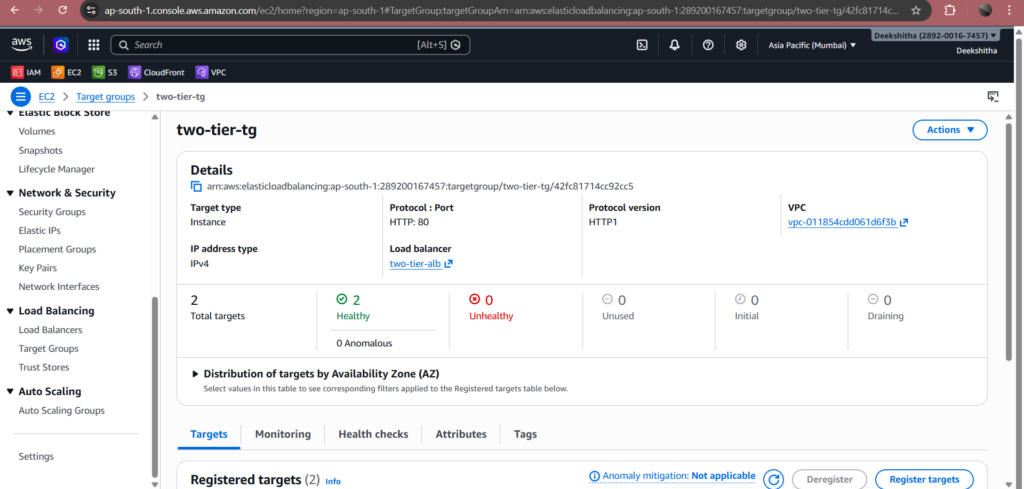
3. Target Group – Healthy Instances
Both app server instances are registered in the target group and show status as Healthy. This confirms the ALB health checks are passing, the Node.js application is running on port 80, and traffic is being distributed correctly across both instances.
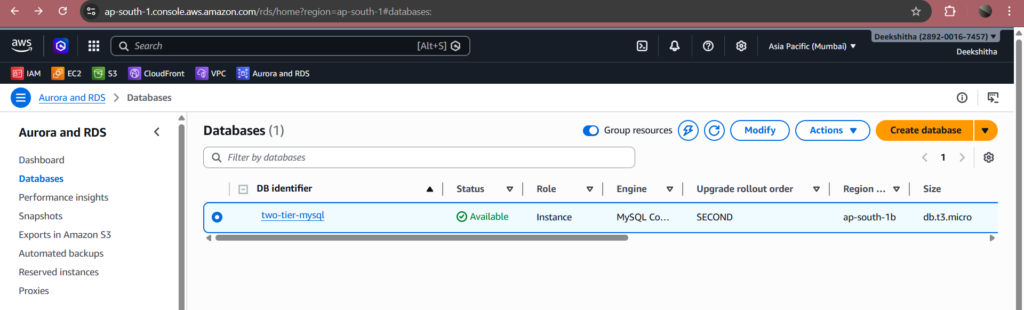
4. RDS Database
Go to AWS Console → RDS → Databases. You should see two-tier-mysql with engine MySQL 8.0 and status Available. Notice that Publicly accessible shows No — confirming the database is completely isolated from the internet.
Key Learnings
- Private subnets are security by default. App servers and databases must never have public IPs. The ALB is the only public-facing entry point into the architecture.
- NAT Gateway is essential for private instances. Without a NAT Gateway, private EC2 instances have no outbound internet access — they cannot download Node.js, npm packages, or any dependencies during User Data execution.
- Bastion Host is the correct way to SSH into private instances. Never open port 22 directly to the internet. Always use a bastion in a public subnet with SSH restricted to your IP only.
- Auto Scaling with ALB provides zero downtime updates. When instances are replaced, the ALB keeps old instances serving traffic until new ones pass health checks — then terminates the old ones automatically.
- Terraform modules make infrastructure maintainable. Each layer of the architecture is independently manageable — update, debug, or reuse any module without touching the others.
- templatefile() is the correct way to inject variables into User Data. Using <<EOF without single quotes allows Terraform to substitute variables like ${db_host} and ${db_password} correctly inside shell scripts.
- MySQL 8.0 reserves certain keywords. Words like current_time are reserved in MySQL 8.0 and must be wrapped in backticks when used as column aliases.
Cleanup
After completing the project, destroy all resources to avoid AWS charges:
terraform destroyType yes when prompted. This will delete all 24+ resources including the NAT Gateway, RDS instance, EC2 instances, ALB, and VPC.
FAQ
What is a two-tier architecture in AWS?
A two-tier architecture in AWS is a cloud design pattern that divides your infrastructure into two separate, isolated layers — the application layer and the database layer.
The application layer consists of EC2 instances running your web application, placed inside an Auto Scaling Group in private subnets. All incoming traffic first hits the Application Load Balancer (ALB) in the public subnet, which distributes it evenly across healthy EC2 instances.
The database layer consists of an Amazon RDS MySQL instance in a completely separate private subnet with no internet access. It can only receive connections from the application layer via a security group rule that allows MySQL on port 3306 exclusively from the application security group.
This separation provides three key benefits — security (each layer has its own security boundary), scalability (each layer scales independently), and maintainability (each layer can be updated without affecting the other).
Why use Terraform for AWS infrastructure?
Terraform is an open-source Infrastructure as Code (IaC) tool that lets you define your entire AWS infrastructure using simple configuration files written in HCL (HashiCorp Configuration Language). Instead of manually clicking through the AWS console to create every resource, you write your infrastructure once as code and run three commands terraform init, terraform plan, and terraform apply.
Furthermore, Terraform automatically understands resource dependencies. It knows the NAT Gateway must come after the Internet Gateway, the Auto Scaling Group after the Launch Template, and the RDS instance after the DB Subnet Group. As a result, you never have to figure out the order manually.
Because your infrastructure is code, you store it in Git, version-control every change, and reproduce it anytime. The same code that builds your dev environment builds an identical production environment by simply changing a few variable values. The same code that builds your dev environment can build an identical production environment by simply changing a few variable values. In this project, all 24 AWS resources were provisioned automatically in the correct order in under 15 minutes.
What is a Bastion Host in AWS?
A Bastion Host is a small EC2 instance deployed in a public subnet that acts as a secure SSH jump server for accessing instances in private subnets.
Since application servers are placed in private subnets with no direct internet access, you cannot SSH into them directly from your local machine. Instead, you first SSH into the Bastion Host using its public IP, and then from the bastion you SSH into the private application servers using their private IPs.
Security is enforced at the security group level — the bastion security group allows SSH on port 22 only from your specific IP address. The application server security group allows SSH only from the bastion security group, not from the internet. This means the only path into your private infrastructure is through the bastion, and the bastion itself is locked down to your IP only.
This is the industry-standard approach for secure access to private cloud resources — never expose SSH directly to the internet.
Why do private EC2 instances need a NAT Gateway?
Private instances are placed in subnets that have no route to the Internet Gateway, which means they have no outbound internet access by default. This is intentional from a security perspective — no one from the internet can reach them directly.
However, during the EC2 User Data execution, the instances need to download packages from the internet — such as Node.js, npm, and application dependencies. Without outbound internet access, these downloads fail and the application never gets installed.
This is exactly what happened in this project. The first deployment failed because there was no NAT Gateway — the instances could not reach the internet to install Node.js, so the app never started and the target group stayed unhealthy.
A NAT Gateway placed in the public subnet solves this. It gives private instances a secure outbound-only internet path — they can initiate connections to the internet to download packages, but no one from the internet can initiate a connection back to them. This gives you the best of both worlds — internet access for package installation, and full protection from inbound traffic.
How does Auto Scaling work with an Application Load Balancer?
The Application Load Balancer (ALB) maintains a target group — a logical group of EC2 instances that are ready to receive traffic. The Auto Scaling Group is attached to this target group, so every instance launched by the ASG is automatically registered into it.
The ALB continuously runs health checks on every registered instance by sending HTTP requests to the / path every 30 seconds. If an instance returns a 200 OK response, it is marked as healthy and receives traffic. If an instance fails two consecutive health checks, it is marked as unhealthy, removed from the target group, and the ALB stops sending traffic to it.
At the same time, the Auto Scaling Group detects that healthy instances dropped below the desired count of 2. Consequently, it automatically launches a fresh replacement instance. Once the new instance passes the health checks, the ALB registers it into the target group and starts sending traffic to it.
This entire process happens automatically with zero manual intervention — ensuring your application remains available even when individual instances fail, are terminated, or are replaced during deployments.
Is the RDS database publicly accessible in this setup?
No. The RDS instance is configured with publicly_accessible = false, which means AWS will not assign it a public IP address or expose it to the internet in any way.
Moreover, the database sits inside a DB Subnet Group that spans two private subnets. Neither subnet has a route to the Internet Gateway. Therefore, even if you accidentally set publicly_accessible to true, the subnet routing still blocks all internet traffic.
Access to the database is further restricted at the security group level. The database security group has a single inbound rule — it allows MySQL traffic on port 3306 only from the application security group. This means only the EC2 app servers can connect to the database. The bastion host, the ALB, and any other resource in the VPC cannot reach it.
This three-layer protection — the Terraform setting, the private subnet routing, and the security group rule — ensures the database is completely isolated and only accessible to the application servers that need it.
What is the difference between Internet Gateway and NAT Gateway?
Both Internet Gateway and NAT Gateway provide internet connectivity in AWS, but they serve very different purposes and work in opposite directions.
An Internet Gateway (IGW) is attached to the VPC and enables two-way internet communication for resources in public subnets. When a public subnet resource like the Bastion Host or ALB has a public IP, the IGW allows inbound traffic from the internet to reach it, and outbound traffic from it to reach the internet. The public route table has a route pointing 0.0.0.0/0 to the IGW.
A NAT Gateway is placed inside a public subnet and provides outbound-only internet access for resources in private subnets. Private instances send their outbound requests to the NAT Gateway, which forwards them to the internet using its own Elastic IP. When the response comes back, the NAT Gateway forwards it to the private instance. At no point does the internet know the private instance’s IP address — so no inbound connection can ever be initiated from outside.
In simple terms — the Internet Gateway is a two-way door for public resources, while the NAT Gateway is a one-way exit for private resources. In this project, the Bastion Host and ALB use the Internet Gateway, while the private EC2 app servers use the NAT Gateway to download Node.js and npm packages during startup.
Can I use Python instead of Node.js for this architecture?
Yes. The architecture is completely application-agnostic — the infrastructure layer and the application layer are fully decoupled from each other.
The infrastructure layer is completely independent of your application language. The VPC, NAT Gateway, ALB, Auto Scaling Group, and RDS MySQL instance do not care whether you use Node.js or Python. They simply route traffic, scale instances, and store data.
To switch from Node.js to Python, you only need to update the userdata.sh script inside the autoscaling module. Instead of installing Node.js and running an Express app, you would install Python, pip, and Flask or FastAPI, and start your Python application on port 80. Everything else — the Terraform modules, the security groups, the ALB health checks, the RDS connection — remains exactly the same.
This is one of the key advantages of a modular Terraform architecture. The application code and the infrastructure code are completely separate, so you can swap one without touching the other.
Conclusion
Building a two-tier architecture on AWS using Terraform is one of the most valuable hands-on exercises for any DevOps engineer. It covers the core pillars of production cloud infrastructure — networking, security, scalability, automation, and database management — all in a single project.
Throughout this project, we built a custom VPC with public and private subnets across two availability zones. We secured it with a Bastion Host and layered security groups. Next, we enabled outbound internet access using a NAT Gateway and distributed traffic using an Application Load Balancer. Finally, we automated application deployment using EC2 User Data and connected everything to an RDS MySQL 8.0 database — all provisioned automatically using Terraform modules.
The real-world challenges faced during this deployment — such as the NAT Gateway requirement for private instances, the MySQL 8.0 reserved keyword issue, and the Terraform variable substitution in User Data scripts — are exactly the kind of problems you will encounter in production environments. Solving them hands-on builds the deep understanding that no tutorial can fully replicate.
If you want to extend this architecture further, consider these improvements. First, add HTTPS using AWS Certificate Manager. Second, enable RDS Multi-AZ for database high availability. Third, set up CloudWatch alarms for Auto Scaling triggers. Finally, store Terraform state remotely using S3 and DynamoDB for team collaboration.
The complete Terraform code for this project is available above — feel free to use it as a starting point for your own AWS infrastructure projects.
Written by Deekshitha R
LinkedIn: www.linkedin.com/in/deekshitha-raveendran-31581527b
