Kubernetes (K8s) labels are key-value pairs that can be a powerful resource for managing, configuring, and troubleshooting. Users can use Kubernetes labels to add meaningful metadata to any Kubernetes object or resource. Because of their extensibility, a sound understanding of Kubernetes labels can make you a better K8s administrator and improve your container workflows.
In this article, we take a closer look at labels and the selectors used to filter them and work through example commands and use cases so you can get hands-on experience with K8s labels.
What is Label
In Kubernetes, labels are key-value pairs attached to objects such as Pods, Deployments, Services, and ReplicaSets. They are used to organize, categorize, and identify resources in a meaningful way. Labels act as metadata that describe attributes of an object and allow users to group and select subsets of resources efficiently. For example, you can assign labels like app=frontend, env=production, or tier=backend to differentiate and manage workloads across environments or application tiers. Unlike names or UIDs, labels are not required to be unique, which means multiple objects can share the same label. Kubernetes controllers and Services use these labels to select and manage groups of Pods dynamically through label selectors. This mechanism enables flexible management operations like rolling updates, scaling, and load balancing across selected Pods. Labels also make it easier to filter and query resources using commands such as kubectl get pods -l app=frontend, helping teams maintain clarity and control in large, complex Kubernetes environments.
Working with Labels
1. Create a Pod with Labels Save the following manifest as labeled-pod.yaml. We are attaching three distinct labels to this Pod in the metadata.labels section.
apiVersion: v1
kind: Pod
metadata:
  name: web-server-pod
  labels:
    app: nginx
    tier: frontend
    environment: development
spec:
  containers:
  - name: nginx-container
    image: nginx
Apply the manifest to create the Pod:
$ kubectl apply -f labeled-pod.yaml2. Viewing Labels You can view the labels of your Pods using the --show-labels flag.
$ kubectl get pods --show-labelsOutput:
NAME             READY   STATUS    RESTARTS   AGE   LABELS
web-server-pod   1/1     Running   0          30s   app=nginx,environment=development,tier=frontend
To view specific labels as columns, use the -L flag.
$ kubectl get pods -L app,environment3. Adding and Modifying Labels You can easily add or update labels on an existing object using the kubectl label command. Let’s add an owner label.
$ kubectl label pod web-server-pod owner=adminVerify the new label was added:
$ kubectl get pods --show-labelsTo update an existing label, you must use the --overwrite flag.
$ kubectl label pod web-server-pod environment=staging --overwrite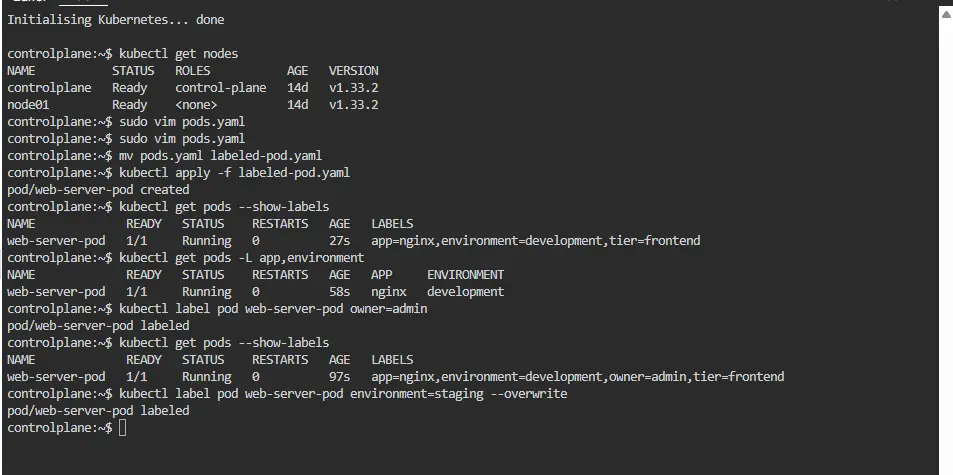
What are Selectors?
If labels are the sticky notes you put on objects, Selectors are how you find and filter those objects based on the notes. Selectors are used extensively in Kubernetes to define which Pods a Service should target, which Pods a Deployment should manage, and more.
There are two types of selectors:
Equality-Based Selectors
Equality-based selectors are mostly used in the Imperative or Command line statements. These are simple rules that check if a label has a specific value. There are three kinds of operators admitted to it, =, ==, !=.
- =: Checks if a label has a specific value (same as ==).Example: env=production selects resources where the label env is set to production.
- ==: Also checks if a label has a specific value (synonym for =).Example: env==production selects resources where the label env is set to production.
- !=: Checks if a label does not have a specific value.Example: env!=staging selects resources where the label env is not set to staging.
Let’s take an example scenario where we want to filter resources based on exact label matches using Equality Selectors.
You want to find all resources where the env label is set to production
To find resources with the label env=production, you can use the following CLI command:
kubectl get pods -l env=productionThis command filters and lists all Pods with the env=production label.
Set-Based Selectors
Set-Based selectors are typically used in declarative statements using the YAML file. They provide more flexibility than Equality-Based selectors. Three kinds of operators are supported: In, NotIn, and Exists.
- In: Selects resources with a label that matches any of the given values.
Example: environment In (production, staging) will find resources in either production or staging.
- NotIn: Excludes resources with a label that matches any of the given values.
Example: team NotIn (dev, qa) will skip resources labeled as dev or qa.
- Exists: Selects resources that have the specified label, regardless of its value.Example:
tier Existsselects resources that have thetierlabel
Hands-On: Using Selectors
To make this interesting, let’s create two more Pods. db-pod.yaml:
apiVersion: v1
kind: Pod
metadata:
  name: database-pod
  labels:
    app: postgres
    tier: backend
    environment: development
spec:
  containers:
  - name: postgres-container
    image: postgres
api-pod.yaml:
apiVersion: v1
kind: Pod
metadata:
  name: api-pod
  labels:
    app: user-api
    tier: backend
    environment: production
spec:
  containers:
  - name: api-container
    image: gcr.io/google-samples/hello-app:1.0
Apply both files: $ kubectl apply -f db-pod.yaml -f api-pod.yaml
Now, let’s query these Pods using selectors with the -l flag.
1. Equality-Based Selection Find all Pods in the development environment.
$ kubectl get pods -l environment=developmentFind all Pods that are part of the backend tier.
$ kubectl get pods -l tier=backendYou can also combine selectors with a comma. Find the Pod that is both backend and production.
$ kubectl get pods -l 'tier=backend,environment=production'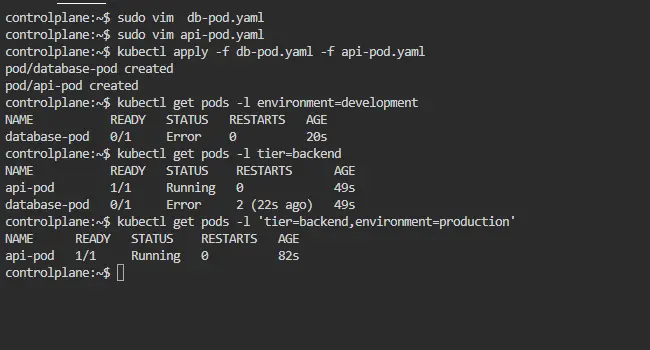
2. Set-Based Selection Find all Pods in either the development or staging environment.
$ kubectl get pods -l 'environment in (development,staging)'Find all Pods that do not have the tier label set to frontend.
$ kubectl get pods -l 'tier notin (frontend)'Find all Pods that have an app label, regardless of its value (the exists operator).
$ kubectl get pods -l 'app'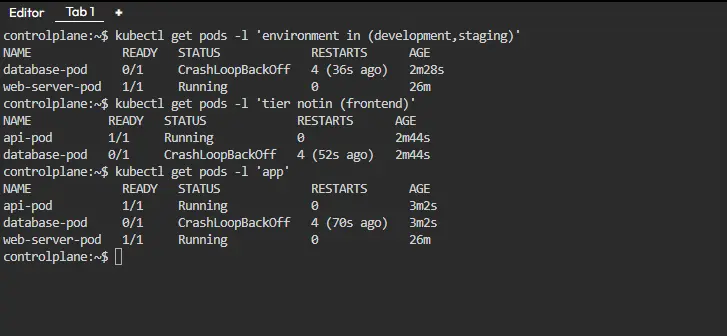
Difference Between Labels and Selectors in Kubernetes
| Feature | Labels | Selectors |
|---|---|---|
| Definition | Labels are key-value pairs attached to Kubernetes objects like Pods, Deployments, and Services to describe and organize them. | Selectors are queries or filters used to identify and select objects based on their labels. |
| Purpose | Used to categorize, tag, and group resources logically. | Used to find, match, and manage groups of resources that share specific labels. |
| Type | Metadata assigned to objects. | Mechanism used to filter objects using label values. |
| Usage | You add labels while creating or updating Kubernetes objects. | You use selectors in controllers, Services, or CLI commands to match objects with specific labels. |
| Example | "app=frontend", "env=production", "tier=backend" | matchLabels: app=frontend, or CLI: kubectl get pods -l app=frontend |
| Who Uses It | Developers and DevOps engineers assign labels to organize and describe workloads. | Controllers (like ReplicaSet, Deployment, Service) use selectors to target specific Pods or objects. |
| Configuration Location | Defined inside the metadata section of a YAML file under metadata.labels. | Defined under spec.selector in controllers or used as a filter in kubectl commands. |
| Relationship | Labels are the data or attributes assigned to objects. | Selectors are the queries that use those labels to filter objects. |
| Dependency | Labels work independently and can exist without selectors. | Selectors depend on labels to function properly. Without labels, selectors have no targets. |
| Dynamic Nature | You can modify labels anytime to reclassify resources. | Selectors automatically adjust to include or exclude objects when labels change. |
| Use in Services | Services assign labels to Pods for grouping. | Service selectors determine which Pods will receive traffic. |
| Use in Deployments | Labels identify Pods created by the Deployment. | Selectors ensure the Deployment manages the correct set of Pods. |
| Command Example | kubectl label pod nginx app=frontend | kubectl get pods -l app=frontend |
| Common Mistake | Using inconsistent or duplicate labels across environments. | Defining selectors that don’t match any existing labels (leads to unmanaged Pods). |
| Analogy | Think of labels as “tags” on files or photos. | Think of selectors as “search filters” that find items with those tags. |
Benefits of Using Labels and Selectors in Kubernetes
Using labels and selectors in Kubernetes provides several powerful advantages that simplify the management of large-scale containerized applications.
- Efficient Resource Organization:
Labels categorize and organize Kubernetes objects such as Pods, Services, and Deployments. You can group related resources, like all components of a specific application or environment, to manage them more easily and maintain a structured system. - Dynamic Grouping and Management:
Selectors let you dynamically target multiple objects that share the same labels. Controllers such as ReplicaSets or Services can then recognize and manage the correct Pods automatically, reducing manual effort. - Simplified Scaling and Updates:
Labels streamline scaling and rolling updates. When new Pods use the same label, Services instantly add them to the load balancer, ensuring smooth traffic distribution without extra configuration. - Better Environment Segregation:
Labels likeenv=dev,env=staging, orenv=prodseparate resources based on environments. This setup clearly distinguishes each stage of development and minimizes configuration errors. - Enhanced Monitoring and Troubleshooting:
Labels simplify monitoring and issue resolution. You can use label selectors inkubectlcommands to quickly find and debug specific applications, environments, or components. - Automation and CI/CD Integration:
Labels and selectors enable efficient automation in CI/CD pipelines. They help tools identify, update, and deploy the correct set of Pods or resources during continuous delivery. - Flexible Service Discovery:
Kubernetes Services rely on label selectors to locate and route traffic to the correct Pods. This approach improves service discovery and maintains high availability as Pods scale or restart.
Best Practices for Assigning Labels and Selectors
Here are a few tips to keep in mind:
- Use descriptive and meaningful names: Rather than using a label like
envorservice1, consider using more descriptive names likeenvironmentorservice-type. - Use a consistent naming convention: For example, use
camelCaseorsnake_casefor your label names and always use lowercase letters. - Use consistent values: Similarly, it’s crucial to use them for your labels to help ensure that they are easy to understand and use. For example, stop using a mix of
test,Test, andTESTto indicate the test environment. Instead, consider using a consistent value liketestfor all of your test environment labels. - Avoid using too many labels: While labels can be handy, it’s essential to use only a few, as this can make it challenging to manage and understand your labels. Try to use only the necessary labels for your applications, and consider consolidating labels if possible.
- Avoid using overly broad or generic labels: It’s also a good idea to avoid them, as these can be difficult to work with and may provide little value. For example, rather than using a label like
appto indicate the type of application, consider using more specific labels likefrontendorbackendinstead.
Conclusion
Labels and selectors play a vital role in managing and organizing Kubernetes resources efficiently. Labels act as descriptive tags that help categorize and identify objects, while selectors use those tags to dynamically filter and control resource groups. Together, they provide flexibility, scalability, and automation in workload management. By using labels and selectors effectively, DevOps teams can streamline operations like scaling, monitoring, and rolling updates—making Kubernetes clusters easier to manage and maintain in complex production environments.
