In Kubernetes, the Kubelet is a vital node-level agent that ensures the smooth operation of containerized applications within a cluster. Running on every worker node, the Kubelet bridges the communication between the Kubernetes control plane and individual nodes, enabling the deployment, management, and monitoring of containers according to the desired state defined in Pod specifications. Understanding Kubelet internals is crucial for grasping how Kubernetes orchestrates workloads, manages resources, handles storage and networking, and maintains cluster health. This deep dive explores the architecture, core responsibilities, and troubleshooting strategies of Kubelet, helping you gain a comprehensive view of its role in maintaining a robust and efficient Kubernetes environment.
What is Kubelet in Kubernetes?
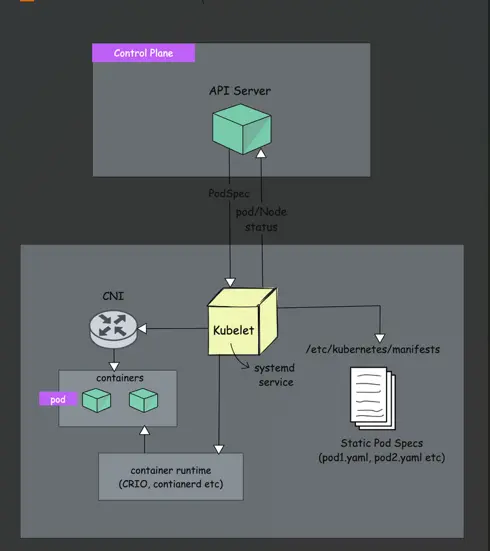
Kubelet in Kubernetes is an essential component that runs on each node (worker machine) in the cluster. It acts as the node agent and is responsible for ensuring that containers are running and healthy on the node. Kubelet works closely with the Kubernetes control plane to manage and maintain the desired state of containers as defined in the cluster’s configurations.
Core Responsibilities of Kubelet
1. Node Registration
Kubelet is responsible for registering worker nodes with the API server.
For example, if you have deployed your own kubeadm cluster, you typically run the node join command from the worker node with API server details and token.
kubeadm join <control-plane-ip>:6443 \
        --token <token> \
        --discovery-token-ca-cert-hash sha256:<hash>
In this process, Kubelet communicates with the API server to register itself. The registration includes sending the node’s details (like hostname, IP address, CPU, memory, and operating system) to the API server.
It then continually reports the node’s status (e.g., available resources, health, and running conditions) to the API server. This ensures that the control plane, particularly the scheduler, has an up-to-date understanding of the node’s capacity and condition.
2. Pod Management
As we learned in the architecture, Kubernetes follows a design principle where most of the components monitor (or “watch”) the API server to make decisions.
The kubelet is one such component that continuously watches the API server for pod information.
When kubelet finds a pod assigned to the node, it retrieves the podSpec (Pod specification – YAML or JSON) from the API server.
An example podSpec
apiVersion: v1
kind: Pod
metadata:
  name: app-pod
  labels:
    app: app
spec:
  containers:
    - name: app-container
      image: nginx:latest
      ports:
        - containerPort: 80
      resources:
        limits:
          memory: "256Mi"
          cpu: "500m"
        requests:
          memory: "128Mi"
          cpu: "250m"
      env:
        - name: ENVIRONMENT
          value: "production"
      volumeMounts:
        - name: app-storage
          mountPath: /usr/share/nginx/html
  volumes:
    - name: app-storage
      persistentVolumeClaim:
        claimName: my-app-pvc
The podSpec defines the desired state of the pod, which includes the following key aspects:
- The containers that should run inside the pod, including the container image and command to run.
- The CPU and memory limits and requests for each container
- Environment variables, volumes (storage), labels, and probes (such as liveness and readiness checks).
Kubelet then takes action to ensure the pod’s containers are running in the specified state on the node.
3. Container Lifecycle Management
The Container Runtime Interface (CRI) is a standard interface that lets Kubernetes interact with different container runtimes. In simpler terms, it allows Kubernetes to work with various underlying container engines, like containerd, Docker Engine, CRI-O, gVisor, and Kata Containers.
The Kubelet uses CRI to communicate with the container runtime in order to manage containers and pods. Specifically, the Kubelet relies on CRI to create, start, stop, and delete containers, which is essential for managing the pod lifecycle.

CRI also provides APIs for operations like pulling container images, removing images, and getting image status. This helps the Kubelet manage container images effectively.
The Kubelet works to ensure that the actual state of the pod matches the desired state described in the pod specification (podSpec). This includes creating, modifying, or deleting containers as needed.
Additionally, the Kubelet continuously performs readiness and liveness probes, if specified in the podSpec, to monitor the health of the containers. When a pod is deleted, the Kubelet gracefully terminates the containers and releases the associated resources.
4. Volume Management
When deploying a pod that requires persistent storage, you often specify a PersistentVolumeClaim (PVC) in your pod’s configuration. This PVC requests storage from a PersistentVolume (PV), which can be backed by external storage solutions like:
- AWS Elastic Block Store (EBS)
- Network File System (NFS)
- Amazon Elastic File System (EFS)
Even though these volumes are created outside the Kubernetes cluster, the pod needs to access them as if they were local storage.
This is achieved by mounting the external volumes onto directories within the node’s filesystem where the pod is running.
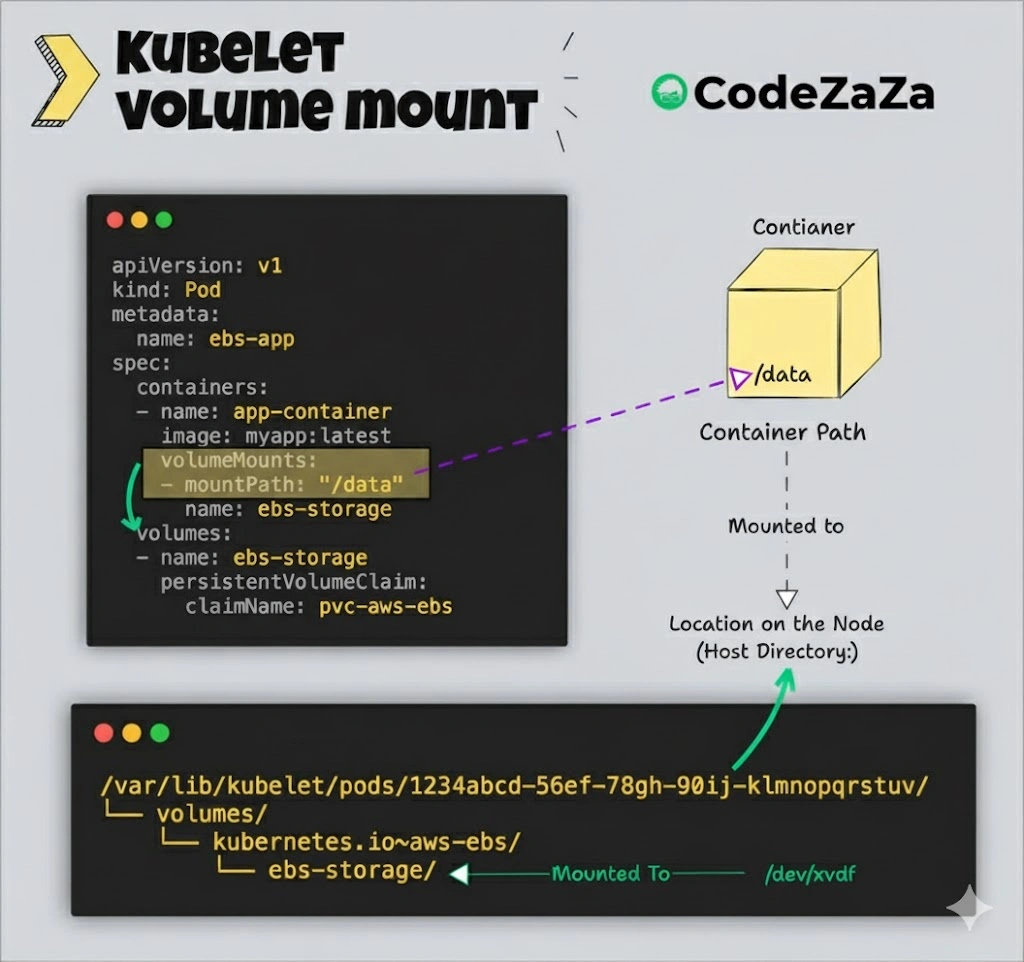
The Kubelet is responsible for all host-level operations related to volume mounting.
Kubelet uses the CSI (container storage interface) gRPC to configure block volumes.
The Container Storage Interface (CSI) is a standard way for Kubernetes to manage storage. It lets Kubernetes connect to different storage systems (like cloud storage, network storage, or local storage on servers) without needing custom solutions for each one.
The Kubelet parses the pod’s configuration file (podSpec), which includes volume definitions and mount points.
Kubelet mounts volumes by reading pod configurations and creating respective directories on the host for volume mounting.
Kubelet creates the appropriate directory on the host machine (node) where the pod is scheduled to run, such as /var/lib/kubelet/pods/[pod-id]/volumes/kubernetes.io~pvc/[pvc-name].
The Kubelet ensures the container inside the pod has access to the volume by binding the mount point to the container’s filesystem at the specified path in volumeMounts.
5. Secrets and ConfigMaps Mounts
When you create ConfigMaps and Secrets and then associate them with a pod using volume mounts, the kubelet reads the ConfigMaps and Secrets from the Kubernetes API and injects them into the pods at runtime.
Secret Management
The kubelet fetches Secrets from the API server when pods on its node need them. It mounts Secrets as files into pods through a tmpfs (RAM-backed filesystem).
The following example shows mounted tmpfs (temporary filesystem) for secret that Kubernetes has set up for a specific pod on a node.
$ mount | grep tmpfs | grep password

root@node02:/var/lib/kubelet/pods/208ef857-e54f-4ceb-a569-64af9cb57994/volumes/kubernetes.io~secret/secret-volume
Also, it automatically updates mounted Secrets when they change
If you want to try it out, you can get the pod ID and the node where the pod is running by using the following commands:
$ kubectl get po <pod-name> -o jsonpath='{.metadata.uid}'

$ kubectl get po -o wide
ConfigMap Management:
The kubelet also mounts ConfigMap data as files into pods and updates the mounted ConfigMap data when changes occur.
Here is an example of a mounted ConfigMap on a node for a pod:
$ ls /var/lib/kubelet/pods/208ef857-e54f-4ceb-a569-64af9cb57994/volumes/kubernetes.io~configmap/config-volume

welcome-message
6. Logging and Execution
When you run commands like kubectl logs and kubect exec, kublet plays a key role.
Kubelet exposes an HTTP endpoint to stream logs and provide exec sessions for clients.
First lets understand how kubelet is related to pod logs. Lets say you want to get the logs of a pod named db-pod.
kubectl logs db-podHere is what happens.
kubectl logscommand constructs an API request to the Kubernetes API server to retrieve logs from thedb-pod- The API server looks up to determine on which node it is running.
- The API server forwards the log request to the Kubelet running on the node hosting
db-pod. - The Kubelet uses the container runtime (e.g., Docker, containerd) to access the logs of the container. It reads the log files or streams the logs in real-time. This is where Kubelet’s HTTP endpoint for streaming logs comes into play.
- The Kubelet sends the logs back to the API server, which then relays them to
kubectl, displaying them in the terminal.
Now, let’s understand how Kubelet is related to executing commands inside a pod. Let’s say you want to start an interactive shell session in a pod named db-pod.
kubectl exec -it db-pod -- /bin/bashHere is what happens:
- The
kubectl execcommand constructs an API request to the Kubernetes API server to execute the/bin/bashcommand insidedb-pod. - The API server looks up
db-podin its datastore to determine on which node it is running. - The API server uses its API proxy functionality to forward the exec request to the Kubelet on the node hosting
db-pod. This proxying allows communication with the Kubelet without exposing it directly, enhancing security. - The Kubelet receives the proxied request from the API server.
- It uses the container runtime (e.g., Docker, containerd) to execute the specified command (
/bin/bash) inside the container. - It sets up a streaming session to handle the input and output streams between your terminal and the container. This involves multiplexing stdin, stdout, and stderr over a single connection using protocols like SPDY or WebSockets.
- The Kubelet streams the command’s output back to the API server via the API proxy.
- The API server then relays this data to your
kubectlclient, allowing you to interact with the shell inside the container directly from your terminal.
7. Status Reporting
The kubelet in Kubernetes is responsible for managing the containers on each node, and part of its role is to monitor and report the status of nodes and pods back to the Kubernetes API server.
For node-level metrics collection, the kubelet gathers resource usage statistics directly from the operating system and the hardware of the node itself.
For container metrics, the kubelet uses tools like cAdvisor (Container Advisor), which is integrated directly into kubelet.
cAdvisor collects detailed resource usage and performance metrics for each container, tracking:
- CPU usage
- Memory usage
- Network traffic
- Disk usage
The kubelet then sends these aggregated node-level metrics to the Kubernetes API server. This makes the data available to other Kubernetes components for scheduling, scaling, and health monitoring.
When you install the Metrics Server component in a Kubernetes cluster, it collects resource metrics like CPU and memory usage from each node by querying the kubelet running on that node
If you install the metrics server component, it uses the resources metrics exposed nby inividual kubelets on each node.
8. Networking
Kubelet plays several important roles in Pod networking.
Kubelet interacts with the Container Network Interface (CNI) plugins. When a new Pod is scheduled, kubelet calls the CNI plugin to:
- Allocate an IP address for the Pod
- Set up the network namespace
- Configure network interfaces
Besides basic networking, kubelet also takes care of setting up DNS for the Pod. Specifically, kubelet configures the /etc/resolv.conf file inside the Pod to make sure the Pod can use:
- Cluster DNS server
- Search domains (for example, resolving just
service-nameinstead ofservice-name.namespace.svc.cluster.local). - DNS options
Why is Kubelet important in Kubernetes?
Kubelet plays a crucial role in ensuring the overall health and stability of a Kubernetes cluster. By monitoring the containers running on each node and reporting back any issues, Kubelet enables Kubernetes to automatically detect and recover from failures, ensuring that the applications running on the cluster remain available and responsive.
Kubelet also enables Kubernetes to scale applications horizontally by adding or removing containers as demand fluctuates. This allows Kubernetes to maximize resource utilization, making it a highly efficient and cost-effective platform for running containerized workloads.
How it Works
When a new pod is scheduled to a node, the Kubelet pulls the PodSpec from the API server. It then works with the container runtime (like Docker or containerd) to pull the required container images and start the containers.
Once the containers are running, the Kubelet keeps an eye on them. It uses health probes—like liveness and readiness checks—to ensure the containers are functioning as expected. For example:
- If a liveness probe fails, the Kubelet will restart the container.
- If a readiness probe fails, the pod will be removed from the list of endpoints serving traffic.
The Kubelet also communicates regularly with the API server, sending updates about the pod’s status and node’s health.
What happens when Kubelet is down?
When the kubelet on a node is down, it disrupts the management and monitoring of containers on that specific node.
Here’s what typically happens.
- The node and pod status updates to the Kubernetes API server stop, and the node appears unresponsive to the control plane.
- After a set period (usually 40 seconds by default
--node-monitor-grace-period parameterin the kube-controller-manager), the Kubernetes control plane marks the node as NotReady. - Any running pods on that node will continue to operate as long as the containers themselves are running, but Kubernetes won’t be able to manage or monitor them.
- Readiness and liveness probes, which are used to check the health of containers, rely on the kubelet. When it’s down, these checks stop running, making it difficult for Kubernetes to determine the actual status of applications on the node.
Common Issues and Troubleshooting
Kubernetes clusters, while powerful, can encounter several common issues. Understanding these problems and knowing how to troubleshoot them is essential for maintaining a healthy cluster.
1. Kubelet Fails to Start Pods
Cause: This can happen due to insufficient node resources, missing container images, or misconfigured Pod specifications.
Solution:
Check node resources: Ensure the node has enough CPU and memory to run the Pod. Use kubectl describe node <node-name> to view resource usage.
Verify images: Confirm that the container image exists in the registry and is accessible. Use kubectl describe pod <pod-name> to check for image pull errors.
Validate PodSpec: Ensure your YAML definition is correct—check volumes, environment variables, ports, and syntax. Use kubectl apply --dry-run=client -f pod.yaml to validate the manifest.
2. Node Not Ready
Cause: The node may be marked “Not Ready” due to networking issues, insufficient CPU/memory, or failed heartbeats.
Solution:
Inspect node status: Run kubectl get nodes and kubectl describe node <node-name> to check conditions and recent events.
Check Kubelet and system logs: Use journalctl -u kubelet or dmesg for hardware/resource errors.
Verify networking: Ensure the node can reach the control plane and other nodes. Check CNI plugin logs and network connectivity.
Free resources: If the node is under resource pressure, reduce workloads or add more capacity.
3. Failed Health Probes
Cause: Liveness or readiness probes fail due to misconfiguration or application bugs.
Solution:
Check probe configuration: Verify the endpoint, port, and path used in the probe are correct in your PodSpec.
Test manually: Use tools like curl or telnet to test the probe endpoint from inside the cluster.
Fix application bugs: Ensure the application starts correctly and responds as expected. Adjust probe thresholds, initial delays, and timeouts if necessary.
Conclusion
In Kubernetes, the Kubelet is the fundamental node agent responsible for maintaining the desired state of pods and containers on each node. It acts as the bridge between the control plane and the node, handling tasks such as node registration, pod scheduling, container lifecycle management, volume and secret mounting, logging, and networking. By continuously monitoring container health through liveness and readiness probes, managing storage and network configurations, and reporting node and pod status to the API server, Kubelet ensures that applications run reliably and efficiently across the cluster.
The Kubelet’s proper functioning is critical for cluster stability; when it fails, node and pod monitoring stops, readiness and liveness checks cease, and the control plane may mark the node as “NotReady,” potentially impacting application availability. Common issues like pod start failures, node readiness problems, and failed health probes can usually be resolved by carefully checking node resources, container images, PodSpecs, network configurations, and probe settings.
Overall, Kubelet is indispensable for the automated orchestration, scaling, and fault tolerance that make Kubernetes a robust platform for running containerized applications at scale. It ensures that the cluster remains responsive, self-healing, and capable of efficiently utilizing resources while providing reliable service to end users.
