When you deploy applications in Kubernetes, they’re not running as one big program — they’re a collection of small, independent parts called Pods. These Pods must constantly talk to each other: exchanging data, sending API requests, and connecting to databases or external users.
But have you ever wondered how these Pods actually communicate?
How does a Pod on one node reach another Pod on a different node?
Or how Kubernetes ensures that traffic always finds the right destination, even when Pods keep getting recreated?
That’s where Kubernetes networking comes in.
The Kubernetes networking model allows the different parts of a cluster — such as Nodes, Pods, Services, and external clients — to communicate seamlessly. Whether it’s a Pod reaching another Pod, an external user accessing an application, or a Service distributing traffic, Kubernetes handles networking automatically behind the scenes.
However, beneath this smooth surface lies a sophisticated system that connects thousands of moving parts. Understanding how Kubernetes networking works helps you not only troubleshoot issues but also design secure, scalable, and efficient cluster environments.
Networking inside Kubernetes may sound complex, but once you break it down, it follows simple principles. It’s all about connecting containers, Pods, and Services in a way that’s consistent and reliable — no matter how big your cluster grows.
In this guide, we’ll take a closer look at the core components of Kubernetes networking, including CNI plugins, pod-to-pod communication, kube-proxy, Service networking, overlay networks, and DNS internals.
We’ll also explain how Kubernetes differs from traditional networking systems and explore the mechanisms that make traffic routing, load balancing, and name resolution possible inside your cluster.
Let’s dive in and uncover how Kubernetes keeps every part of your cloud-native system connected
What is Kubernetes networking?
Kubernetes networking refers to the system of communication between pods, services, and external resources within a Kubernetes cluster. Networking handles several different scenarios, which we’ll explore below, but some key ones include communication between Pods, communication between Kubernetes Services, and handling external traffic to the cluster.
Because Kubernetes is a distributed system, the network plane spans across your cluster’s physical Nodes. It uses a virtual overlay network that provides a flat structure to which your cluster resources can connect.
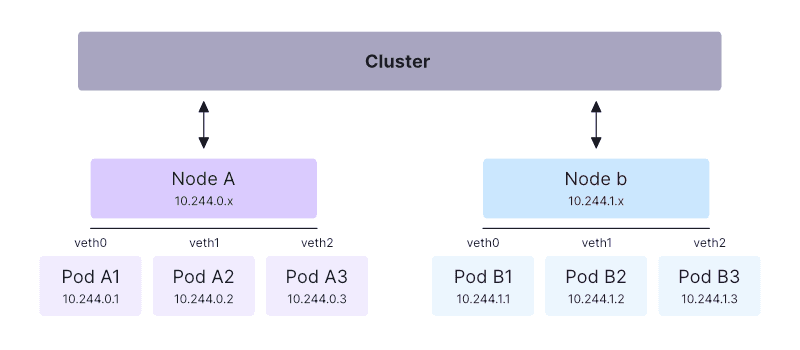
Below is an example of a Kubernetes networking diagram:
The Kubernetes networking implementation allocates IP addresses, assigns DNS names, and maps ports to your Pods and Services. This process is generally automatic—when using Kubernetes, you won’t normally have to manage these tasks on your network infrastructure or Node hosts.
At a high level, the Kubernetes network model works by allocating each Pod a unique IP address that resolves within your cluster. Pods can then communicate using their IP addresses, without requiring NAT or any other configuration.
This basic architecture is enhanced by the Service model, which allows traffic to route to any one of a set of Pods. It also includes control methods, including network policies that prevent undesirable Pod-to-Pod communications.
What is the difference between physical/VM networking and Kubernetes networking?
Kubernetes networking takes familiar networking principles and applies them to Kubernetes cluster environments. Compared to traditional networking models used for physical devices and VMs, Kubernetes networking is simpler, more consistent, and more automated.
Whereas you’d previously have to manually configure new endpoints with IP addresses, firewall port openings, and DNS routes, Kubernetes provides all this functionality for your cluster’s workloads.
Developers and operators don’t need to understand how the network is implemented to successfully deploy resources and make them accessible to others. This simplifies setup, maintenance, and continual enforcement of security requirements by allowing all management to be performed within Kubernetes itself.
What is the difference between Docker networking and Kubernetes networking?
Kubernetes uses a flat networking model that’s designed to accommodate distributed systems. All Pods can communicate with each other, even when they’re deployed to different physical Nodes.
As a single-host containerization solution, Docker takes a different approach to networking. It defaults to joining all your containers into a bridge network that connects to your host. You can create other networks for your containers using a variety of network types, including bridge, host (direct sharing of your host’s network stack), and overlay (distributed networking across Nodes, required for Swarm environments).
Once they’re in a shared network, Docker containers can communicate with each other. Each container is assigned a network-internal IP address and DNS name that allows other network members to reach it. However, Docker does not automatically create port mappings from your host to your containers—you must configure these when you start your containers.
In summary, Docker and Kubernetes networking have similarities, but each is adapted to its use case. Docker is primarily concerned with single-node networking, which the bridged mode helps to simplify, whereas Kubernetes is a naturally distributed system that requires overlay networking.
This difference is apparent in how you prevent containers from communicating with each other: to stop Docker containers from interacting, you must ensure they’re in different networks. This contrasts with Kubernetes, where all Pods are automatically part of one overlay network, and traffic through the network is controlled using policy-based methods
Kubernetes Networking Architecture
Kubernetes uses a flat and open network design. This means that every Pod inside the cluster can talk to any other Pod or Service — no matter which Node they are running on.
Let’s look at the main features that make this possible.
Key Features of the Networking Model
- Each Pod has its own IP address.
Every Pod gets a unique IP. This makes communication simple because one Pod can talk to another directly using that IP address. - Nodes act as network bridges.
Each Node connects all the Pods running on it and passes their traffic to other Nodes when needed. This setup allows all Pods in the cluster to communicate freely. - No need for NAT (Network Address Translation).
Pods don’t need special translation rules to send or receive traffic. This keeps networking simple and more reliable. - Pods use their own network interfaces.
Every Pod has a virtual network interface that handles its incoming and outgoing traffic. - Traffic moves easily between Nodes.
A cluster-wide network layer connects all Nodes together. This layer ensures that data always reaches the correct Pod, even if it’s on another Node. - No need to manually map ports.
Pods don’t have to bind to Node ports to be reachable. However, if needed, you can still assign a Pod ahostPortto expose it on the Node.
Because of these design choices, Kubernetes networking is predictable and consistent. Developers and administrators don’t have to do any manual setup to make Pods talk to each other — everything just works automatically.
Main Components of Kubernetes Networking
Kubernetes networking is made up of three main layers: Pod networking, Service networking, and Ingress/Egress networking.
1.Pod Networking
This layer manages communication between Pods.
Each Pod gets its own IP, and Pods talk directly without NAT.
A CNI plugin (like Calico, Flannel, or Weave) sets up routes and assigns IP addresses so Pods can find each other.
2. Service Networking
This layer provides stable access points for Pods.
Since Pods are temporary, Services use a ClusterIP (a fixed virtual IP) to route traffic to healthy Pods.
The kube-proxy component handles the routing using iptables, IPVS, or eBPF — ensuring load balancing and smooth communication.
3. Ingress and Egress Networking
This layer connects the cluster to the outside world.
- Ingress controllers manage incoming HTTP/HTTPS traffic and route it to the correct Service.
- Egress rules control how Pods send requests to external systems, often through NAT or an egress gateway for security and tracking.
How Kubernetes allocates pod IP addresses
Kubernetes allocates IP addresses to Pods using the Classless Inter-Domain Routing (CIDR) system. This notation defines the subnet of IP addresses that will be available for use by your Pods. Each Pod is allocated an address from the CIDR range that applies to your cluster. You’ll need to specify the permitted CIDR range when you configure a new cluster’s networking layer.
Many Kubernetes networking plugins also support IP Address Management (IPAM) functions, so you can manually assign IP addresses, prefixes, and pools. This facilitates advanced management of IP addresses in more complex networking scenarios
How DNS works in Kubernetes clusters
Kubernetes clusters include built-in DNS support. CoreDNS is one of the most popular Kubernetes DNS providers; it comes enabled by default in many Kubernetes distributions.
Kubernetes automatically assigns DNS names to Pods and Services in the following format:
- Pod –
pod-ip-address.pod-namespace-name.pod.cluster-domain.example(e.g.10.244.0.1.my-app.svc.cluster.local) - Service –
service-name.service-namespace-name.svc.cluster-domain.example(e.g.database.my-app.svc.cluster.local)
The applications running in your Pods should usually be configured to communicate with Services using their DNS names. Names are predictable, whereas a Service’s IP address will change if the Service is deleted and then replaced.
Types of Kubernetes networking and examples
Kubernetes clusters need to handle several types of network access:
- Pod-to-Pod communication
- Service-to-Pod communication
- External communication to services
Each scenario uses a slightly different process to resolve the destination Node and Pod.
1. Pod-to-Pod (same Node)
Communication between two Pods running on the same Node is the simplest situation.
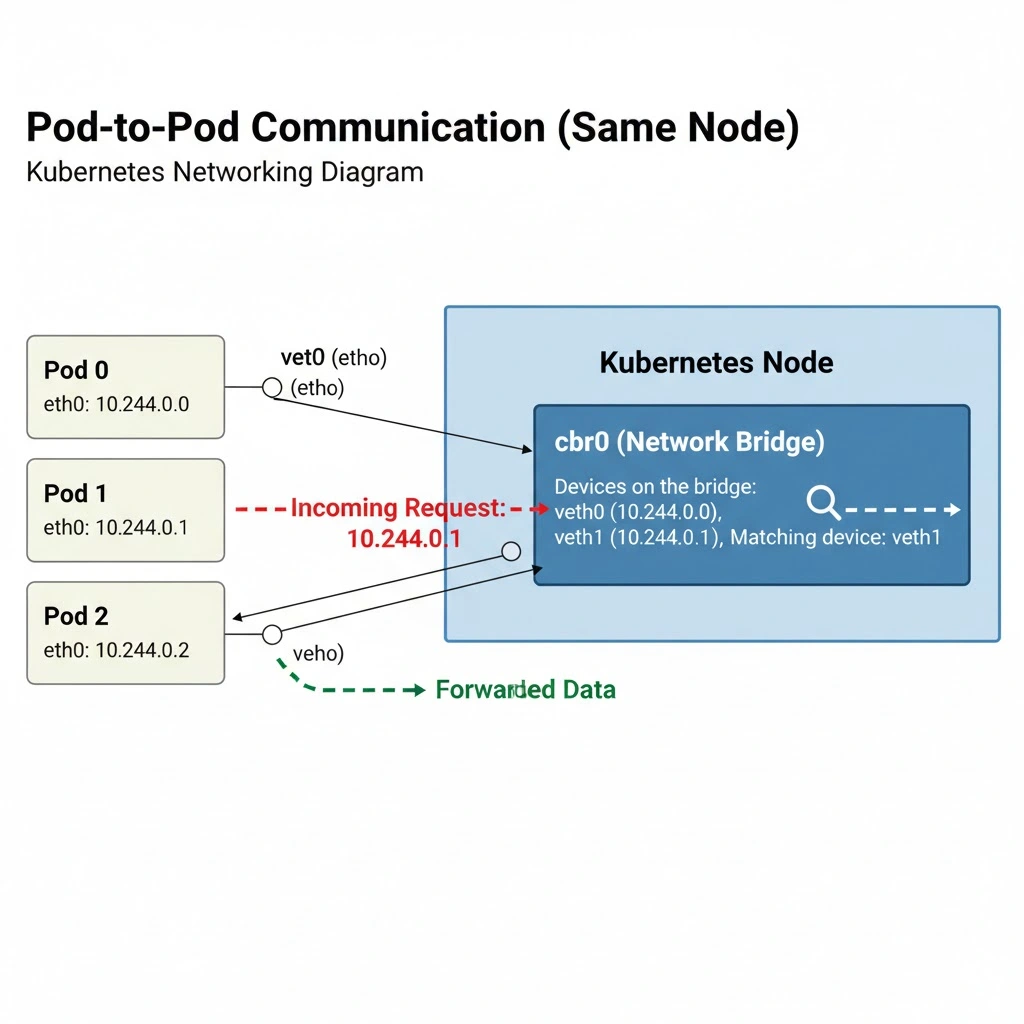
The Pod that initiates the network communication uses its default network interface to make a request to the target Pod’s IP address. The interface will be a virtual ethernet connection provided by Kubernetes, usually called eth0 on the Pod side and veth0 on the Node side. The second Pod on the Node will have veth1, the third Pod veth2, and so on:
- Pod 0 —
10.244.0.0,veth0 - Pod 1 —
10.244.0.1,veth1 - Pod 2 —
10.244.0.2,veth2
The Node side of the connection acts as a network bridge. Upon receiving the request for the target Pod’s IP, the bridge checks if any of the devices attached to it (which are the Pod network interfaces veth0, veth1, and veth2, etc.) have the requested IP address:
Incoming Request: 10.244.0.1

Devices on the bridge:
Pod 0 – 10.244.0.1, veth0
Pod 1 – 10.244.0.1, veth1
Pod 2 – 10.244.0.2, veth2

Matching device: veth1
If there’s a match, then the data is forwarded to that network interface, which will belong to the correct Pod.
2. Pod-to-Pod (different Nodes)
Communication between Pods on different Nodes isn’t much more complex
.
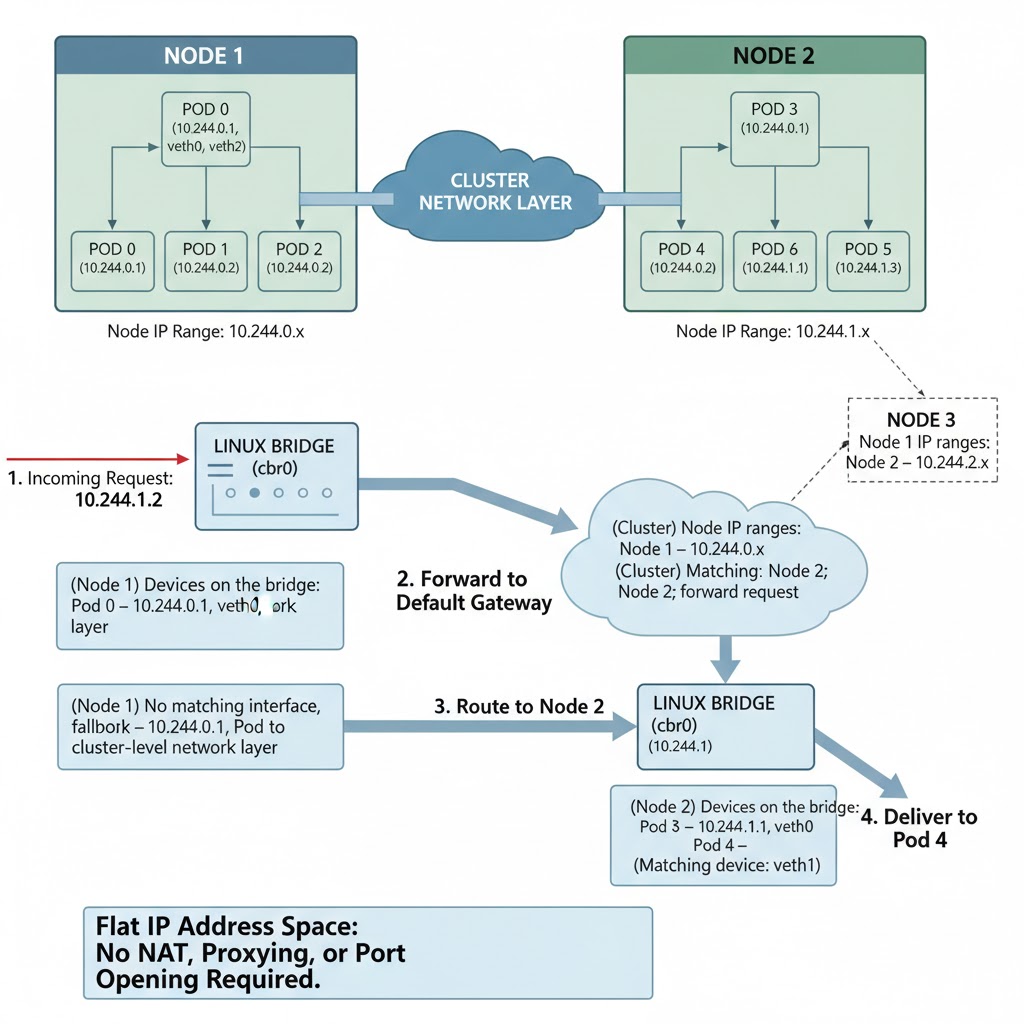
First, the previous Pod-to-Pod flow is initiated, but this will fail when the bridge finds none of its devices have the correct IP address. At this point, the resolution process will fall back to the default gateway on the Node, which will resolve to the cluster-level network layer.
Each Node in the cluster is assigned a unique IP address range; this could look like the following:
- Node 1 – All Pods have IP addresses in the range
10.244.0.x - Node 2 – All Pods have IP addresses in the range
10.244.1.x - Node 3 – All Pods have IP addresses in the range
10.244.2.x
Thanks to these known ranges, the cluster can establish which Node is running the Pod and forward the network request on. The destination Node then follows the rest of the Pod-to-Pod routing procedure to select the target Pod’s network interface.
(Node 1) Incoming Request: 10.244.1.1

(Node 1) Devices on the bridge:
Pod 0 – 10.244.0.1, veth0
Pod 1 – 10.244.0.1, veth1
Pod 2 – 10.244.0.2, veth2

(Node 1) No matching interface, fallback to cluster-level network layer

(Cluster) Node IP ranges:
Node 1 – 10.244.0.x
Node 2 – 10.244.1.x
Node 3 – 10.244.2.x

(Cluster) Matching Node: Node 1; forward request

(Node 1) Devices on the bridge:
Pod 0 – 10.244.1.1, veth0
Pod 1 – 10.244.1.1, veth1
Pod 2 – 10.244.1.2, veth2

(Node 1) Matching device: veth1
The network connection is established to the correct Pod network interface on the remote Node. It’s notable that no NAT, proxying, or direct opening of ports was required for the communication, because all Pods in the cluster ultimately share a flat IP address space.
3. Service-to-Pod Communication
In Kubernetes, a Service is like a middleman that connects users (or other Pods) to the right group of Pods running your app.
A Service has a virtual IP address or DNS name that stays the same, even if the Pods behind it change. When someone sends a request to that Service, Kubernetes automatically sends it to one of the Pods running your app.
There are different types of Services for different situations:
- ClusterIP – This type is only available inside the cluster. It’s used for internal apps, like databases or APIs that other Pods need to talk to.
- NodePort – This type opens a specific port on every Node in the cluster so you can reach the Service from outside the cluster (for example, through your Node’s IP address).
- LoadBalancer – This type is used when you want to expose your app to the internet. Kubernetes asks your cloud provider to create a Load Balancer that sends outside traffic to your Service.
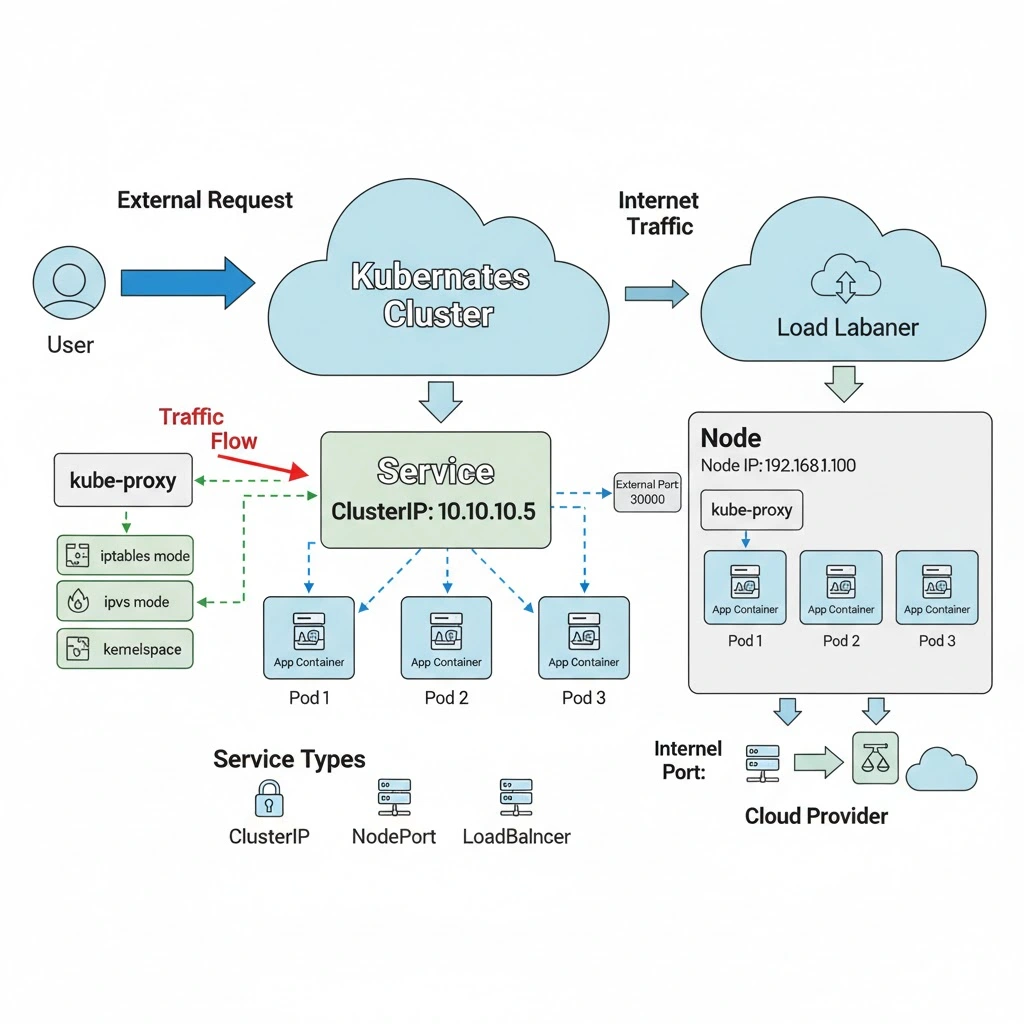
When someone sends a request to a Service, a process called kube-proxy decides which Pod should receive the request. kube-proxy runs on every Node and handles how network traffic is routed.
There are three ways kube-proxy can work:
- iptables mode – Uses Linux firewall rules to forward traffic.
- ipvs mode – Uses a faster method with more traffic balancing options (like sending traffic to the Pod with the fewest connections).
- kernelspace mode – Used on Windows Nodes; it does the same job using Windows network rules.
After kube-proxy chooses a Pod, the traffic moves directly to that Pod like a normal Pod-to-Pod communication.
4. External-to-Service Communication
Normally, you can’t directly access Pods or Nodes in a Kubernetes cluster from the internet. Instead, external traffic goes through a Service.
There are two main ways to make a Service available to the outside world:
- By giving it an external IP address, or
- By using a LoadBalancer Service type (the most common and easiest option).
When you use a LoadBalancer, your cloud provider creates a real load balancer for you. This load balancer gets a public IP address and sends incoming internet traffic to your Kubernetes Service. Kubernetes then forwards the request to one of the available Pods.
In real-world setups, most people use an Ingress.
An Ingress acts like a smart traffic manager. It uses one LoadBalancer to handle all incoming HTTP/HTTPS requests and then decides which Service (and which Pods) should handle each request — based on the website address, path, or request type.
What Are CNI Plugins?
CNI (Container Network Interface) plugins are small pieces of software that provide networking capabilities to containers and pods in Kubernetes. They act as a bridge between your Kubernetes nodes and the pods running on them, allowing pods to communicate with each other, with services, and with external networks. Essentially, a CNI plugin configures the network interfaces inside pods and ensures that they have the right IP addresses, routes, and connectivity rules.
Without a CNI plugin, Kubernetes nodes cannot assign IP addresses to pods or manage their networking properly, leaving pods in a pending state. This is why a node stays in a NotReady state until a CNI plugin is installed.
Role of CNI Plugins in Kubernetes Networking
- Pod-to-Pod Communication:
CNI plugins handle IP assignment and routing so pods on the same or different nodes can communicate seamlessly. Each pod gets a unique IP address that the plugin manages. - Node Readiness:
Kubernetes relies on CNI plugins to configure pod networking. A node won’t be marked as ready until the networking is functional, ensuring that the cluster doesn’t schedule pods that can’t communicate. - Service Connectivity:
Plugins work with kube-proxy and other components to enable services to route traffic correctly to the pods backing them. - Network Policies:
Many CNI plugins also support network policies, which allow cluster administrators to control which pods can communicate with each other or with external networks, providing an extra layer of security.
Impact on Node Readiness
Node Readiness: A Kubernetes node remains in a NotReady state until a CNI plugin is installed. Without it, pods cannot receive proper networking configuration, causing them to remain in a pending state.
Connectivity Assurance: Core components like kube-prox
Popular CNI Plugins
1. Calico
Calico is one of the most widely used CNI plugins, known for its performance, scalability, and security features. It provides Layer 3 (routing-based) networking, assigning unique IPs to pods and using standard IP routing to connect them across nodes. Calico also supports network policies, allowing administrators to control which pods or external endpoints can communicate with each other. This makes it suitable for clusters that require fine-grained security and large-scale deployments. Calico can also operate in VXLAN mode, which creates an overlay network if routing isn’t possible in your environment.
2. Flannel
Flannel is a simple and lightweight overlay network designed primarily for small to medium-sized clusters. It assigns a unique subnet to each node and routes pod traffic using VXLAN or host-gateway (host-gw) mode, depending on the setup. Flannel focuses on ease of setup and simplicity, making it ideal for beginners or clusters where advanced network policies aren’t required. However, it does not provide network policy enforcement, so additional tools are needed if security policies are important.
3. Weave Net
Weave Net provides automatic networking for Kubernetes pods, creating a flat network where pods can communicate without manual IP management. It supports encryption between pods, which is useful for securing traffic across nodes. Weave Net is self-configuring, meaning it automatically handles routing and network address management as the cluster grows or shrinks. Its simplicity makes it popular for dynamic and cloud-based clusters, though it can have slightly higher latency compared to Calico for very large clusters.
4. Cilium
Cilium is a modern CNI plugin that leverages eBPF (Extended Berkeley Packet Filter) in the Linux kernel to provide high-performance networking and security. Unlike traditional plugins, Cilium can enforce Kubernetes API-aware network policies, allowing very fine-grained control over which services or pods can talk to each other. It also supports load balancing, observability, and service mesh features, making it ideal for enterprises that require advanced networking, monitoring, and security capabilities in their clusters.
5. Kube-Router
Kube-Router is designed to combine routing, network policies, and service proxying into a single lightweight plugin. It uses the Linux kernel’s routing table for pod networking, avoiding overlays and providing low-latency communication. Kube-Router also enforces network policies natively and acts as a service proxy, which can replace kube-proxy for improved performance. Its simplicity and minimal overhead make it suitable for clusters where performance is critical and simplicity is preferred.
Kube-Proxy: The Traffic Director of Kubernetes
When applications run in Kubernetes, they’re split into multiple small, independent parts called Pods. These Pods must constantly communicate with each other—sending API requests, accessing databases, or connecting to external users. But as Pods are ephemeral (they can be created, destroyed, or moved to another node at any time), Kubernetes needs a system that ensures traffic always reaches the right destination. This is where kube-proxy comes in.
kube-proxy is a network component that runs on every node in your cluster. Its main responsibility is to manage the routing of traffic within the cluster so that Services can correctly reach the Pods backing them. Think of kube-proxy as a traffic director: it constantly monitors the state of Services and Pods and updates the node’s network rules to ensure requests go to the right Pod endpoints.
Key Responsibilities of Kube-Proxy
1. Service Load Balancing
Imagine you have a shop with many cashiers, and customers can go to any cashier to pay. A Service in Kubernetes is like the shop entrance—it always stays in the same place, but the customers (requests) need to be sent to one of the cashiers (Pods) inside. kube-proxy acts like a manager at the entrance, directing each customer to a cashier who is available. If one cashier is busy, kube-proxy sends the next customer to another one. This way, the work is shared, and no single cashier gets overloaded. Even if a cashier leaves or a new one comes in, the manager keeps sending customers to the right person.
2. Network Rule Management
To make sure traffic goes to the right Pod, kube-proxy sets up rules on each node. Think of these rules as traffic signs in a city. If a request wants to reach a Service, kube-proxy tells it which Pod to go to by creating and updating the signs automatically. If a Pod stops working or a new Pod starts, kube-proxy changes the signs so that the request always finds the correct Pod. This keeps the traffic flowing smoothly without anyone having to manually adjust anything.
3. Pod-to-Pod Communication Assistance
Pods often need to talk to each other to do their job, like two team members passing notes. Even if they are on different nodes (different offices), kube-proxy makes sure the messages reach the right Pod. When a Pod sends a request to a Service, kube-proxy acts like a post office: it checks which Pod should get the message and delivers it correctly. This happens automatically, so Pods can communicate reliably, no matter where they are in the cluster or if they get replaced.
Troubleshooting Impact
1. Failure to Start
If kube-proxy fails to start on a node, the Services on that node won’t know where to send traffic. This is like having a traffic manager absent at a busy intersection—cars (requests) get stuck or lost. Pods trying to communicate through Services may not reach their destination, causing parts of your application to stop working.
2. Misconfigured Rules
Sometimes kube-proxy might run but have wrong network rules. This is like having wrong traffic signs in a city: requests may be sent to the wrong Pod or blocked entirely. Misconfigured rules can prevent Services from reaching their Pods, breaking internal communication and making the application unreliable.
3. Monitoring kube-proxy
To catch problems early, it’s important to monitor kube-proxy in the kube-system namespace. You can check if it’s running and view logs for errors. Monitoring acts like a security guard, ensuring that the traffic manager is on duty and guiding traffic correctly, keeping your cluster healthy.
Overlay Network: The Virtual Road System of Kubernetes
An overlay network is like a virtual road system that connects all the Pods across different nodes in a Kubernetes cluster. Even if Pods are running on separate machines (nodes), the overlay network makes them feel like they are on the same local network. This means Pods can communicate directly with each other using their IP addresses, without worrying about which physical machine they are on. Overlay networks are created by CNI plugins like Flannel, Calico, or Weave Net, which handle the virtual connections between nodes.
Responsibilities
- Connecting Pods Across Nodes
The overlay network ensures that Pods on different nodes can talk to each other. It builds a virtual tunnel between nodes so that network traffic flows seamlessly, as if all Pods were on the same machine. - Encapsulating Network Traffic
Traffic between Pods is often wrapped inside this virtual tunnel, which allows it to travel across the physical network safely and without conflicts. This is similar to sending a package inside a secure envelope so it reaches the right address. - Providing a Flat IP Space
Each Pod gets a unique IP address that is valid across the entire cluster. The overlay network makes sure these IPs don’t collide and that Pods can always find each other.
Impact and Troubleshooting
- Communication Failures
If the overlay network isn’t working, Pods on different nodes won’t be able to communicate. It’s like the roads between cities being blocked—messages get lost, and Services can’t route traffic to Pods. - Service Discovery Issues
Services rely on the overlay network to forward requests to Pods. If the overlay fails, Service traffic won’t reach the correct Pods, breaking applications that depend on inter-Pod communication. - Monitoring and Debugging
You can monitor overlay network components (like Flannel pods or Calico controllers) to check connectivity and logs. Ensuring the overlay network is healthy is crucial for keeping the cluster running smoothly.
Conclusion
Kubernetes networking may seem complex at first, but it’s really about keeping all the parts of your applications connected, no matter where they run in the cluster. Pods are temporary, Services move traffic, and nodes come and go—but Kubernetes ensures that requests always reach the right destination.
CNI plugins create the network bridges and assign IPs, overlay networks connect Pods across nodes, and kube-proxy acts like a traffic manager, directing requests to the correct Pods. Together, these components make sure that Pods can talk to each other, Services can route traffic, and external users can access your applications safely and reliably.
By understanding how these networking pieces work, you can troubleshoot problems faster, design secure clusters, and scale applications confidently. In essence, Kubernetes networking takes care of the messy details behind the scenes, letting developers focus on building applications rather than managing connections.
Networking in Kubernetes is like a well-organized city: roads, traffic signals, and delivery systems all work together so everything moves smoothly—without you having to manually guide every car. Once you grasp this, running and managing distributed applications becomes much simpler and predictable.
