Kubernetes has become the de facto standard for container orchestration, allowing organizations to deploy, scale, and manage containerized applications efficiently. While much of Kubernetes’ power lies in its runtime features, the lifecycle of a K8s cluster Management—how it is created, maintained, and upgraded—is equally crucial. This blog explores kubeadm-driven cluster initialization, certificate management, node joining workflows, upgrades, and high-availability internals.
What is Kubernetes Cluster Management?
Kubernetes Cluster Management refers to the process of creating, operating, maintaining, and upgrading a Kubernetes cluster to ensure it runs efficiently, securely, and reliably. A Kubernetes cluster is made up of multiple nodes (machines) running workloads (Pods), and managing the cluster involves handling everything that keeps these nodes and workloads healthy and connected.
It includes several key areas:
- Cluster Initialization
- Node Management
- Certificate and Security Management
- Upgrades and Patching
- High Availability (HA) and Fault Tolerance
- Monitoring and Maintenance
Why Kubernetes Cluster Management is Important
Managing a Kubernetes cluster properly is critical for several reasons:
- Ensures Reliability and Uptime
Poorly managed clusters can lead to downtime, failed deployments, or unresponsive services. Proper management ensures that applications remain available and resilient, even when nodes fail or workloads spike. - Security and Compliance
Kubernetes relies on TLS certificates, tokens, and RBAC for security. Without regular certificate rotation, patching, and monitoring, the cluster can become vulnerable to attacks. - Scalability
Efficient cluster management allows you to scale workloads dynamically. Adding or removing nodes, upgrading Kubernetes versions, and balancing workloads ensures optimal resource utilization. - Operational Efficiency
Automated tools like kubeadm streamline initialization, upgrades, and node joins. This reduces manual errors and operational overhead for DevOps teams. - Disaster Recovery and High Availability
Proper lifecycle management ensures that your cluster can recover from failures quickly and maintain high availability for mission-critical applications.
Kubernetes Cluster Lifecycle
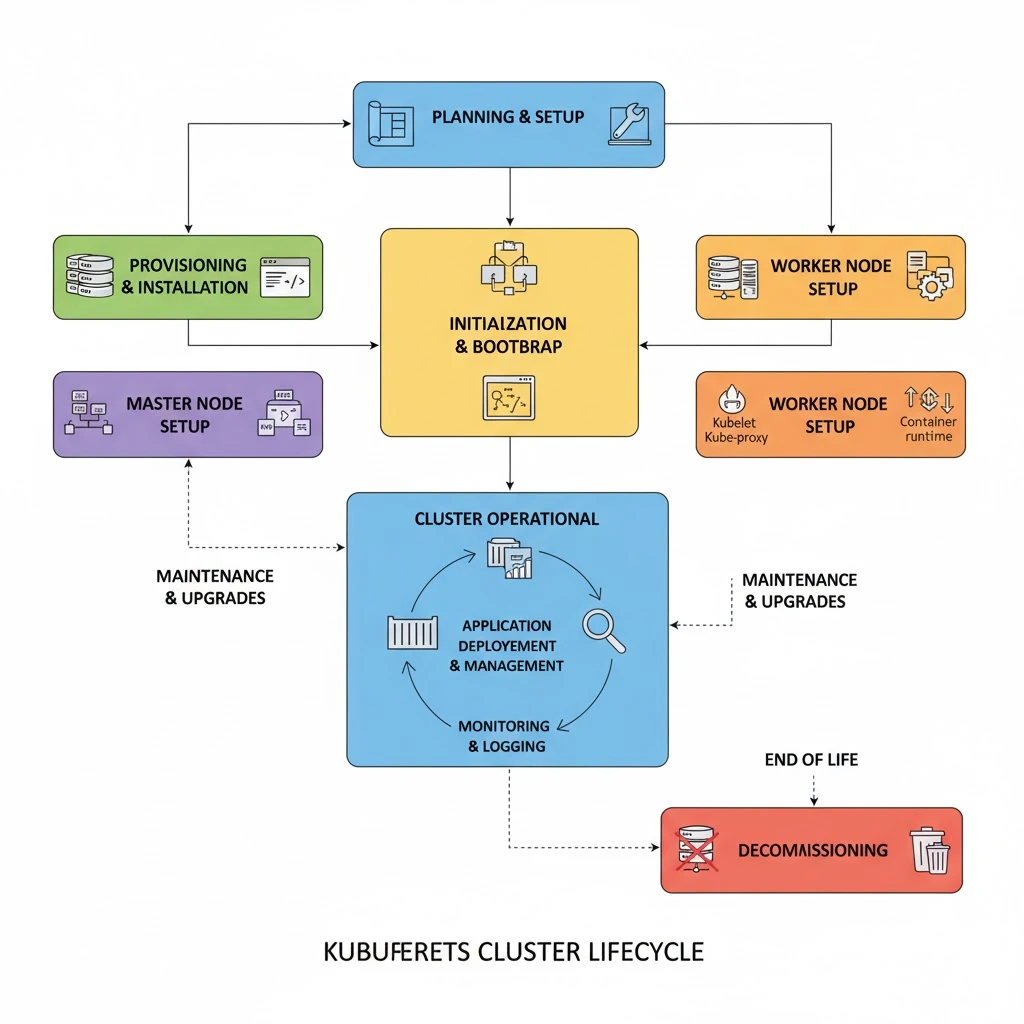
The Kubernetes cluster lifecycle describes the series of stages a cluster goes through—from creation to maintenance and eventual decommissioning. Understanding each stage helps DevOps teams manage clusters efficiently, maintain security, and ensure high availability.
1. Planning and Preparation
The planning stage is the foundation of a successful cluster. It involves architectural, operational, and resource considerations:
Cluster size and node types: You decide the number of control plane nodes and worker nodes. Control plane nodes host the API server, scheduler, controller-manager, and etcd, while worker nodes run application workloads. Choosing the right number of nodes affects fault tolerance, high availability, and performance. For example, a production HA cluster often has 3 or 5 control plane nodes and multiple worker nodes distributed across availability zones.
Network design: A cluster requires IP ranges for Pods and Services. Pod CIDR and Service CIDR ranges must not overlap with your existing network. The CNI plugin (Calico, Flannel, Cilium) is chosen to manage networking, routing, and policies. Good network planning ensures seamless communication and avoids IP conflicts.
High Availability (HA): Decide if your control plane should be single-node or multi-node. HA prevents single points of failure. Multi-node control planes often use an external load balancer to distribute traffic between API servers.
Kubernetes version and OS: Select a Kubernetes version compatible with your workloads and CNI plugin. Choose an OS optimized for containers (Ubuntu, CentOS, Rocky Linux) and a container runtime (containerd, CRI-O, Docker).
Resource allocation: Plan CPU, memory, and storage per node to avoid overloading. Consider future scaling and peak load requirements.
Good planning prevents network conflicts, resource contention, and downtime. It lays the groundwork for smooth cluster initialization and scalability.
2. Cluster Initialization
Initialization creates the control plane, the “brain” of the cluster:
API server setup: The API server processes all REST requests, validates configurations, and exposes the cluster to kubectl or other clients.
Scheduler and Controller Manager: The scheduler assigns Pods to nodes based on resource availability, taints, and affinity rules. The controller-manager ensures cluster state matches the desired configuration.
Etcd cluster setup: Etcd is a distributed key-value store that holds all cluster state, from nodes to Secrets. Its correct setup is critical for data consistency and high availability.
Certificate creation: kubeadm automatically generates TLS certificates for secure communication between control plane components, kubelets, and etcd nodes. Proper certificate handling ensures encrypted communication and authentication.
Network bootstrap: kubeadm sets up the cluster networking foundation. Once a CNI plugin is installed, Pods can communicate across nodes and reach Services.
After initialization, the cluster’s control plane is ready, the API server is running, and kubectl can manage the cluster.
3. Node Bootstrapping and Joining
Worker nodes must securely join the cluster:
Bootstrap kubelet: The kubelet agent starts on each node and prepares it to communicate with the API server.
Token-based authentication: Nodes use a bootstrap token and CA hash for authentication. This ensures only authorized nodes join.
Certificate distribution: Each kubelet receives a client certificate to communicate securely with the API server.
Node readiness: Once all checks pass, the node appears in kubectl get nodes as Ready, meaning it can schedule workloads.
Proper bootstrapping prevents unauthorized nodes from joining and ensures nodes are correctly configured to run workloads securely.
4. Workload Deployment and Networking
Once nodes are ready, the cluster supports application deployment:
Pods and Deployments: Applications are deployed as Pods. Deployments manage replicas, updates, and rollbacks. StatefulSets handle stateful applications like databases. DaemonSets run Pods on every node for monitoring or logging.
CNI networking: The CNI plugin assigns Pod IPs, ensures cross-node communication, and enforces network policies.
Services and DNS: Services provide stable IPs, and CoreDNS handles name resolution within the cluster.
Ingress and load balancing: Ingress controllers expose applications externally, route traffic, and manage TLS termination.
Proper workload and network setup ensure applications communicate efficiently, are discoverable, and scale dynamically.
5.Ongoing Maintenance and Monitoring
After workloads are deployed, the cluster enters the maintenance phase, which is crucial to ensure continued stability, security, and performance. Moreover, regular maintenance prevents small issues from escalating into major failures.
Monitoring and Observability:
Tools like Prometheus (for metrics), Grafana (for dashboards), and the ELK stack (Elasticsearch, Logstash, Kibana) help track node health, resource usage, and application performance. Consequently, observability allows teams to detect anomalies such as memory leaks, high CPU usage, or failed Pods before they impact production.
Node Management:
Nodes may require maintenance for hardware updates, kernel patches, or software upgrades. For instance, commands like kubectl drain <node> safely evict workloads from a node, while kubectl cordon <node> prevents new workloads from being scheduled. As a result, maintenance does not cause downtime or unexpected failures.
Security Updates and Compliance:
Continuous updates to TLS certificates, RBAC permissions, OS patches, and container runtime versions are critical. Furthermore, regular security audits and patching prevent vulnerabilities from being exploited by malicious actors.
Scaling Workloads:
Kubernetes supports Horizontal Pod Autoscalers (HPA), which automatically adjust the number of Pod replicas based on metrics like CPU usage, memory, or custom application metrics. Therefore, applications remain responsive even under varying load conditions.
ongoing maintenance ensures high reliability, security, and optimal performance, keeping clusters healthy and preventing service interruptions.
6.Upgrades and Version Management
Kubernetes releases frequent updates with new features, bug fixes, and security patches. Hence, structured upgrades are essential for maintaining a healthy cluster.
Control Plane Upgrades:
Upgrade the API server, scheduler, controller-manager, and etcd nodes one at a time to maintain availability. Thus, cluster-wide downtime is prevented, and workloads continue to run uninterrupted.
Worker Node Upgrades:
Worker nodes are upgraded by updating kubelet, kube-proxy, and the container runtime. Pods are drained from nodes before upgrades to prevent disruption. Afterwards, the node is re-registered and workloads resume automatically.
Tooling Support:
kubeadm provides upgrade plans, version checks, and automated certificate rotation to simplify the process. Additionally, managed tools like Rancher, KOPS, or cloud-managed services provide extra safety and automation.
Example:
In production, an upgrade may involve upgrading three control plane nodes sequentially, followed by rolling out upgrades to a fleet of 10 worker nodes using a canary approach to monitor for issues.
Therefore, regular upgrades enhance security, add new features, and fix critical bugs, keeping clusters stable and up-to-date without service disruption.
7.High Availability and Scaling
To handle failures and growing workloads, clusters need redundancy and elasticity. Moreover, high availability ensures minimal downtime during unexpected failures.
HA Control Plane:
Deploy multiple master nodes behind a load balancer. If one control plane node fails, others continue to serve API requests. Additionally, distributed etcd ensures all state data is replicated and safe against node failure.
Horizontal Scaling:
Add or remove worker nodes dynamically to match workload demand. As a result, Kubernetes schedules Pods across available nodes for optimal resource utilization.
Automatic Scheduling:
The scheduler distributes Pods based on resource availability, node taints/tolerations, affinities, and policies. Consequently, workloads remain balanced and reduce the risk of overloading a single node.
Fault Tolerance:
If a node fails, the scheduler automatically reschedules Pods onto healthy nodes. In particular, stateful workloads with PersistentVolumes are rescheduled with minimal downtime.
Example:
E-commerce platforms during sale events might scale from 5 to 20 worker nodes to handle traffic spikes while maintaining high availability for checkout services.
HA and scaling ensure clusters remain resilient, responsive, and performant under load or failure conditions.
8.Decommissioning and Cleanup
Eventually, nodes or entire clusters may need to be retired. Consequently, proper decommissioning ensures security, cost efficiency, and cluster hygiene.
Draining Workloads:
Safely evict all Pods from a node using kubectl drain. This prevents workload loss and allows nodes to be removed without disrupting services.
Deleting Resources:
Remove sensitive data such as Secrets, ConfigMaps, and PersistentVolumes. Furthermore, clean up custom resources to prevent orphaned workloads.
Node Removal:
Unregister nodes from the control plane using kubectl delete node <node-name> or kubeadm commands. Therefore, the cluster state reflects the removal accurately.
Resource Cleanup:
Release cloud resources (VMs, storage volumes, IP addresses) to reduce costs and prevent resource leaks. For example, a cloud-based test cluster can be fully decommissioned after development sprints.
proper decommissioning prevents security risks, resource waste, and cluster clutter, keeping the Kubernetes environment clean and efficient
Best Practices for Kubernetes Cluster Lifecycle Management
Managing a Kubernetes cluster effectively requires more than just following the lifecycle stages; adhering to best practices ensures clusters remain secure, reliable, and scalable throughout their lifecycle.
1. Plan and Document the Cluster Architecture
Before creating a cluster, it’s essential to carefully plan the architecture. This includes deciding the number of control plane and worker nodes, selecting networking and storage solutions, and defining resource requirements. Documenting the architecture ensures that all team members understand the cluster setup and provides a reference for future scaling or troubleshooting. In addition, having clear documentation reduces errors during upgrades, node additions, or high availability configurations, ensuring smooth cluster operations.
2. Use Infrastructure as Code (IaC)
Provisioning and managing clusters manually can be error-prone. Therefore, leveraging Infrastructure as Code tools like Terraform, Ansible, or Pulumi allows teams to define nodes, networking, storage, and Kubernetes configurations in a repeatable and version-controlled manner. This approach ensures that clusters are consistent across environments, reduces human errors, and simplifies scaling, upgrades, and disaster recovery processes.
3. Automate Cluster Bootstrapping and Node Joining
Automating cluster initialization and node bootstrapping using kubeadm scripts, cloud-init, or configuration management tools ensures that nodes join the cluster securely and consistently. Furthermore, automation helps enforce best practices such as disabling swap, configuring required firewall rules, and installing compatible Kubernetes versions, making cluster deployment faster and more reliable.
4. Implement Observability and Monitoring Early
From day one, clusters should have monitoring and logging set up. Tools like Prometheus, Grafana, and ELK stack provide insight into node health, resource usage, and application performance. As a result, teams can detect anomalies, troubleshoot failures, and proactively scale workloads before performance issues impact end-users. Observability is a cornerstone of stable and reliable cluster operations.
5. Maintain Security Best Practices
Security should be enforced throughout the cluster lifecycle. This includes regularly rotating TLS certificates, following RBAC policies, scanning container images for vulnerabilities, and applying security patches to OS and Kubernetes components. Moreover, integrating admission controllers to enforce policies, network segmentation using CNI plugins, and limiting access to the API server strengthens the cluster against attacks and misconfigurations.
6. Adopt Rolling Upgrades and Version Control
Kubernetes clusters evolve rapidly, so upgrades must be planned carefully. Therefore, always follow rolling upgrade strategies: upgrade control plane nodes first, then worker nodes, one at a time. Version control for cluster manifests, Helm charts, and configuration files ensures reproducibility and rollback capability. As a result, clusters remain stable, downtime is minimized, and workloads continue to operate smoothly during upgrades.
7. Plan for High Availability and Disaster Recovery
High availability should be considered throughout the cluster lifecycle. Deploy multiple control plane nodes with distributed etcd clusters and configure load balancers to prevent a single point of failure. Additionally, regularly back up etcd data and test disaster recovery procedures. Consequently, in the event of node failures or outages, the cluster remains operational and critical workloads continue to run without interruption.
8. Enforce Resource Management and Autoscaling
To prevent resource contention and optimize performance, implement resource requests, limits, and quotas for Pods. Combine this with Horizontal Pod Autoscalers (HPA) and cluster autoscalers to dynamically scale workloads based on real-time demand. This ensures that applications remain performant during spikes in traffic while minimizing wasted resources during low demand periods.
9. Clean Decommissioning and Cost Management
Properly retiring nodes or clusters is as important as deployment. Always drain workloads, delete sensitive resources, and unregister nodes before termination. In cloud environments, releasing unused resources reduces costs. Moreover, maintaining a cleanup routine prevents cluster clutter, orphaned resources, and potential security risks, keeping the environment healthy and cost-efficient.
Conclusion
Kubernetes has transformed the way organizations deploy and manage containerized applications, but its power extends far beyond just running workloads. Effective cluster lifecycle management is equally critical to ensure clusters remain secure, reliable, and performant. From careful planning and initialization to node bootstrapping, workload deployment, monitoring, upgrades, scaling, and eventual decommissioning, each stage plays a vital role in the health of a cluster.
Adhering to best practices—such as documenting cluster architecture, automating node joins, implementing observability, enforcing security policies, adopting rolling upgrades, planning for high availability, and managing resources efficiently—ensures that Kubernetes clusters can handle growing workloads, recover gracefully from failures, and evolve safely over time.
Ultimately, mastering the lifecycle of a Kubernetes cluster empowers DevOps and infrastructure teams to deliver highly available, secure, and scalable applications, while minimizing downtime, operational overhead, and risks. Proper lifecycle management transforms Kubernetes from a powerful orchestration platform into a resilient foundation for modern, cloud-native applications.
