Docker is a containerization platform that uses OS-level virtualization to package applications and their dependencies into lightweight containers. These containers run on any system that has Docker or a compatible container runtime, whether it’s your local machine or a cloud server.
The platform also provides a powerful networking system that manages communication between containers, the Docker host, and external networks. It supports several network types, each designed for different use cases.
In this Blog, we’ll explore how Docker networking works and show you how to use it effectively in your container deployments.
What is Docker networking?
Docker networking is the system that enables containers to communicate with each other, the host, and external networks. It defines how data moves between containers and across systems during containerized application execution.
It provides isolated, flexible network environments using built-in drivers like bridge, host, overlay, and none. Each driver supports different use cases, such as local development, swarm-based orchestration, or integration with legacy infrastructure.
Proper network configuration is critical for performance, security, and service discovery.
Key networking concepts
Below are the key concepts related to Docker networking:
- Network namespaces – Each Docker container runs inside its own network namespace, isolating its network stack from the host and other containers. This ensures that IP addresses, routing tables, and interfaces don’t conflict across containers.
- Virtual Ethernet interfaces (veth pairs) – Docker uses veth pairs to connect containers to networks. One end is inside the container, and the other connects to a bridge or another network device on the host.
- Bridges – A bridge acts like a virtual switch that forwards traffic between containers and the host. Docker automatically creates a default bridge to connect containers unless specified otherwise.
- Port mapping – Containers can expose specific ports to the host using port mapping. This allows external clients to access containerized applications through the host’s IP and a designated port.
- DNS Resolution – Docker provides an internal DNS service that allows containers to resolve each other by name. This makes service discovery easier without needing to hardcode IP addresses.
- Subnets and IP addressing – Docker assigns containers IP addresses from configured subnets. This allows containers to communicate directly with each other within a network.
- Routing – Docker manages routing rules so that packets can move between containers, the host, and external networks. Containers follow the routing table defined by their network namespace.
- Firewall rules (iptables) – Docker configures iptables rules to manage traffic between containers, hosts, and external networks. These rules enforce isolation and port forwarding
Docker Network Types
Docker networks control how containers talk to each other and to the outside world. Every container needs to be connected to a Docker network to send or receive data. The way containers communicate depends on which network type they are attached to.
Docker supports six main types of networks, each designed for different situations. Let’s look at each one in simple terms:
1. Bridge Network
The bridge network is the default option for most standalone containers. When you start a new container, Docker automatically connects it to a bridge network unless you specify something else.
Think of it like a small private network inside your computer where containers can talk to each other using their IP addresses or container names. This network is isolated from your main system, which adds a layer of security. You can also connect containers from the same bridge network so they can easily share data.
2. Host Network
The host network removes the separation between the container and the Docker host. Instead of getting its own private IP, the container shares the same network as your computer or server.
This can improve performance since there’s no extra network layer between the container and the host. It’s useful when you want your containerized application to use the same ports or network interfaces as the host system — for example, when running a web server that needs direct access to the host’s network.
3. None Network
The none network completely disables networking for the container. In this mode, the container cannot send or receive any data over the network.
This setup is ideal for containers that don’t need network access, such as those performing secure computations or testing offline features. You can still manually configure networking later if needed, but by default, the container stays fully isolated.
4. Overlay Network
The overlay network is designed for containers that run across multiple Docker hosts. It creates a virtual network that connects containers on different machines as if they were on the same local network.
This is especially useful in Docker Swarm environments, where you deploy services across several nodes. Overlay networks make communication between those containers secure and straightforward, even when they’re running on different physical or cloud servers.
5. Macvlan Network
The macvlan network gives each container its own MAC address, making it look like a separate physical device on your local network. This means containers appear just like real machines to other devices on the same network.
It’s often used for legacy applications that need to be directly accessible on the local network or expect a unique IP address. With macvlan, containers can communicate directly with other devices on your LAN without going through the Docker host.
6. IPvlan Network
The ipvlan network works similarly to macvlan but manages traffic in a slightly different way. Instead of assigning unique MAC addresses, it uses the parent interface of the host to handle multiple container connections efficiently.
This makes ipvlan a better choice for high-density environments where you need to run many containers with minimal overhead. However, it’s a bit less flexible than macvlan in terms of configuration options.
The table below summarizes the differences between the networking types:
| Network type | Default available? | Isolation | Connectivity | Use cases | Notes / Limitations |
| Bridge | Yes (default if none specified) | Containers isolated from host, communicate via virtual bridge | Containers on same bridge can talk using container name/IP; NAT for external access | Local container-to-container communication; small deployments | Need explicit port mapping (-p) to expose services outside host |
| Host | Yes | No isolation between container and host network | Shares host’s network stack (IP, ports) | Performance-critical apps needing low latency, access to host network directly | Port conflicts possible, less isolation and security |
| None | Yes | Complete isolation | No networking (no external or internal communication) | Highly secure workloads; testing containers that don’t need network | Useful only for special cases; must configure manually for data exchange |
| Overlay | No (requires Docker Swarm or manual setup) | Multi-host isolation via VXLAN | Connects containers across multiple Docker hosts | Multi-host clustering, microservices | Needs key-value store or Swarm; more complexity |
| Macvlan | No (must be configured manually) | Appears as a physical device with unique MAC | Containers get IPs from physical LAN, look like physical devices on network | Legacy apps needing direct L2 access, bypassing NAT | Requires careful IPAM config; can conflict with host NIC |
| IPvlan | No (must be configured manually) | Similar to Macvlan, but uses host’s MAC | Containers share host MAC but get unique IPs | High-scale networking with simpler setups, telco workloads | Limited support on some drivers; fewer features vs Macvlan |
Which network type should I use?
Bridge networks are the most suitable option for the majority of scenarios you’ll encounter. Containers in the network can communicate with each other using their own IP addresses and DNS names. They also have access to your host’s network, so they can reach the internet and your LAN.
Host networks are best when you want to bind ports directly to your host’s interfaces and aren’t concerned about network isolation. They allow containerized apps to function similarly to network services running directly on your host.
Overlay networks are required when containers on different Docker hosts need to communicate directly with each other. These networks let you set up your own distributed environments for high availability.
Macvlan networks are useful in situations where containers must appear as a physical device on your host’s network, such as when they run an application that monitors network traffic. IPvLAN networks are an advanced option for when you have specific requirements around container IP addresses, tags, and routing.
Docker also supports third-party network plugins, which expand the networking system with additional operating modes. These include Kuryr, which implements networking using OpenStack Neutron, and Weave, an overlay network with an emphasis on service discovery, security, and fault tolerance.
Finally, Docker networking is always optional at the container level: setting a container’s network to none will completely disable its networking stack. The container will be unable to reach its neighbors, your host’s services, or the internet. This helps improve security by sandboxing applications that aren’t expected to require connectivity
How Docker Networking Works
Docker networking allows containers to talk to each other and to the outside world, just like regular computers on a network. Behind the scenes, Docker uses your system’s existing network setup to make this happen — you don’t have to do it manually.
When Docker starts, it uses a tool built into Linux called iptables. This tool controls how data moves between different parts of the network. Docker automatically adds its own rules to iptables so that network traffic going to a container is sent to the right place. You don’t need to configure these rules yourself — Docker handles it for you.
Each Docker container also gets its own network namespace. Think of a namespace as a private room with its own network view. This means every container can have its own IP address and network setup, completely separate from others.
To help containers communicate with the outside world, Docker creates virtual network interfaces on your computer (the Docker host). These act like digital cables connecting your container’s private network to your system’s main network.
Even though the behind-the-scenes setup is quite technical, Docker makes it simple for users. You don’t need to know about Linux networking or iptables to use Docker effectively. Everything just works out of the box — and if you want to dive deeper, Docker’s documentation provides more advanced details.
Docker Networking vs. VM Networking
Both Docker and virtual machines (VMs) let you run applications in isolated environments, but the way they handle networking is a bit different.
In Docker, each container runs inside a shared operating system, and Docker creates virtual networks to connect these containers. It uses Linux features like namespaces and iptables to keep each container’s network separate and secure.
In virtual machines, networking works differently. Each VM runs its own full operating system and has a complete, separate network stack — almost like a real computer on a physical network. This gives VMs more independence but also uses more system resources.
The terms can sometimes be confusing too. For example, Docker’s “bridge network” is similar to a NAT (Network Address Translation) network in most VM platforms. Both allow internal communication between apps while sharing the host’s internet connection.
In general, VMs can create more complex network setups than Docker can by default. However, Docker still provides everything most users need. You can use features like macvlan to give containers their own IP address on your real network, or add plugins to enable advanced network types if needed.
How to use Docker networks
Ready to explore Docker networking in practice? Here’s how to use networks to manage container communications. To follow along with this tutorial, you’ll need to open three terminal windows.
1. Creating networks
To create a new Docker network, use the docker network create command. You can specify the driver to use, such as bridge or host, by setting the -d flag. A bridge network will be created if you omit the flag.
Run the following in your first terminal window:
$ docker network create demo-network -d bridge
50ed05634f6a3312e56700ef683ca39df44bfc826e2e4da9179c2593c79910f9

Your terminal receives the ID of the newly created network. However, the new network is useless at the moment because no containers have been connected.
2. Connecting containers to networks
You can attach new containers to a network by setting the --network flag with your docker run command. Run this command in your second terminal window:
$ docker run -it --rm --name container1 --network demo-network busybox:latest
Next, open your third terminal window and start another Ubuntu container, this time without the --network flag:
$ docker run -it --rm --name container2 busybox:latest
Now try communicating between the two containers, using their names:
# in container1
/ # ping container2
ping: bad address 'container2'
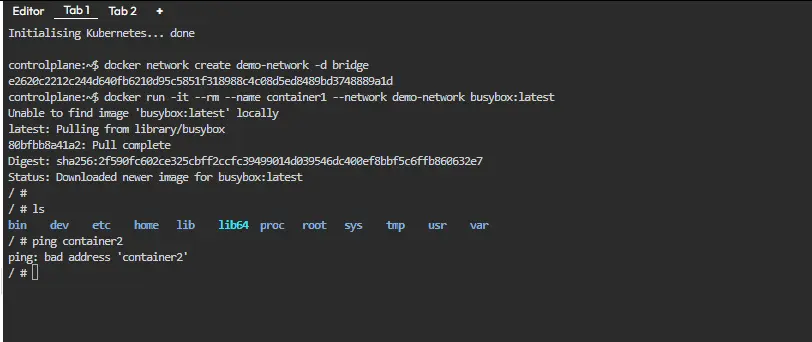
The containers aren’t in the same network yet, so they can’t directly communicate with each other.
Use your first terminal window to join container2 to the network:
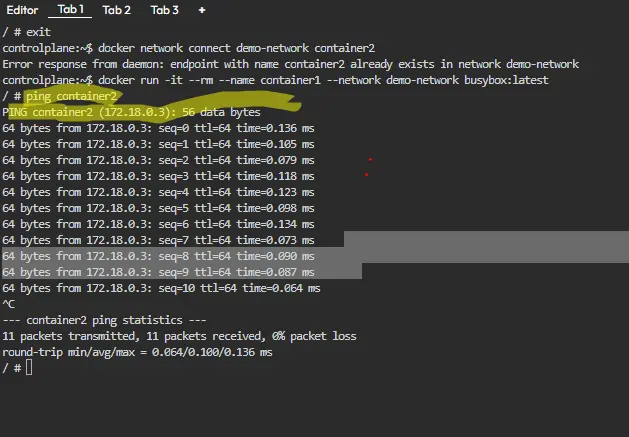
$ docker network connect demo-network container2The containers now share a network, which allows them to discover each other:
# in container1
/ # ping container2
PING container2 (172.22.0.3): 56 data bytes
64 bytes from 172.22.0.3: seq=0 ttl=64 time=4.205 ms
3. Using host networking
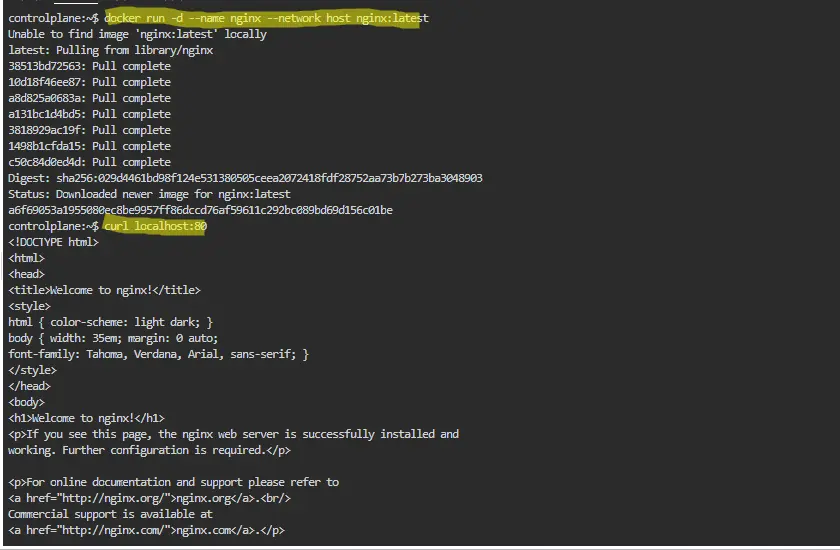
Bridge networks are what you’ll most commonly use to connect your containers. Let’s also explore the capabilities of host networks, where containers attach directly to your host’s interfaces. You can enable host networking for a container by connecting it to the built-in host network:
$ docker run -d --name nginx --network host nginx:latestNGINX listens on port 80 by default. Because the container’s using a host network, you can access your NGINX server on your host’s localhost:80 outside the container, even though no ports have been explicitly bound:
$ curl localhost:80
<!DOCTYPE html>
<html>
<head>
<title>Welcome to nginx!</title>
4. Disabling networking
When a container’s networking is disabled, it will have no connectivity available – either to other containers or to your wider network. Disable networking by attaching your container to the none network:
$ docker run -it --rm --network none busybox:latest
/ # ping google.com
ping: bad address 'google.com'
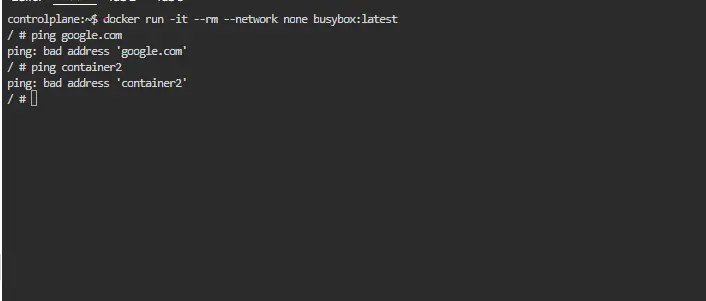
This lets you easily sandbox unknown services.
5. Removing containers from networks
Docker lets you freely manage network connections without restarting your containers. In the previous section, you saw how to connect a container after its creation; it’s also possible to remove containers from networks they no longer need to participate in:
$ docker network disconnect demo-network container2Any changes you make will apply immediately.
6. Managing networks
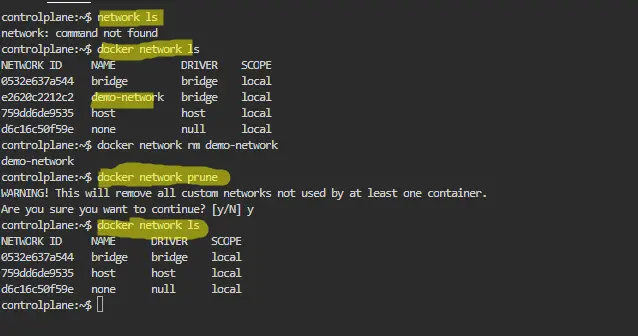
You can list all your Docker networks with the network ls command:
$ docker network ls
NETWORK ID     NAME           DRIVER    SCOPE
44edcc537a6f   bridge         bridge    local
2cf9f8f370ad   demo-network   bridge    local
4d60b27f787a   host           host      local
288376a0a4f8   none           null      local
The output includes the built-in networks, bridge, host, and none, as well as the networks you’ve created.
To delete a network, disconnect or stop all the Docker containers that use it, then pass the network’s ID or name to network rm:
$ docker network rm demo-networkYou can automatically delete all unused networks using the network prune command:
$ docker network prune
Benefits of Docker Networking
Docker networking brings many advantages that make containerized applications easier to run, manage, and scale. Here are the key benefits:
- Isolation and Security
Each container gets its own network namespace, which keeps its traffic separate from other containers and the host system. This isolation helps prevent unauthorized access and improves overall security. - Easy Communication Between Containers
Docker networks allow containers to talk to each other using IP addresses or container names. You don’t have to manually configure complex network settings, making it simple to set up multi-container applications. - Flexibility in Network Configuration
With multiple network types (bridge, host, overlay, macvlan, and ipvlan), Docker lets you choose the setup that best fits your needs. You can connect containers locally, across hosts, or even directly to your physical network. - Portability Across Environments
Containers connected via Docker networks behave the same way on your laptop, test environment, or cloud server. This ensures consistency and reduces network-related issues when moving applications between environments. - Simplified Service Discovery
Docker’s internal DNS allows containers to resolve each other by name, making it easier for services to find and communicate with each other without hardcoding IP addresses. - Efficient Resource Usage
Unlike virtual machines, Docker shares the host’s operating system kernel. Its lightweight networking uses fewer resources, enabling faster deployment and scaling of containers. - Enhanced Performance Options
Advanced network types, like host and macvlan, allow containers to achieve near-native network performance when needed, which is important for high-performance applications like web servers or databases.
Conclusion
Docker networking is one of the key features that makes containerized applications flexible, scalable, and easy to manage. It allows containers to communicate securely with each other, the host system, and external services — all while keeping environments isolated and predictable.
By understanding the different Docker network types (bridge, host, overlay, none, macvlan, and ipvlan) and how they work, you can design the right setup for your applications — whether you’re running a few containers on your laptop or managing a large-scale production cluster.
Docker also simplifies complex networking tasks through automation. You don’t need deep Linux networking knowledge to get started; commands like docker network create, connect, and ls make it easy to build and control container communication.
As you grow more comfortable, you can explore advanced options like overlay networks for multi-host setups or macvlan for full network integration. With these tools, Docker gives you the flexibility to create secure, high-performance environments tailored to your needs.
