
In this post, we’ll walk through a complete, real-world setup of SonarQube for code quality analysis integrated with Jenkins CI/CD, all deployed on an AWS EC2 instance using Docker.
By the end of this guide, you’ll have:
SonarQube running inside Docker
Jenkins installed and configured
A working Jenkins pipeline analyzing your code using SonarQube
What is SonarQube?
SonarQube is an open-source code quality and security analysis platform.
It continuously inspects your source code for bugs, code smells, and vulnerabilities across multiple programming languages.
SonarQube helps teams:
- Maintain clean, secure, and maintainable code
- Enforce coding standards
- Integrate automated code review into the CI/CD pipeline
It provides a web-based dashboard showing metrics like:
Code Smells | 🐛 Bugs | 🔒 Vulnerabilities | 📊 Coverage | 🔁 Duplications
What is Jenkins?
Jenkins is an open-source automation server used for building, testing, and deploying applications.
It helps automate the software development process by enabling Continuous Integration (CI) and Continuous Delivery (CD).
With Jenkins, you can:
- Automatically build projects from source code repositories
- Run tests and code quality scans (like with SonarQube)
- Deploy artifacts to servers or cloud environments
Architecture Overview
Here’s what we’ll achieve:
- Launch an EC2 instance (Ubuntu 22.04)
- Install Docker and run SonarQube
- Install Jenkins
- Configure SonarQube credentials and plugins in Jenkins
- Run a Jenkins pipeline to scan code with SonarQube
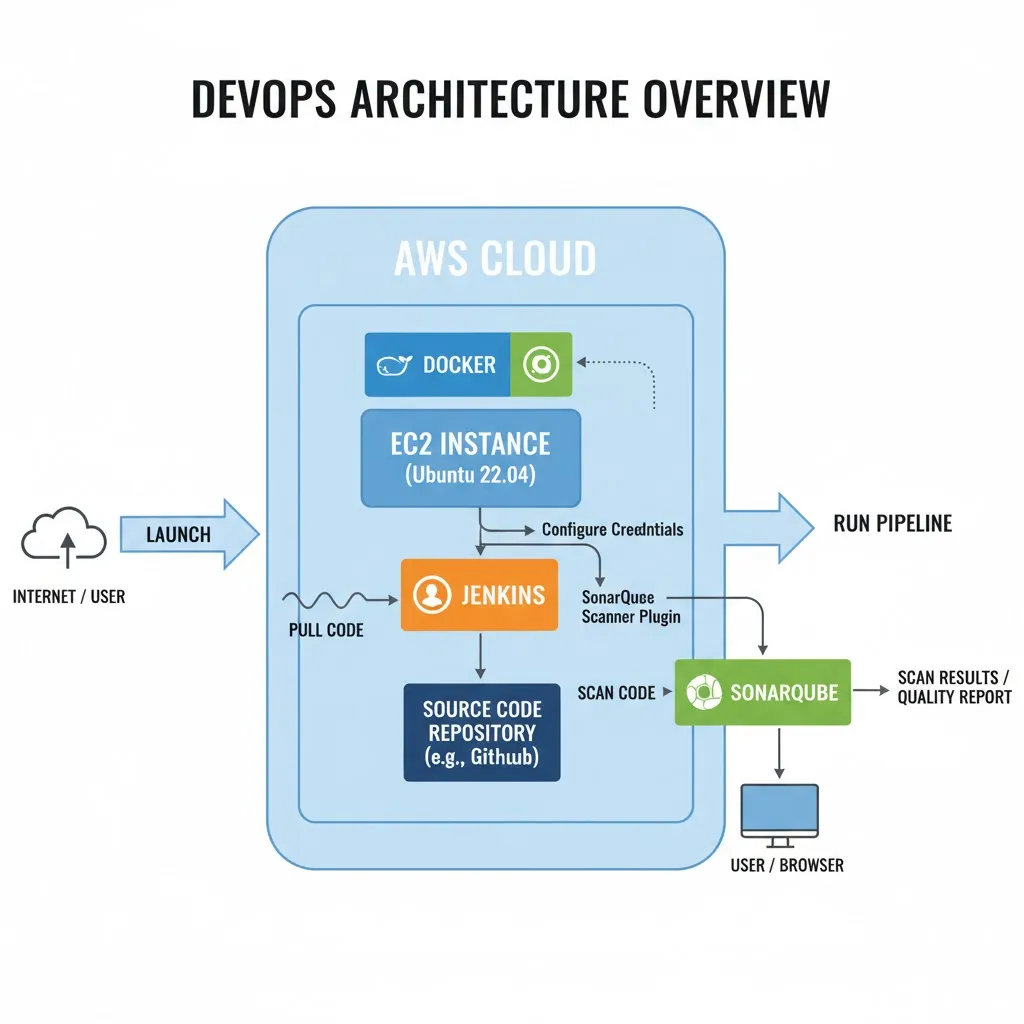
Together, Jenkins + SonarQube enable automated quality checks in every CI/CD pipeline run.
In this setup we have manually setup sonarqube server project then scaned via jenkins
Install Sonarqube using Docker
Step 1: Launch an EC2 Instance
- Go to AWS EC2 console → Launch a new instance.
- AMI: Ubuntu 22.04 LTS (recommended).
- Instance type: At least t2.medium (SonarQube needs 2 vCPUs, 4 GB RAM).
- Storage: Minimum 15–20 GB.
- Security group: Allow ports 22 (SSH), 9000 (SonarQube UI), and optionally 80/443 if behind a reverse proxy.
- SSH into your instance
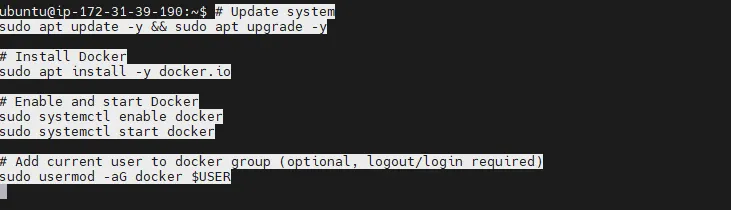
ssh -i mykey.pem ubuntu@<EC2_PUBLIC_IP>Step 2: Install Docker
# Update system
sudo apt update -y && sudo apt upgrade -y

# Install Docker
sudo apt install -y docker.io

# Enable and start Docker
sudo systemctl enable docker
sudo systemctl start docker

# Add current user to docker group (optional, logout/login required)
sudo usermod -aG docker $USER
Step3: Run sonarqube container
docker run -d --name sonarqube \\
  -p 9000:9000 \\
  -v sonarqube_data:/opt/sonarqube/data \\
  -v sonarqube_logs:/opt/sonarqube/logs \\
  -v sonarqube_extensions:/opt/sonarqube/extensions \\
  sonarqube:latest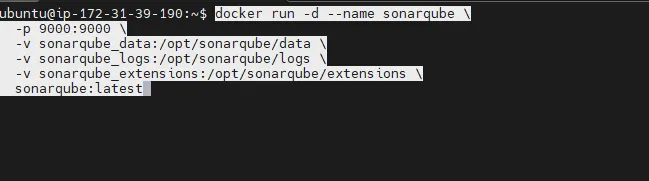
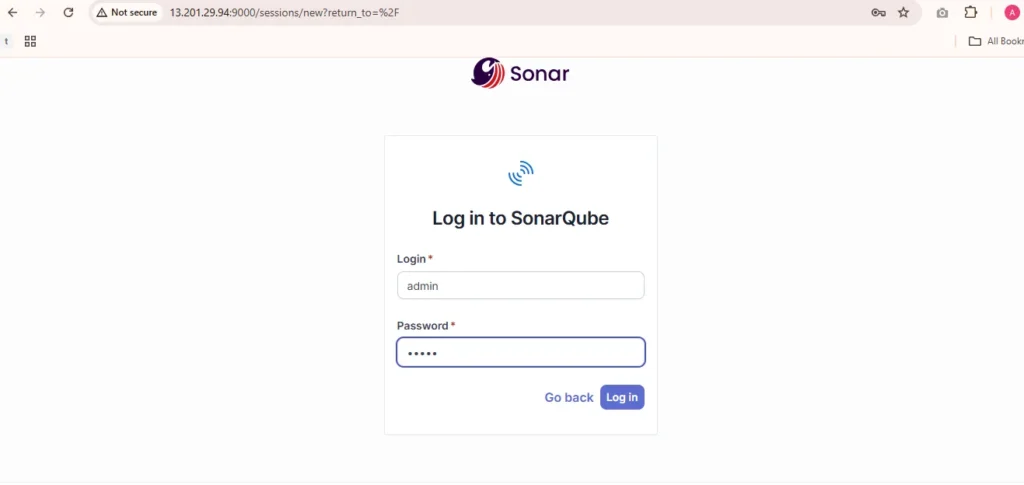
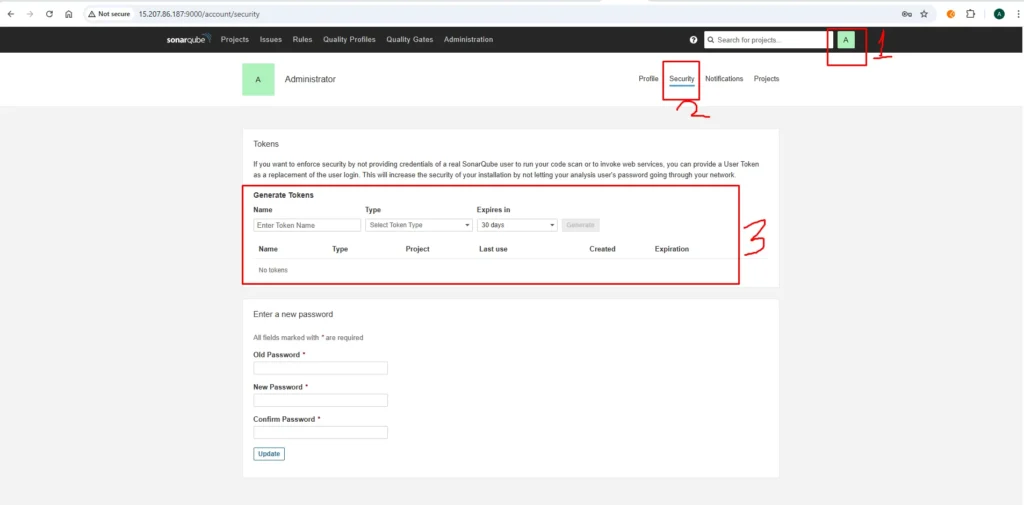
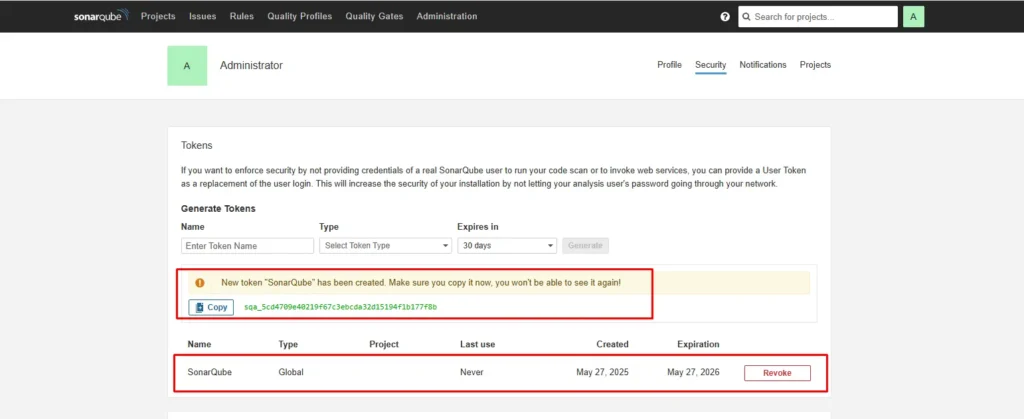
Access the Sonarqube by hitting EC2 Public Url and login with default Username and Password Admin and setup password
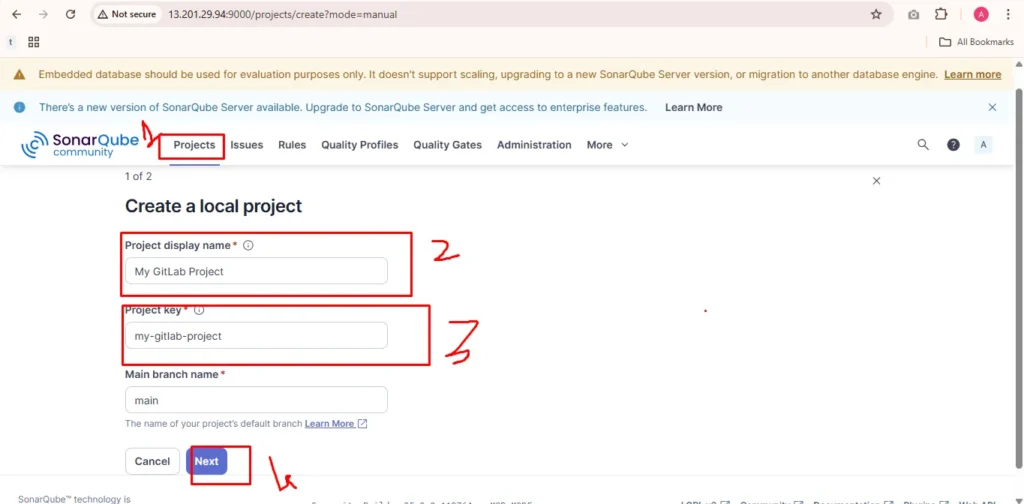
create sonarqube project followed by below image and click next
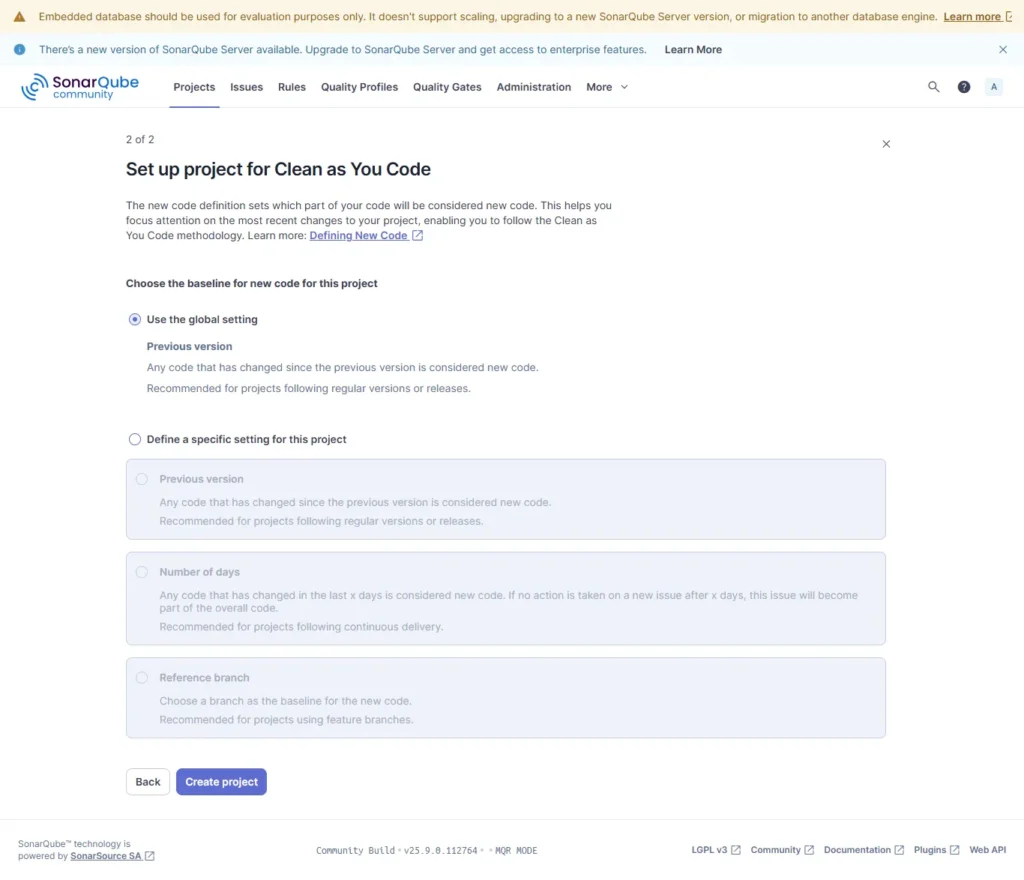
Now click on global setting this will ensure if any changes detected in project consider it as new project and after click on create project
Step 4: Install Jenkins using Follwing shell script
#!/bin/bash

# jenkins.sh - Install Jenkins on Ubuntu

set -e  # Exit immediately if a command exits with a non-zero status.

echo " Step 1: Updating the System..."
sudo apt update && sudo apt upgrade -y

echo " Step 2: Installing Java (Required for Jenkins & SonarQube)..."
sudo apt install openjdk-17-jdk -y
java -version

echo " Step 3: Installing Jenkins..."

# Add Jenkins GPG key and repo
echo " Adding Jenkins GPG key and repository..."
curl -fsSL <https://pkg.jenkins.io/debian-stable/jenkins.io-2023.key> | sudo tee \\
  /usr/share/keyrings/jenkins-keyring.asc > /dev/null

echo deb [signed-by=/usr/share/keyrings/jenkins-keyring.asc] \\
  <https://pkg.jenkins.io/debian-stable> binary/ | sudo tee \\
  /etc/apt/sources.list.d/jenkins.list > /dev/null

# Install Jenkins
echo " Installing Jenkins package..."
sudo apt update
sudo apt install jenkins -y

# Start and enable Jenkins
echo "Starting and Enabling Jenkins..."
sudo systemctl enable jenkins
sudo systemctl start jenkins
sudo systemctl status jenkins
Once Jenkins is installed, now grab your Public IP Address and paste it to your browser like below.
<EC2 Public_IP_Address:8080>
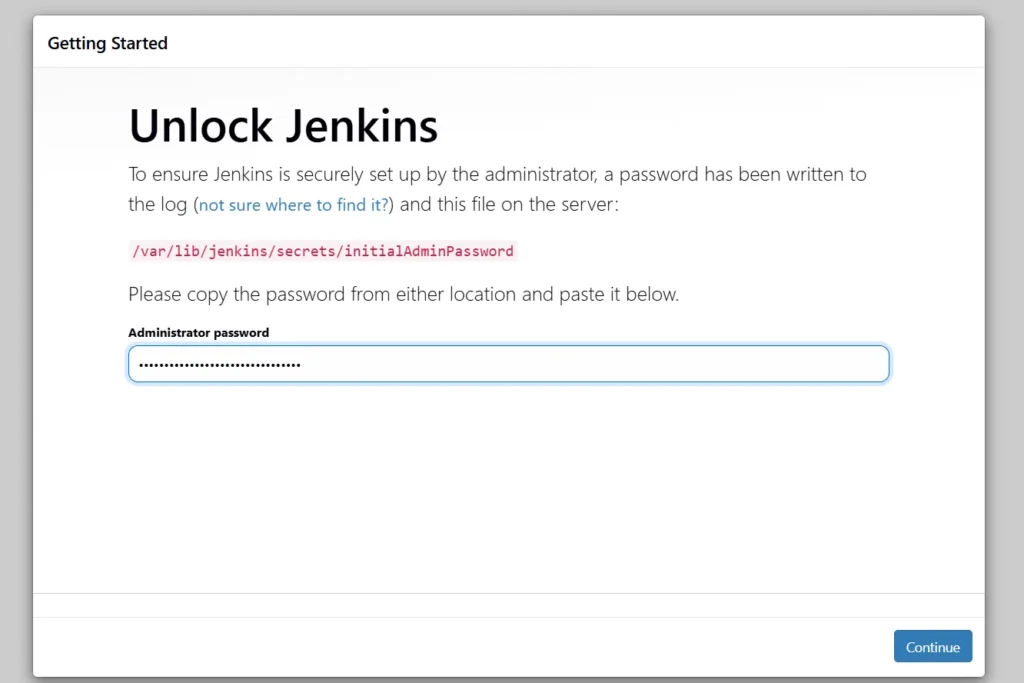
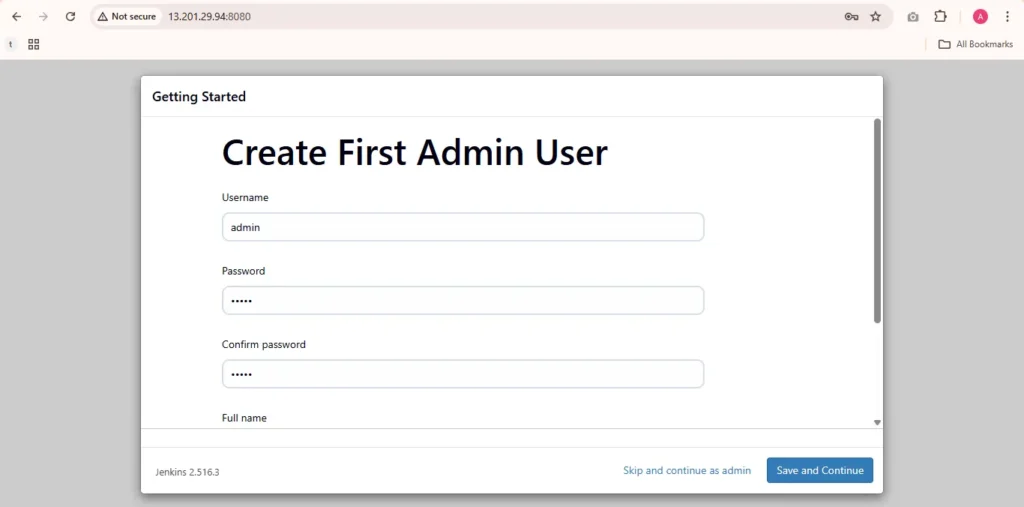
sudo cat /var/lib/jenkins/secrets/initialAdminPasswordUnlock Jenkins using an administrative password and install the suggested plugins.
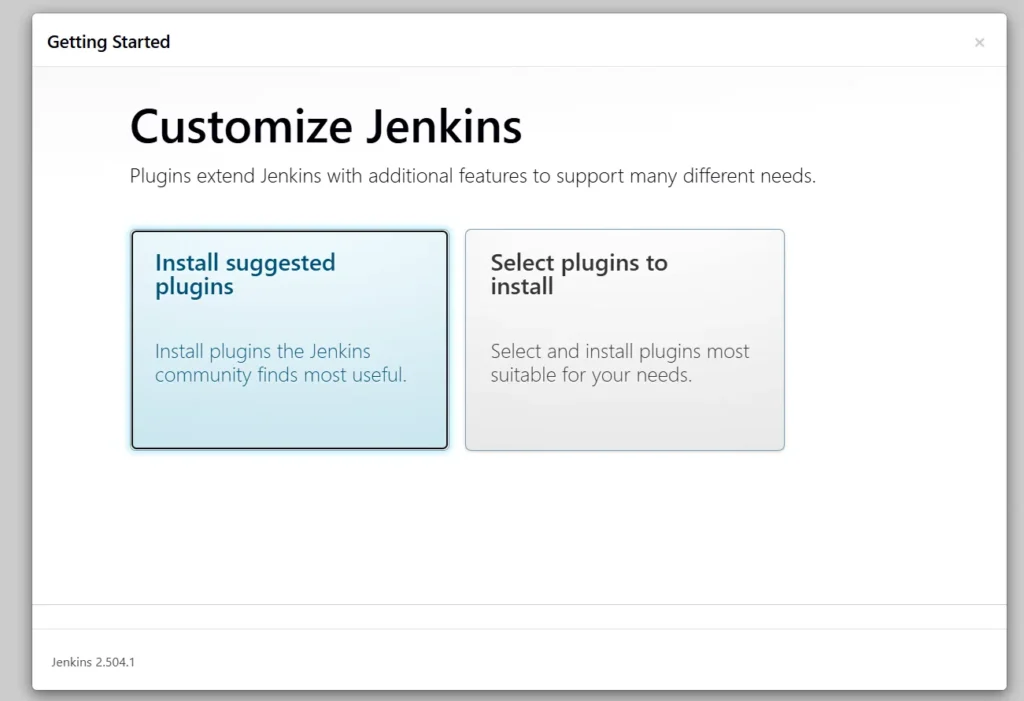
Jenkins will now get install all the libraries.
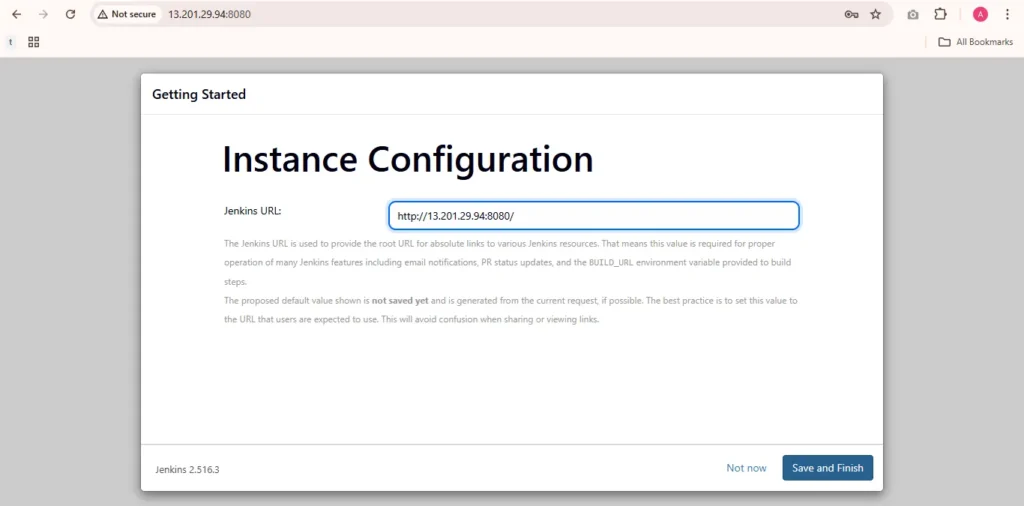
Create a user click on save and continue.
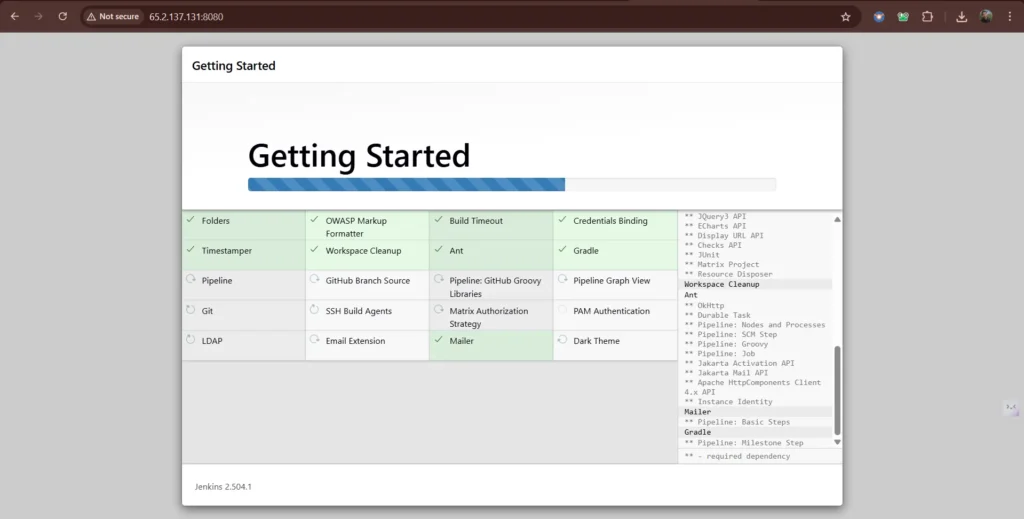
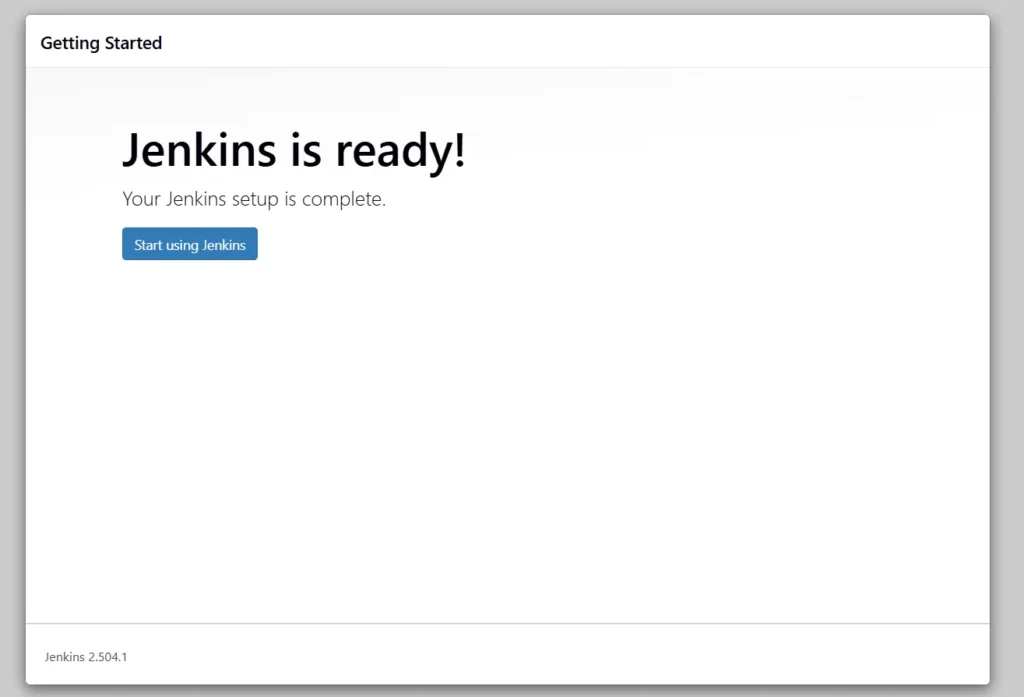
Jenkins Getting Started Screen.
Step 5: Install Plugins and ADD credentials in Jenkins for sonarqube
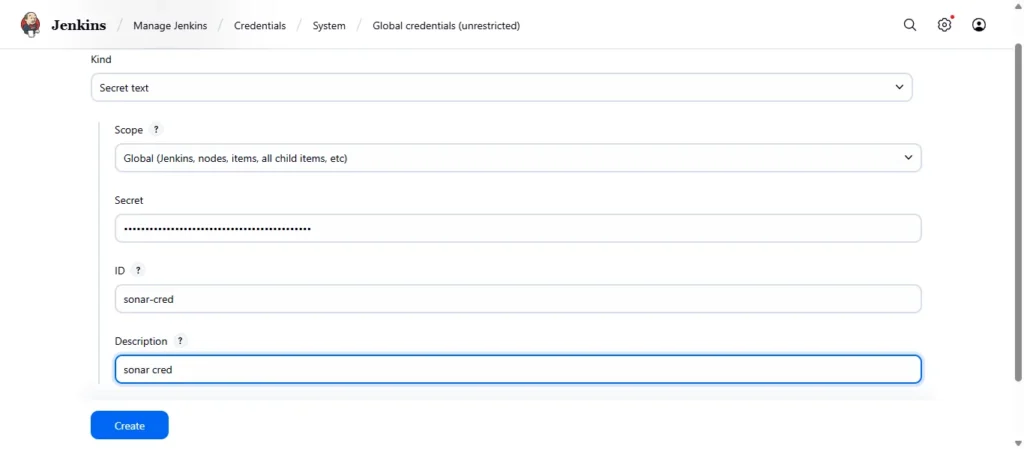
Step 5 A creating sonar credential
To allow Jenkins to connect to SonarQube for code analysis:
Login to Jenkins Dashboard
Navigate to Credentials
Manage Jenkins ➡ Credentials ➡ System ➡ Global credentials (unrestricted)
Add SonarQube Credentials
Click on “Add Credentialsˮ
Kind Select secret text
secret Your SonarQube Token
Description: e.g., SonarQube Token for Code Analysis
Save the credentials.

Step 5b Adding Credential in Jenkins
Now go to jenkins dashboard ➡️manage jenkins ➡️credentials ➡️system ➡️global credentials ➡️add credentials. Use username and access tocken.
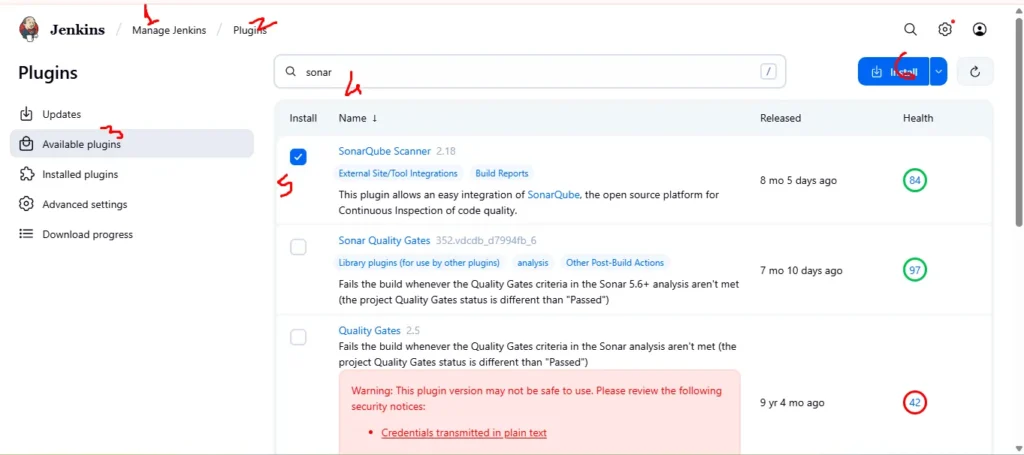
Step 5c Installing Plugin for sonarqube
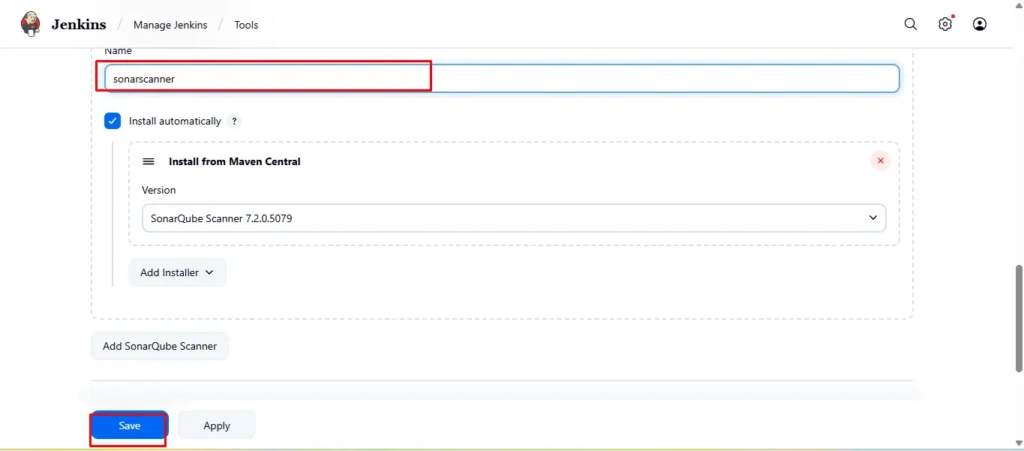
Now go to jenkins dashboard ➡️manage jenkins ➡️Plugins ➡️Available Plugin ➡️Search for “ sonarscanner ➡️click on install
Step 5d Configure SonarQube in Global Tool Configuration
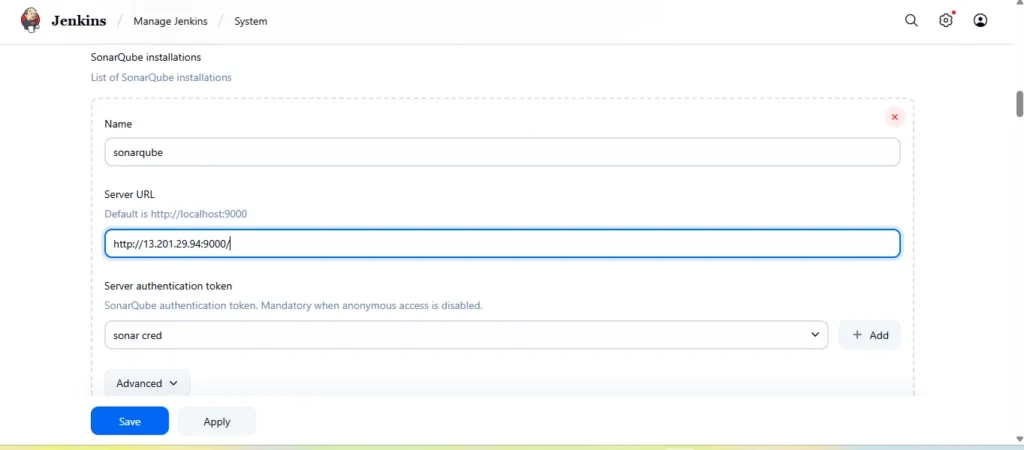
Add sonarqube instalations in system configuration for this GO to Manage Jenkins → System → Inside SonarQube Instalations → Click on Save
Go to Manage Jenkins → Tools → Install SonarQube → Click on Save
Step6 Create jenkins job
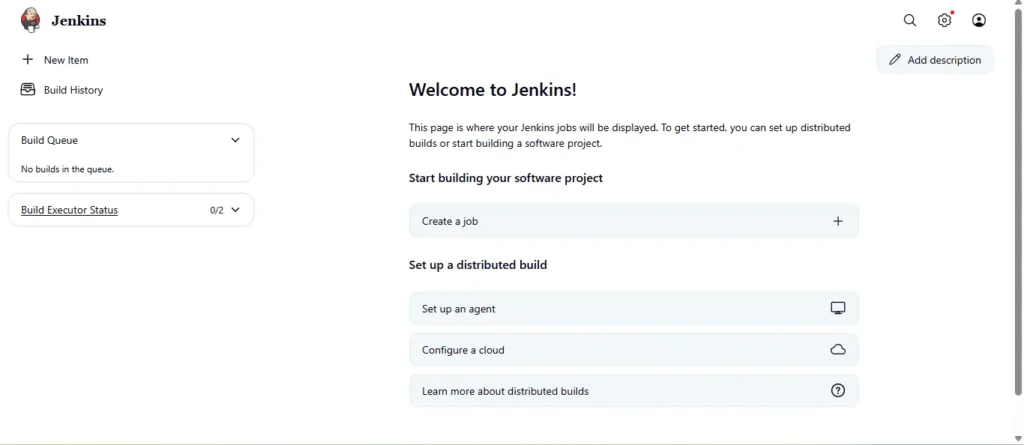
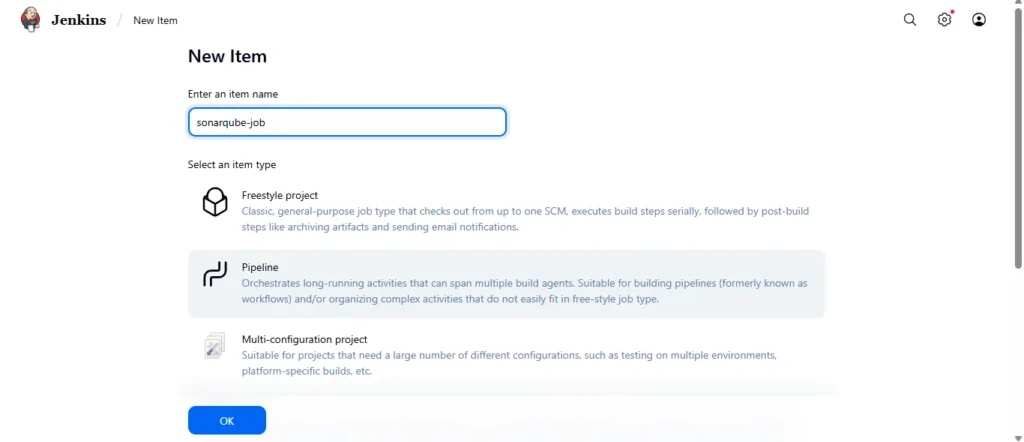
Go to jenkins job and click on Crete a New Job
Give name to your Job
Add following Pipeline Script in side the created job and save
pipeline {
    agent any

    environment {
        GIT_REPO = "https://gitlab.com/your repoinventory_management_system.git"
        PROJECT_KEY = "my-gitlab-project"
    }

    stages {
        stage('Clone Repository') {
            steps {
                git branch: 'staging', url: "${GIT_REPO}", credentialsId: 'gitlab-token'
            }
        }

        stage('SonarQube Analysis') {
            steps {
                withSonarQubeEnv('sonarqube') {
                    script {
                        def scannerHome = tool name: 'sonarscanner', type: 'hudson.plugins.sonar.SonarRunnerInstallation'
                        sh """
                          ${scannerHome}/bin/sonar-scanner \
                            -Dsonar.projectKey=${PROJECT_KEY} \
                            -Dsonar.sources=. \
                            -Dsonar.exclusions=**/*.js,**/*.ts
                        """
                    }
                }
            }
        }

        // Quality Gate stage skipped
    }
}
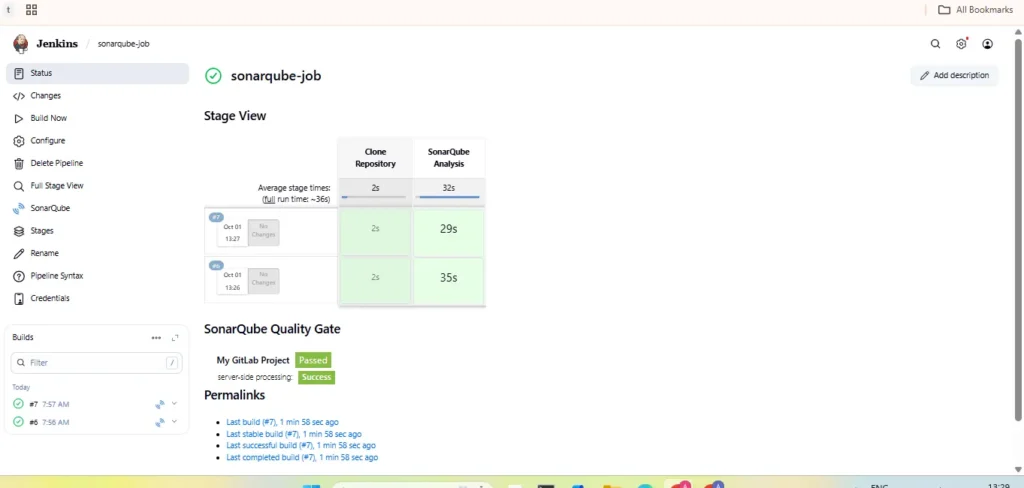
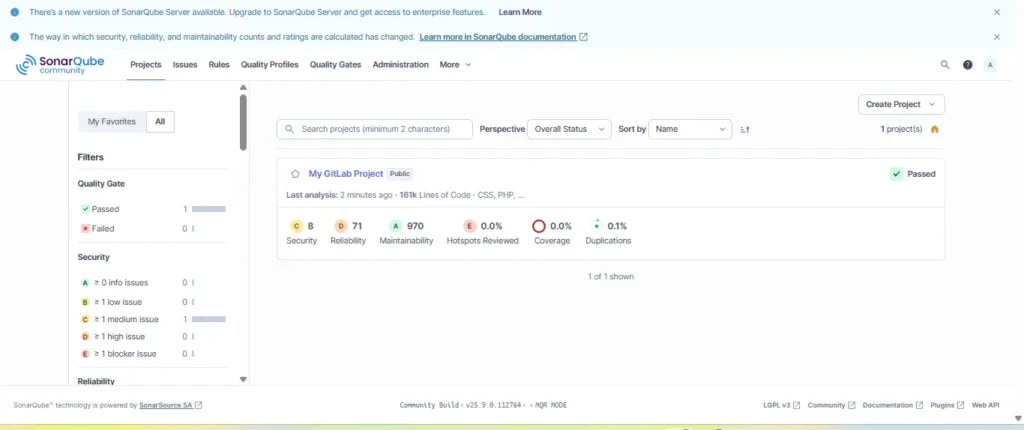
Result
Conclusion
By completing this setup, you’ve built a powerful, automated DevOps workflow that integrates SonarQube and Jenkins on AWS EC2 using Docker. This end-to-end pipeline ensures that every code commit is automatically analyzed for bugs, vulnerabilities, and code smells, maintaining high development standards. Jenkins handles the automation of builds and analysis, while SonarQube provides deep insights into code quality and security. Together, they create a seamless CI/CD environment where teams can detect issues early, enforce coding best practices, and continuously improve their software’s reliability and performance.
