In today’s IT world, thousands of employees work in a company and use different technologies approved by the organization. These people are often called users of those tools.
In the case of Jenkins, many users work with it every day to run jobs or tasks. However, for security and access control, the Jenkins administrator cannot give every user all permissions. That’s why it’s important to manage users based on their specific roles or responsibilities.
Jenkins provides a feature called User Management, which helps you add, edit, and assign different roles to each user. To make this role-based access possible, Jenkins uses several plugins.
What is the Role Strategy in Jenkins?
The role-based technique supports with choosing which access types can be assigned to particular users. As previously noted, not all users can be granted administrative access; hence, Jenkins gives the opportunity to assign different responsibilities to specific users. The “Role-based strategy plugin” enables this feature.
The Role-based strategy plugin is a particular type of Jenkins plugin that uses the role-based approach to control user permissions. Some of the primary features offered by this plugin are:
- Global roles such as admin, anonymous, and job creator allow you to establish permissions such as job, view, agent, run, and SCM.
- Project roles provide us access to specific projects with job and run permissions.
- Agent roles are used to configure node-related permissions.
- This plugin allows you to assign roles to users and groups.
So, how do we install this plugin in Jenkins and leverage its features to manage user roles?
How to Install the Role-Based Strategy Plugin in Jenkins
The Role-Based Strategy Plugin in Jenkins helps administrators assign specific roles and permissions to users. This makes it easier to control who can do what within the Jenkins environment. Follow the steps below to install it easily.
Step 1: Go to Manage Plugins
First, go to the Manage Jenkins page.
Then, under the System Configuration section, click on Manage Plugins, as shown below.
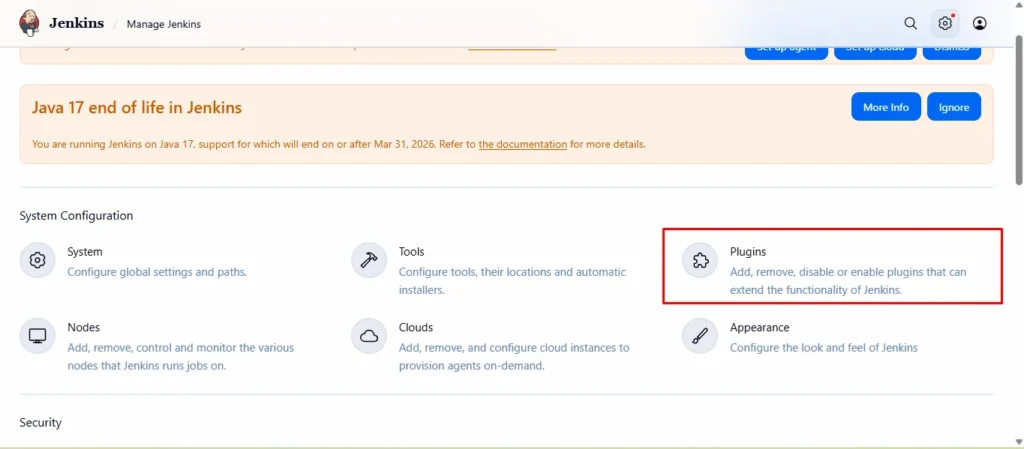
After you click on Manage Plugins, Jenkins will redirect you to the Plugin Manager page.
Step 2: Search and Install the Plugin
Next, to install the plugin, follow these steps carefully:
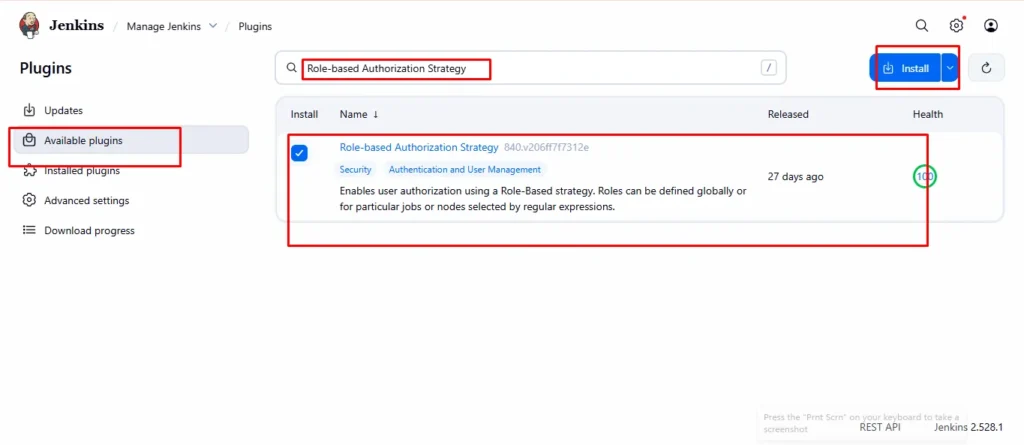
- Click on the Available tab.
- In the search box, type “role”.
- When you see Role-based Authorization Strategy, check the box next to it.
- Then, click on Install without restart.
- Alternatively, you can choose Download now and install after restart if you prefer.
During installation, Jenkins will automatically download and install the plugin files.
Step 3: Verify Installation
Finally, once the installation is complete, you will see a confirmation screen like the one below.
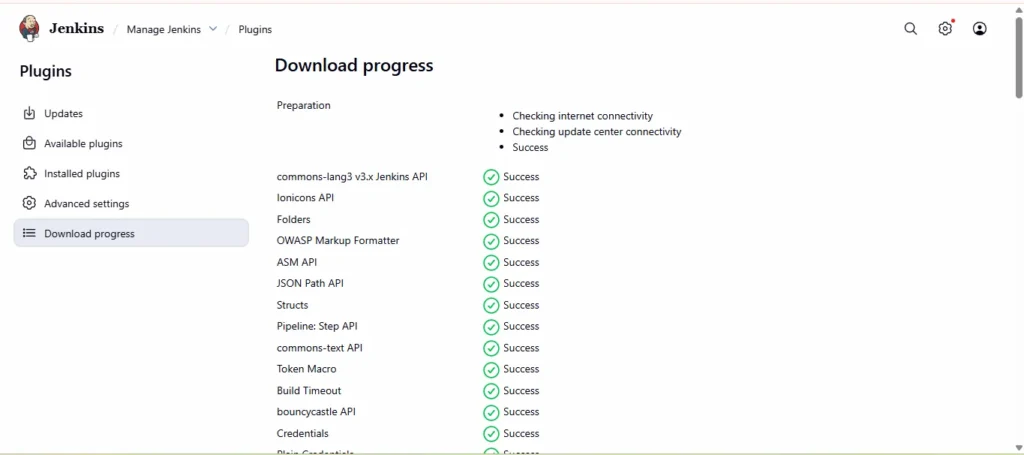
Now, you have successfully installed the Role-Based Strategy Plugin in Jenkins. You can start using it to manage users more effectively by assigning different roles and permissions based on their job responsibilities.
Tip:
Using this plugin improves security and organization because each user gets only the access they actually need.
How to enable the Role-based strategy on Jenkins?
After installing the Role-based Strategy plugin in Jenkins, the following step is to enable it. To accomplish this, take the following steps:
Step 1: Go to the Manage Jenkins page and select the “Configure Global Security” option from the Security section, as shown below:

Step 2: To enable the role-based strategy on Jenkins, follow the procedures outlined below:
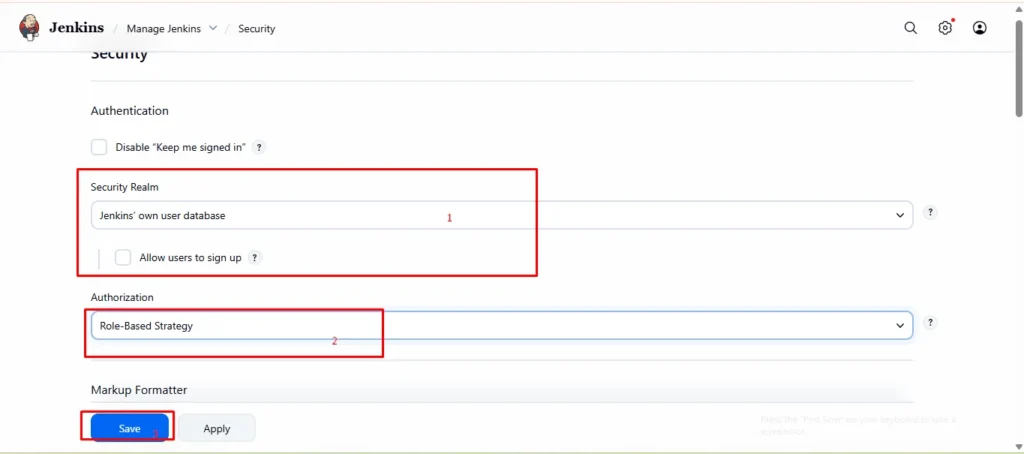
- Select the “Jenkins’ user database” option, if by default not selected.
- Select the “Role-Based Strategy”
- Click on the Save
This allows us to enable the Role-based strategy on Jenkins. Jenkins is now ready to grant role-based access to different users. Let’s create a new user and see how we may grant different permissions to that user.
How to Create a User in Jenkins?
When we finished the Jenkins installation process, Jenkins automatically established one admin user with full access. To create a new user in Jenkins, please follow the instructions below.
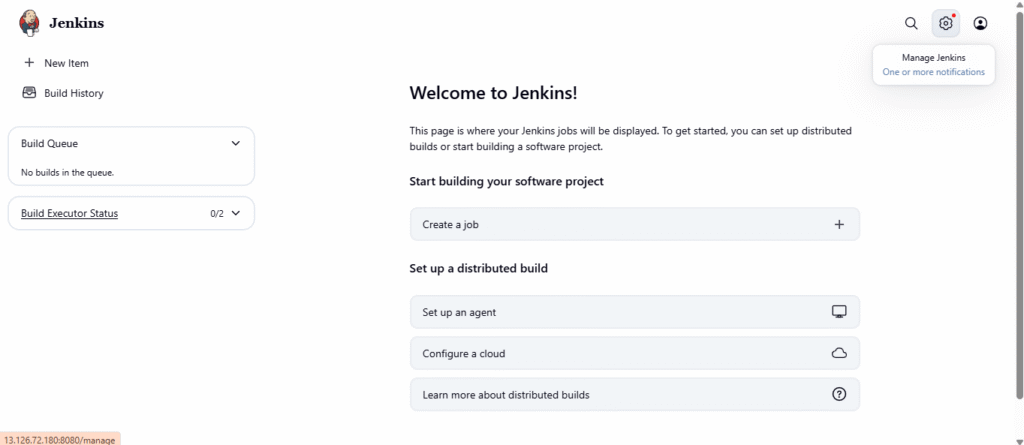
Step 1: Go to the Jenkins dashboard and click on the “Manage Jenkins” link, as highlighted below:

Step 2: As soon as we will click on Manage Jenkins, we will be redirected to the Manage Jenkins Page.
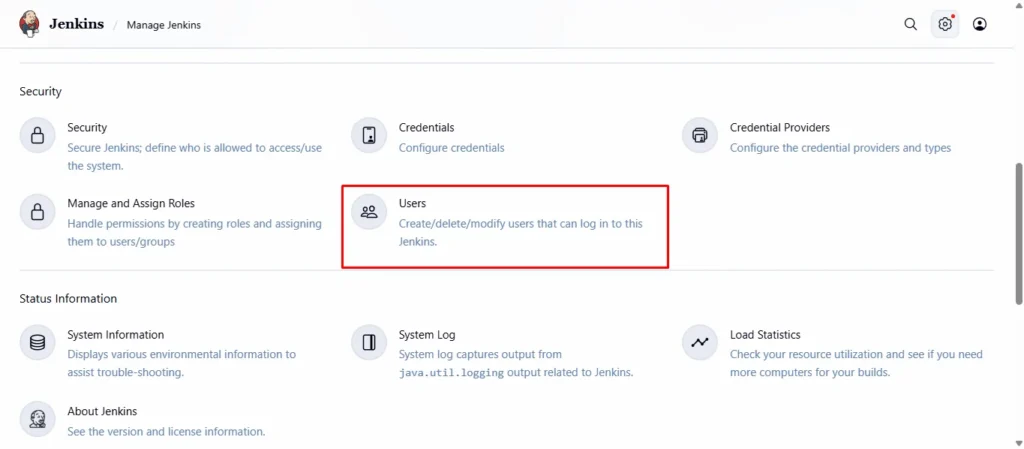
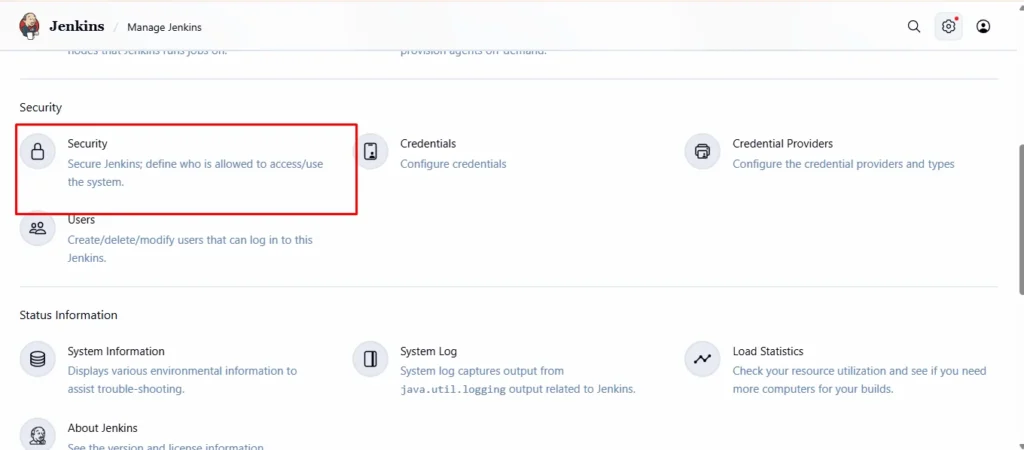
On the Manage Jenkins page, click the “Users” link under the Security section.
Step 3: When we click “ Users” on the Security section of the Manage Jenkins website, we are redirected to the Users page.
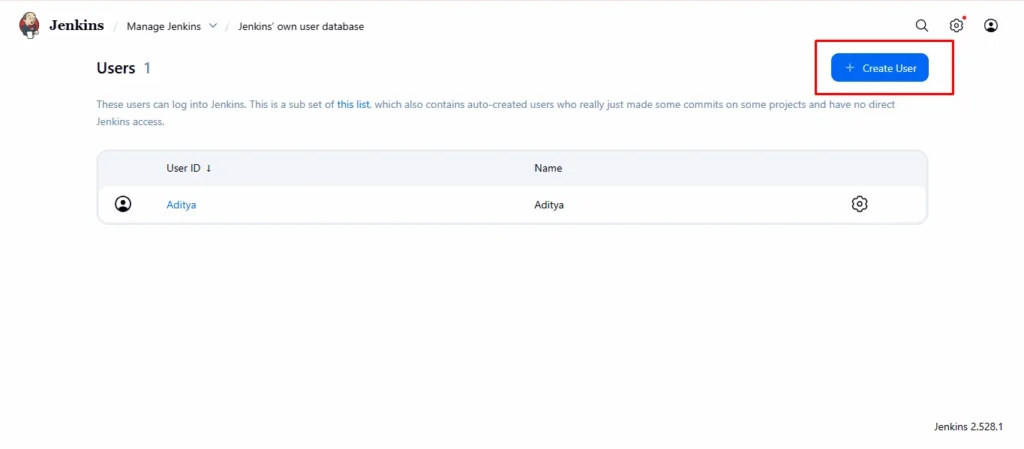
We can create a new user by clicking the “Create User” link, as seen above.
Step 4: When we click on the Create User link, we will be sent to the Create User page, where we will enter our username, password, confirm password, full name, and email address.
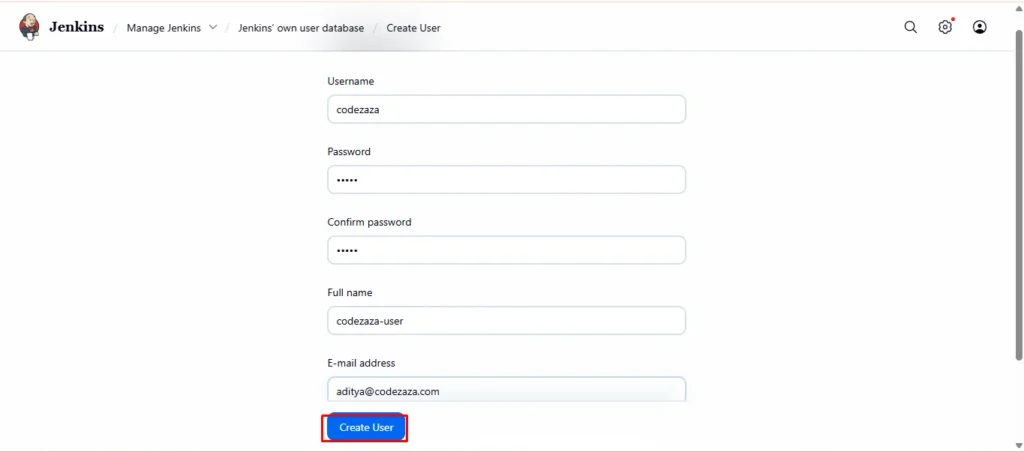
After filling in all information, click on the Create User button.
Step 5: As soon as we click on the Create User button, a new user will be created and displayed on the Manage Users page.
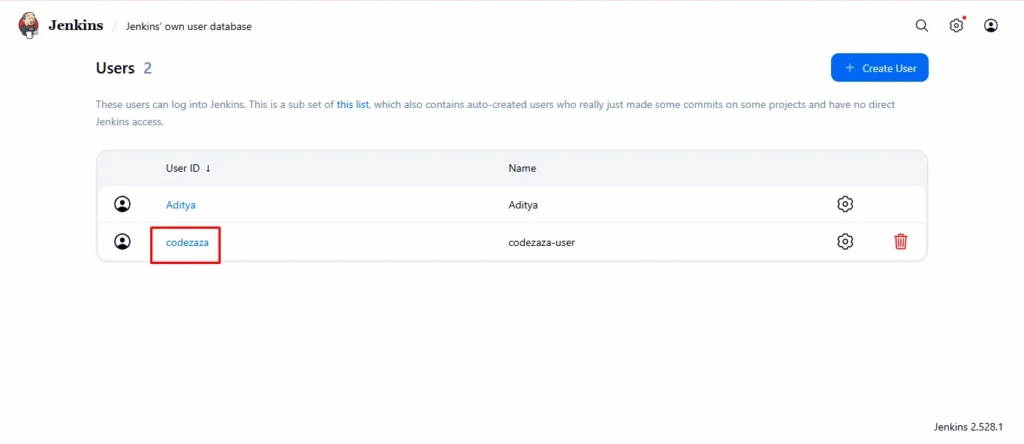
This allows us to create as many users as we want in Jenkins. Now, how can we assign roles to these users?
How to manage user roles in Jenkins?
Alright, so in this section, we will see how to create roles and assign permissions to users. For achieving this, follow the below steps:
Step 1: Firstly, go to the Manage Jenkins page and click on “Manage and Assign Roles”.
Note: This option will be visible only after installing the “Role-based strategy plugin”.
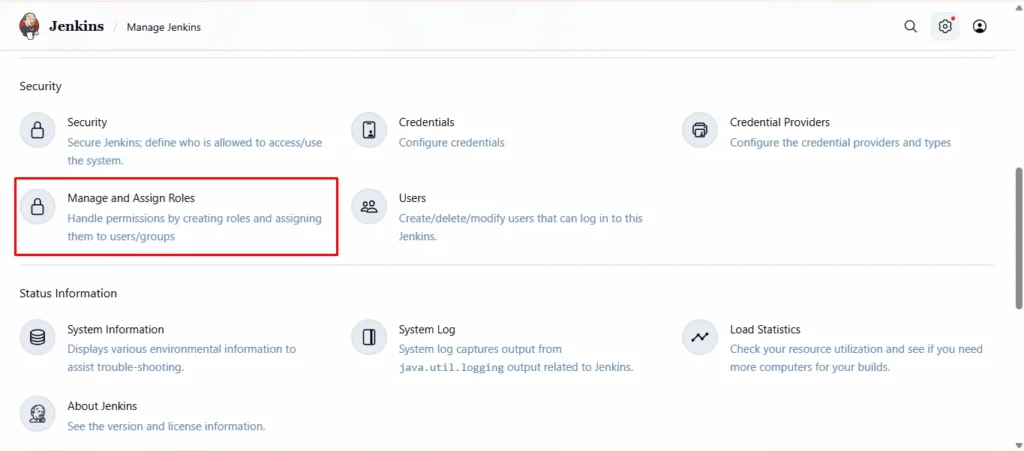
When we click on Manage and Assign Roles, we will be led to the Manage and Assign Roles page.
Step 2: Secondly, click on the “Manage Roles” option, as highlighted below:
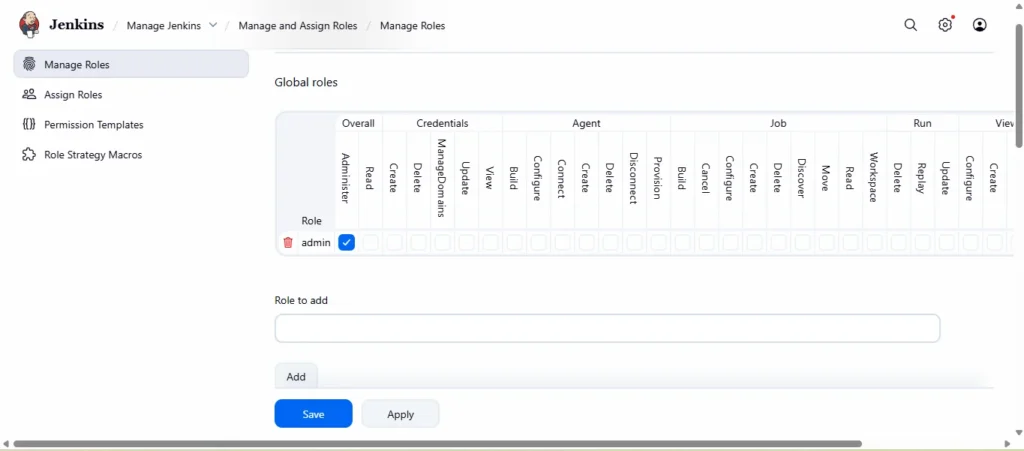
As soon as we click on the Manage Roles option, we will go to the Manage Roles page.
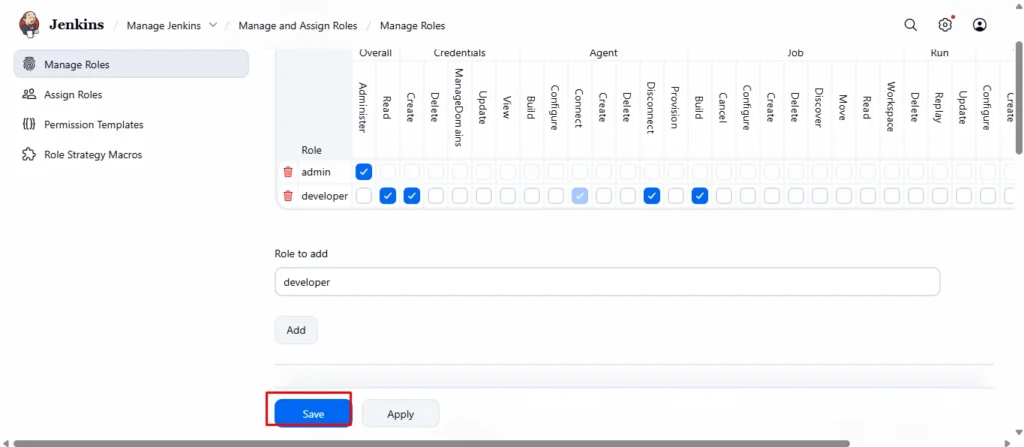
Step 3: For creating new roles, kindly follow the below highlighted steps:
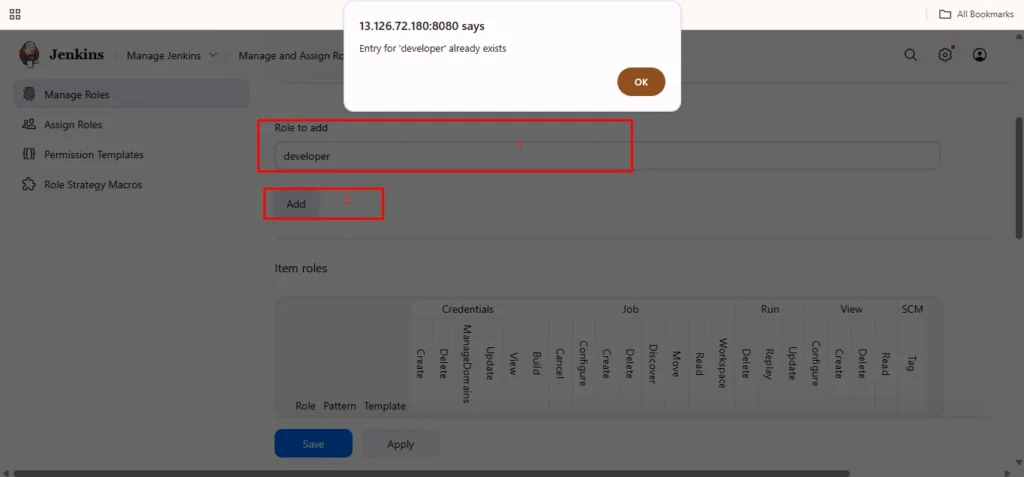
- Enter the desired Role in the “Role to Add” textbox. Here, we will build a role called “developer“.
- Click the Add
- Once we click the Add button, the needed role will be added to the Global Roles grid.
So in this way, we can create as many roles as we want. Now it’s time to permit the newly added role.
Step 4: Check the permissions that we want to give to the newly added role and click on the Save button.
So, we now have a new role in the system, which comes with particular permissions. Now, let’s look at how we may assign these roles to a certain user so that they have the same permissions as the described role.
How to assign roles to a user in Jenkins?
In the last section, we learned how to construct roles and grant authorization to them. In this section, we will learn how to assign certain responsibilities to users. For demonstration reasons, we generated one Jenkins user. Please follow the steps below to assign the role to a specific user.
Step 1: Go to the Manage and Assign Roles page and click on the “Assign Roles” link, as highlighted below:

Step 2: As soon as we click on Assign Roles, we will be taken to the Assign Roles page. Under the Global roles area, we can see the new role (“developer”) that we created in the previous step. Now we may assign this role to the appropriate person. Please do the following steps to achieve it:
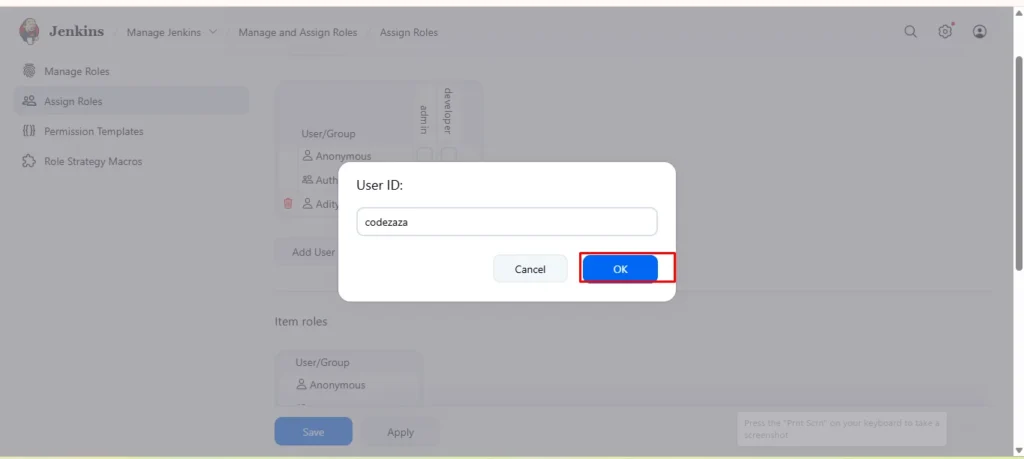
- Enter the desired user in the “User/Group to Add” textbox. Here, we will create a user called “codezaza“.
- Click the Add
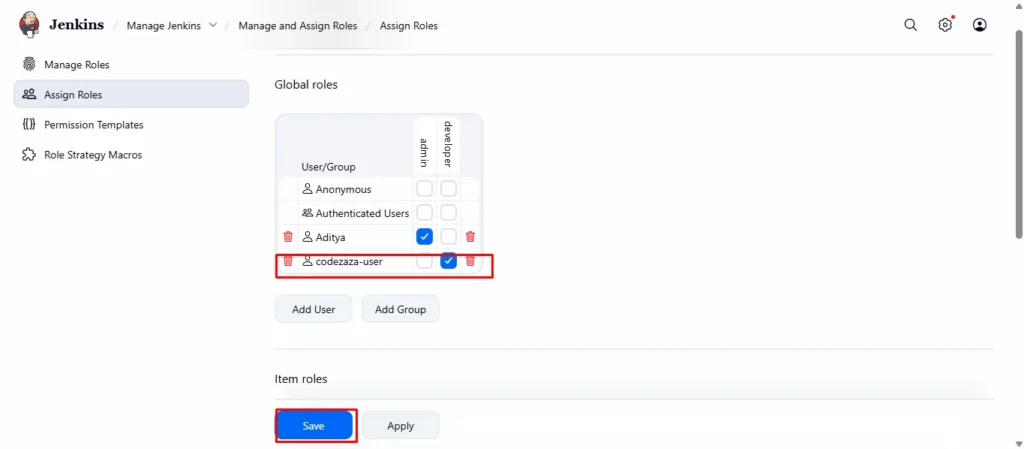
- As soon as we click the Add button, the required user is added to the Global roles grid. Now, mark the developer checkbox for this user.
- Click the Save
Step 3: As we given a role to the user in the previous phase, it is now time to validate the rights associated with the role for any individual user. To do this, log in as that specific user. We did not assign the “Create Job” role to the user “codezaza” in the previous section, thus when we login as this user, the “Create a new Item” link should not appear on the Jenkins dashboard, as seen in the screenshot below.
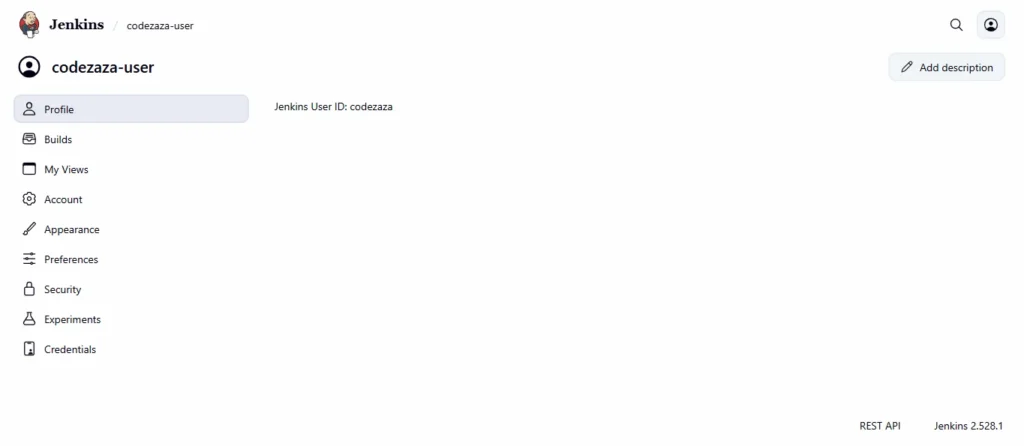
In conclusion, any permissions we provide to the role will only cover the tasks that the user will execute. That concludes this section. In the following part, we’ll look at Jenkins’ project-based matrix authorization mechanism.
What is the Project-based Matrix Authorization strategy in Jenkins?
The project-based matrix strategy is an authorization technique that specifies the user’s or group’s permissions on certain projects. It also specifies the permissions for activities that any person or group can take over jobs. This option is under Authorization, and when we select it, a grid appears in which we can add people and assign them privileges by marking the checkboxes.
These privilege groups are categorized as Overall, Credentials, Agent, Job, Run, View, and SCM. In the following sub-section, we will look at how to implement a project-based matrix technique in Jenkins.
How to assign job-specific permissions in Jenkins?
In the last section, we covered the basics of the project-based matrix authorization technique. Now, in this sub-section, we’ll look at how to execute this strategy in Jenkins. Follow the steps below to implement it:
Step 1: Click on “Manage Jenkins” in the Jenkins dashboard.
As soon as we will click on it, we will redirect towards the Manage Jenkins page.
Step 2: Click on “Configure Global Security” under the “Security” section.
We will redirect towards the Configure Global Security page.
Step 3: Select the “Project-based matrix authorization strategy” option under the authorization section.
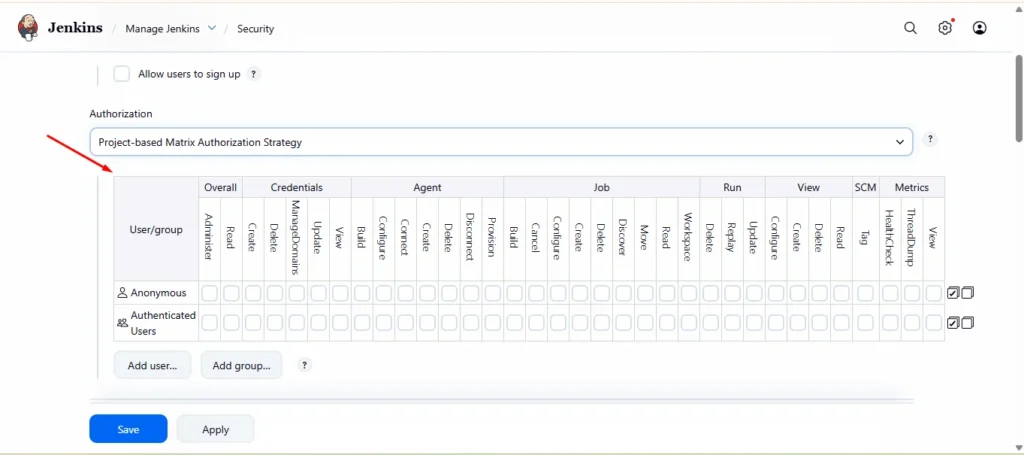
After selecting the required choice, we are presented with a grid-based structure in which we must add previously generated users.
Step 4: Add the user that you want to add by following the below steps:
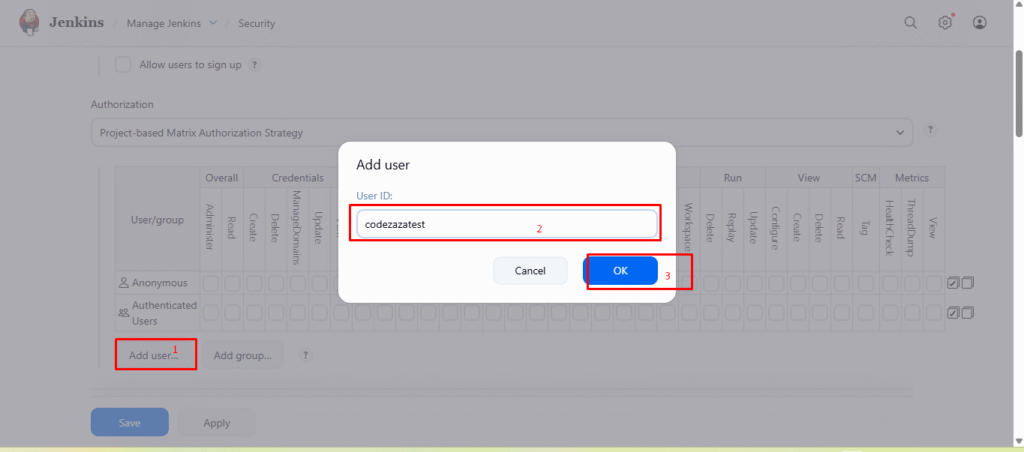
- Click on the “Add user or group”
- Put user “codezazatest” that you want to add.
- Click on the Ok button.
As soon as we will click on the OK button, the user will add to the grid-like below image.
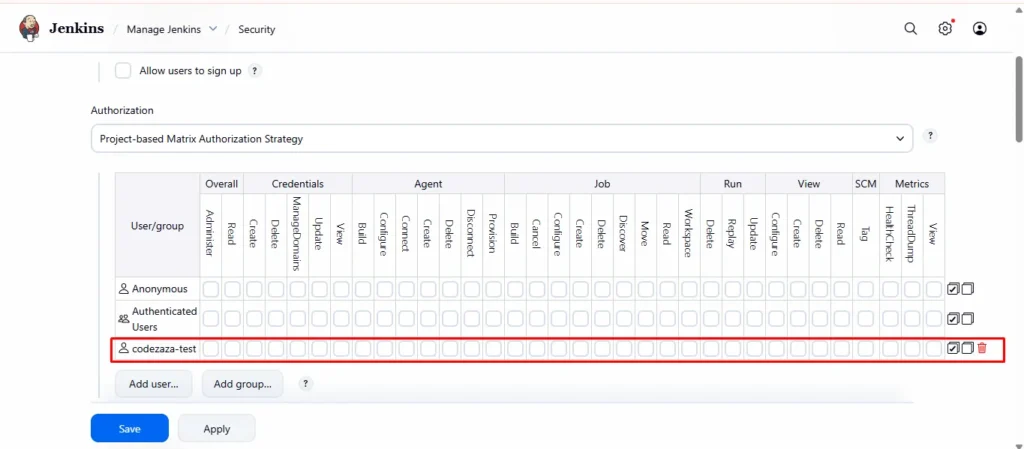
Step 5: Now assign all privileges to this user as we are making as admin and click on the Save button.

Step 6: We now have another user named “codezazatest” that we created. When we login with this account, we will receive an “Access denied” notice in the Jenkins dashboard because we did not add this user to the grid or assign privileges to this user.
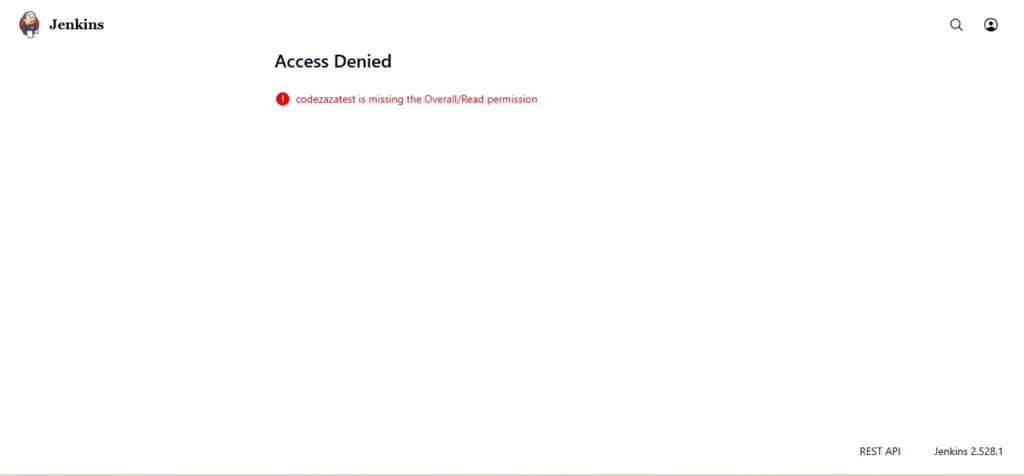
In the next step, we will log in as the admin user and add this user to the grid, assigning READ privilege to this user.
Step 7: Now, add this user inside the grid as we did in previous steps and assign READ privilege to this user.
So in this way READ privilege, we assigned to user “toolsqadev “.
Step 8: Now, when we again login with this user we can see all jobs in the Jenkins dashboard.
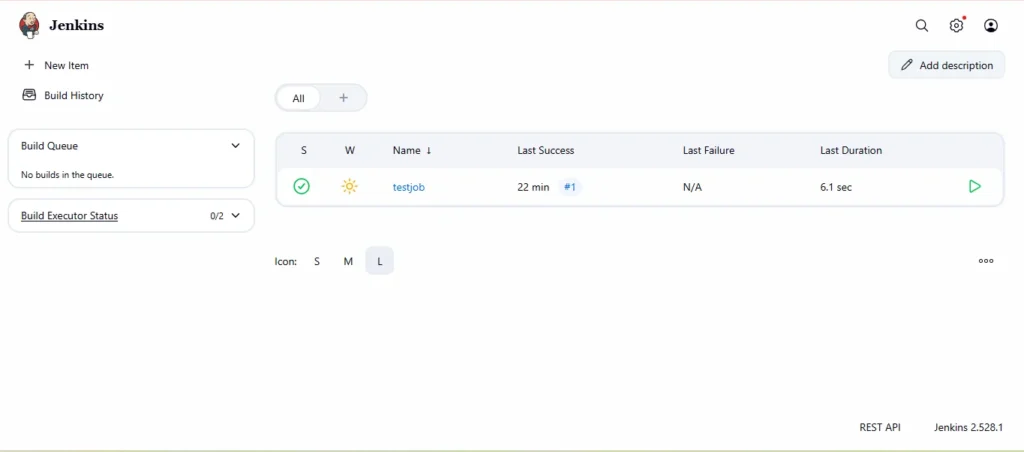
The essential aspect to note here is that we did not see the “Build Now” option on the left for this user because we only granted READ access to them
Conclusion:
Effective user management is crucial for maintaining security and proper access control in Jenkins, especially in large organizations. By using plugins like the Role-Based Strategy and the Project-Based Matrix Authorization, administrators can:
- Define Roles and Responsibilities: Assign specific permissions to users based on their job roles, such as developer, admin, or tester.
- Control Access: Ensure that users only have access to the resources they need, minimizing security risks.
- Simplify Administration: Easily create, edit, and assign roles to multiple users, improving overall system organization.
- Enable Project-Specific Permissions: With project-based matrix strategy, administrators can restrict or allow access to specific jobs, builds, and resources.
- Enhance Security: Limiting permissions reduces accidental or unauthorized changes, protecting sensitive pipelines and infrastructure.
By implementing these strategies, Jenkins becomes a secure, organized, and efficient environment where users can perform their tasks without compromising system integrity. Proper role and permission management ensures smooth operations, accountability, and scalability in a multi-user setup.
