The Problem Every Team Faces
Imagine this: it’s Friday evening, and your team is deploying a critical update to your web application. Users are actively browsing your site when suddenly—everything goes dark. The old container stops, and for the next 30–60 seconds, users are greeted with error messages.
This common scenario highlights why zero-downtime deployment Docker Compose is a critical DevOps requirement for modern applications.
In this comprehensive guide, you’ll learn how to implement zero-downtime deployment Docker Compose using Nginx as a reverse proxy to seamlessly switch traffic between application versions without interrupting users.
By the end of this guide, you’ll understand:
- Why traditional container deployments cause downtime
- How Nginx enables smooth traffic switching
- How zero-downtime deployment Docker Compose works step by step
- Best practices for safe deployments and instant rollback
Perfect for: Developers, System Administrators, and anyone managing containerized applications who want reliable, production-ready deployments.

1.Understanding the Architecture
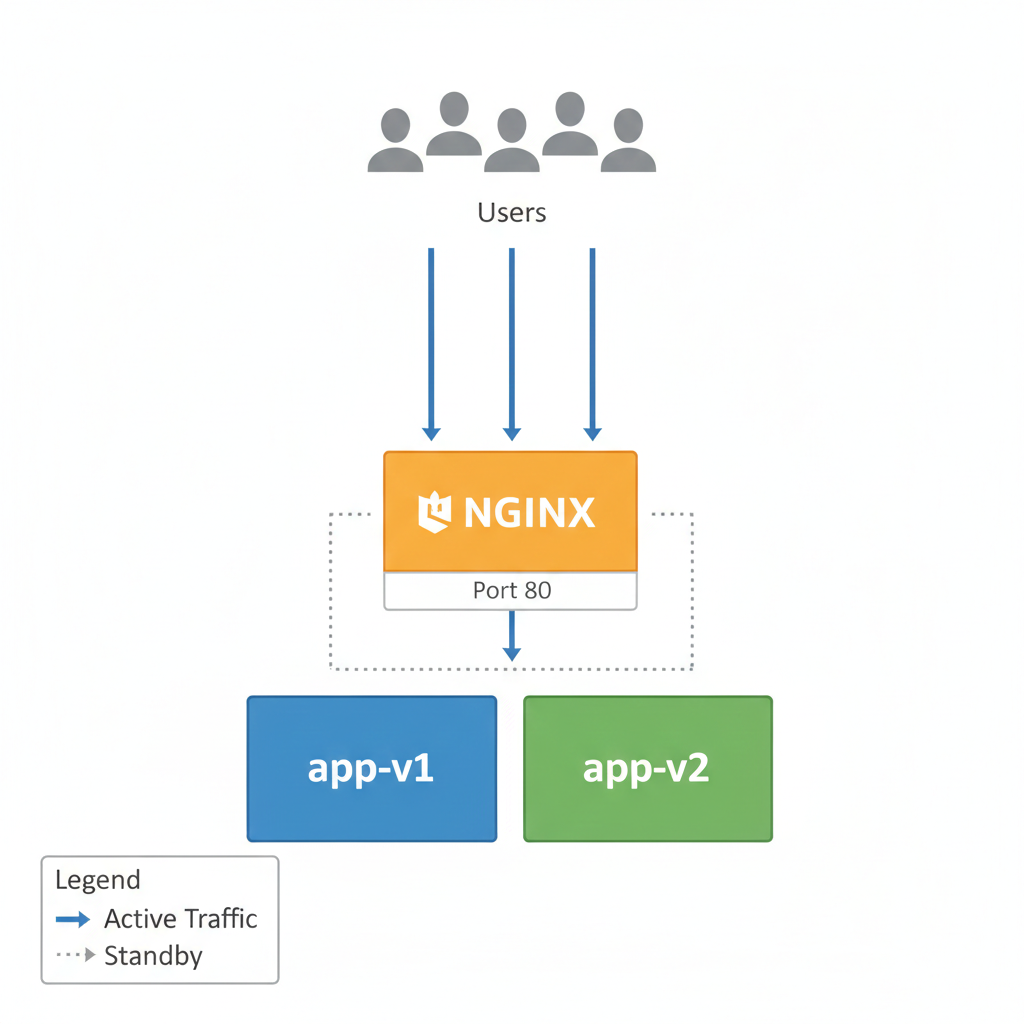
Zero-downtime deployment works by ensuring that a running application is never replaced until a new version is fully ready to take traffic. Instead of stopping the existing container, the system runs two versions of the application at the same time during deployment. The current version (app-v1) continues serving users while the new version (app-v2) is started and tested in the background.
Nginx plays a crucial role as a reverse proxy that sits in front of both application containers. All user requests first reach Nginx, which then forwards traffic to the active backend container. Because Nginx supports configuration reloads without restarting, it allows traffic routing to be changed safely while keeping existing connections alive.
Once the new application version is confirmed to be healthy, Nginx’s configuration is updated to redirect traffic from the old container to the new one. This configuration change is applied using a reload operation, which causes no service interruption. After successful verification, the old application container is removed, completing the deployment without any downtime.
2.Project Setup
Project Structure
Let’s organize our project with a clean structure:
zero-downtime-deployment/
├── app/
│   ├── v1/
│   │   ├── index.html
│   │   └── Dockerfile
│   └── v2/
│       ├── index.html
│       └── Dockerfile
├── nginx/
│   ├── nginx-v1.conf
│   └── nginx-v2.conf
├── docker-compose.yml
└── deploy.sh
3.Code Files
- File 1 : app/v1/index.html
<!DOCTYPE html>
<html lang="en">
<head>
    <meta charset="UTF-8">
    <meta name="viewport" content="width=device-width, initial-scale=1.0">
    <title>My App - Version 1</title>
    <style>
        body {
            font-family: Arial, sans-serif;
            background: linear-gradient(135deg, #667eea 0%, #764ba2 100%);
            display: flex;
            justify-content: center;
            align-items: center;
            min-height: 100vh;
            margin: 0;
        }

        .container {
            text-align: center;
            background: rgba(255, 255, 255, 0.1);
            padding: 40px;
            border-radius: 15px;
            color: white;
        }

        h1 {
            font-size: 2.5em;
            margin-bottom: 20px;
        }

        .version {
            font-size: 1.5em;
            background: rgba(255, 255, 255, 0.2);
            padding: 10px 20px;
            border-radius: 25px;
            display: inline-block;
        }
    </style>
</head>
<body>
    <div class="container">
        <h1> My Application</h1>
        <div class="version">Version 1.0.0</div>
        <p>Current Production Version</p>
    </div>
</body>
</html>- File 2 : app/v1/Dockerfile
FROM nginx:alpine

# Copy the HTML file to Nginx default location
COPY index.html /usr/share/nginx/html/

# Expose port 80
EXPOSE 80

# Health check endpoint
HEALTHCHECK --interval=30s --timeout=3s --start-period=5s --retries=3 \
    CMD wget --quiet --tries=1 --spider http://localhost/ || exit 1

# Start Nginx
CMD ["nginx", "-g", "daemon off;"]- File 3: app/v2/index.html
<!DOCTYPE html>
<html lang="en">
<head>
    <meta charset="UTF-8">
    <meta name="viewport" content="width=device-width, initial-scale=1.0">
    <title>My App - Version 2</title>
    <style>
        body {
            font-family: Arial, sans-serif;
            background: linear-gradient(135deg, #11998e, #38ef7d);
            display: flex;
            justify-content: center;
            align-items: center;
            min-height: 100vh;
            margin: 0;
            color: white;
        }

        .container {
            text-align: center;
            background: rgba(255, 255, 255, 0.1);
            padding: 40px;
            border-radius: 15px;
        }

        .version {
            font-size: 1.5em;
            background: rgba(255, 255, 255, 0.2);
            padding: 10px 20px;
            border-radius: 25px;
            display: inline-block;
            margin: 20px 0;
        }
    </style>
</head>
<body>
    <div class="container">
        <h1>My Application</h1>
        <div class="version">Version 2.0.0</div>
        <p>New Features: UI Updates, Performance, Security</p>
    </div>
</body>
</html>- File 4: app/v2/Dockerfile
FROM nginx:alpine

# Copy the HTML file to Nginx default location
COPY index.html /usr/share/nginx/html/

# Expose port 80
EXPOSE 80

# Health check endpoint
HEALTHCHECK --interval=30s --timeout=3s --start-period=5s --retries=3 \
    CMD wget --quiet --tries=1 --spider http://localhost/ || exit 1

# Start Nginx
CMD ["nginx", "-g", "daemon off;"]- File 5 : nginx/nginx-v1.conf
events {
    worker_connections 1024;
}

http {
    # Point to Version 1
    upstream app_backend {
        server app-v1:80;
    }

    server {
        listen 80;
        server_name localhost;

        # Health check
        location /health {
            return 200 "healthy\n";
        }

        # Forward all requests to app
        location / {
            proxy_pass http://app_backend;
            proxy_set_header Host $host;
        }
    }
}- File 6: nginx/nginx-v2.conf
events {
    worker_connections 1024;
}

http {
    # Point to Version 2
    upstream app_backend {
        server app-v2:80;
    }

    server {
        listen 80;
        server_name localhost;

        # Health check
        location /health {
            return 200 "healthy\n";
        }

        # Forward all requests to app
        location / {
            proxy_pass http://app_backend;
            proxy_set_header Host $host;
        }
    }
}- File 7: docker-compose.yml
version: '3.8'

services:
  # Nginx Reverse Proxy
  nginx:
    image: nginx:alpine
    container_name: reverse-proxy
    ports:
      - "80:80"
    volumes:
      - ./nginx/nginx-v1.conf:/etc/nginx/nginx.conf:ro
    networks:
      - app-network
    depends_on:
      - app-v1

  # Application Version 1
  app-v1:
    build: ./app/v1
    container_name: app-v1
    networks:
      - app-network

  # Application Version 2 (starts only during deployment)
  app-v2:
    build: ./app/v2
    container_name: app-v2
    networks:
      - app-network
    profiles:
      - deployment

networks:
  app-network:
driver: bridge- File 8: deploy.sh
#!/bin/bash

# Exit immediately if any command fails
set -e

# Colors
GREEN='\033[0;32m'
BLUE='\033[0;34m'
YELLOW='\033[1;33m'
RED='\033[0;31m'
NC='\033[0m'

print_info() { echo -e "${BLUE}  $1${NC}"; }
print_success() { echo -e "${GREEN} $1${NC}"; }
print_warning() { echo -e "${YELLOW}  $1${NC}"; }
print_error() { echo -e "${RED} $1${NC}"; }

echo ""
print_info "=========================================="
print_info "Zero-Downtime Deployment Script"
print_info "=========================================="
echo ""

# Step 1: Start app-v2
print_info "Step 1: Starting app-v2..."
docker-compose --profile deployment up -d --build app-v2
print_success "app-v2 started!"
echo ""

# Step 2: Wait for app-v2 to be ready
print_info "Step 2: Waiting for app-v2 to be ready..."
sleep 10
print_success "app-v2 is ready!"
echo ""

# Step 3: Switch traffic (SAFE)
print_info "Step 3: Switching traffic to app-v2..."

# Backup current Nginx config
cp ./nginx/nginx-v1.conf ./nginx/nginx-v1.conf.backup

# Switch traffic
cp ./nginx/nginx-v2.conf ./nginx/nginx-v1.conf

# Validate config before reload
docker exec reverse-proxy nginx -t

# Reload Nginx (zero downtime)
docker exec reverse-proxy nginx -s reload

print_success "Traffic switched to app-v2!"
echo ""

# Step 4: Verification period
print_info "Step 4: Verification period (10 seconds)..."
sleep 10
print_success "Verification successful!"
echo ""

# Step 5: Cleanup old version
print_info "Step 5: Removing old version (app-v1)..."
docker-compose stop app-v1
docker-compose rm -f app-v1
print_success "Cleanup complete!"
echo ""

print_success "=========================================="
print_success "Deployment completed successfully! "
print_success "=========================================="
print_info "Access your app at: http://localhost"
echo ""
4.Step-by-Step Deployment Guide
Initial Setup (Version 1)
Step 1: Start the application
# Make the deploy script executable
chmod +x deploy.sh

# Start version 1
docker-compose up -d --build
Step 2: Verify version 1 is running
# Check container status
docker-compose ps

# Check health
curl http://localhost/health

# View the application
curl http://localhost
You should see Version 1.0.0 running at http://localhost.
Deploying Version 2 (Zero Downtime)
Step 3: Run the deployment script
./deploy.shThe script will:
- Build and start app-v2
- Wait for health checks to pass
- Switch Nginx to point to app-v2
- Verify the deployment
- Remove the old version
Step 4: Monitor the deployment
While the script runs, open another terminal and watch the logs:
# Watch Nginx logs
docker logs -f reverse-proxy

# Watch app-v2 logs
docker logs -f app-v2
Step 5: Verify zero downtime
During deployment, continuously check the application:
# Run this in a loop during deployment
while true; do
  curl -s http://localhost | grep -o "Version [0-9.]*"
  sleep 1
done
You should see a seamless transition from Version 1.0.0 to Version 2.0.0 with no errors!
5.How It Works Internally
The Magic of Nginx Reload
When the nginx -s reload command is executed, Nginx updates its configuration without stopping the running service. Instead of shutting down immediately, Nginx first reads and validates the new configuration file to ensure there are no errors. Once validated, it starts new worker processes that use the updated routing rules while the old workers continue handling existing user requests.
The older worker processes are then gracefully terminated only after they finish serving all active connections. Because of this graceful handover, no user requests are dropped and no active sessions are interrupted. This entire reload operation happens within milliseconds, making it ideal for switching traffic during zero-downtime deployments.
Health Checks Ensure Safety
Our deployment script uses Docker health checks:
HEALTHCHECK --interval=30s --timeout=3s --start-period=5s --retries=3 \
    CMD wget --quiet --tries=1 --spider http://localhost/ || exit 1
This ensures:
- Checks every 30 seconds
- Gives 5 seconds for startup
- Retries 3 times before marking unhealthy
- Times out after 3 seconds
The Deployment Timeline
Here’s what happens in our 60-second deployment:
| Time | Action | Status |
|---|---|---|
| 0s | Start app-v2 container | Both v1 and v2 running |
| 5s | app-v2 starts accepting requests | v1 serving traffic |
| 10s | Health check passes | v1 serving traffic |
| 15s | Update Nginx config | v1 serving traffic |
| 16s | Nginx reload triggered | Switching traffic |
| 17s | New connections go to v2 | v2 serving traffic |
| 20s | Old connections drain | v2 serving traffic |
| 30s | Verification period | v2 serving traffic |
| 60s | Remove v1 container | Only v2 running |
6.Rollback Strategy
One of the biggest advantages of this approach is instant rollback!
If Something Goes Wrong:
If app-v2 fails health checks or shows issues:
# The script automatically rolls back
# Or you can manually rollback:

# 1. Restore v1 configuration
cp nginx/nginx-v1.conf.backup nginx/nginx-v1.conf

# 2. Reload Nginx
docker exec reverse-proxy nginx -s reload

# 3. Stop v2
docker-compose stop app-v2

# 4. Verify v1 is serving traffic
curl http://localhost
Rollback time: Less than 5 seconds!
Manual Rollback Script
Create rollback.sh:
#!/bin/bash

echo " Rolling back to previous version..."

# Restore previous Nginx config
cp nginx/nginx-v1.conf.backup nginx/nginx-v1.conf


# Reload Nginx
docker exec reverse-proxy nginx -s reload

# Start v1 if needed
docker-compose up -d app-v1

# Stop v2
docker-compose stop app-v2

echo " Rollback completed!"
7.Testing & Verification
Let’s prove there’s actually zero downtime during deployment!
Test 1: Continuous Request Test
Run this script during deployment:
#!/bin/bash
# continuous-test.sh

echo "Starting continuous request test..."
echo "Press Ctrl+C to stop"
echo ""

success=0
failure=0
start_time=$(date +%s)

while true; do
    response=$(curl -s -o /dev/null -w "%{http_code}" http://localhost)

    if [ "$response" -eq 200 ]; then
        ((success++))
        echo -ne "\r Successful requests: $success |  Failed: $failure"
    else
        ((failure++))
        echo ""
        echo " Failed request at $(date '+%Y-%m-%d %H:%M:%S') - HTTP $response"
        echo -ne "\r Successful requests: $success |  Failed: $failure"
    fi

    sleep 0.1  # 10 requests per second
done
Expected Result: Zero failures during deployment!
Test 2: Load Testing with Apache Bench
# Install Apache Bench
sudo apt-get install apache2-utils

# Run during deployment - 10,000 requests, 100 concurrent
ab -n 10000 -c 100 http://localhost/

# Expected output:
# Failed requests: 0
# Non-2xx responses: 0
Test 3: Version Transition Check
# Monitor version changes
watch -n 0.5 'curl -s http://localhost | grep -o "Version [0-9.]*"'
You’ll see the version change from 1.0.0 to 2.0.0 smoothly!
8.Taking This to Production
1. Add Canary Deployments
Instead of switching all traffic at once, gradually shift it:
# nginx/nginx-canary.conf
upstream app_backend {
    server app-v1:80 weight=90;  # 90% traffic
    server app-v2:80 weight=10;  # 10% traffic
}
2. Implement Blue-Green Deployment
Maintain two complete environments:
# docker-compose-blue-green.yml
services:
  nginx:
    volumes:
      - ./nginx/nginx-${ACTIVE_ENV}.conf:/etc/nginx/nginx.conf

  app-blue:
    # Blue environment

  app-green:
    # Green environment
3. Add Monitoring & Alerts
# Add Prometheus monitoring
  prometheus:
    image: prom/prometheus
    volumes:
      - ./prometheus.yml:/etc/prometheus/prometheus.yml
    ports:
      - "9090:9090"

  grafana:
    image: grafana/grafana
    ports:
      - "3000:3000"
4. Database Migration Strategy
For deployments involving database changes:
#!/bin/bash
# deploy-with-db.sh

# 1. Run database migrations (backward compatible)
docker-compose run --rm app-v2 python manage.py migrate

# 2. Deploy new version
./deploy.sh

# 3. Verify migration success
docker-compose run --rm app-v2 python manage.py check
5. Automated Testing Before Switch
# Add to deploy.sh before traffic switch
print_info "Running smoke tests..."

# Test critical endpoints
curl -f http://app-v2/health || exit 1
curl -f http://app-v2/api/status || exit 1

# Run integration tests
docker-compose run --rm app-v2 npm test
6. Environment-Specific Configurations
# config/.env.production
NGINX_WORKER_PROCESSES=auto
NGINX_WORKER_CONNECTIONS=2048
APP_MAX_MEMORY=512M
APP_LOG_LEVEL=warning

# config/.env.staging
NGINX_WORKER_PROCESSES=2
NGINX_WORKER_CONNECTIONS=1024
APP_MAX_MEMORY=256M
APP_LOG_LEVEL=debug
9.Common Issues & Troubleshooting
Issue 1: Health Check Fails
Symptom:
app-v2 failed to become healthySolution:
# Check container logs
docker logs app-v2

# Check if port is accessible
docker exec app-v2 wget -O- http://localhost

# Verify Dockerfile health check
docker inspect app-v2 | grep -A 10 Healthcheck
Issue 2: Nginx Won’t Reload
Symptom:
nginx: [error] invalid host in upstream "app-v2:80"Solution:
# Test configuration before reload
docker exec reverse-proxy nginx -t

# Check if app-v2 is in the network
docker network inspect zero-downtime-deployment_app-network

# Verify DNS resolution
docker exec reverse-proxy ping app-v2
Issue 3: Port Already in Use
Symptom:
Error: bind: address already in useSolution:
# Find what's using port 80
sudo lsof -i :80

# Stop conflicting service
sudo systemctl stop apache2  # or nginx

# Or change the port in docker-compose.yml
ports:
  - "8080:80"
Issue 4: Slow Deployment
Symptom: Deployment takes longer than expected
Solutions:
# Use Docker build cache
docker-compose build --parallel

# Pre-pull images
docker-compose pull

# Reduce health check interval during deployment
# In Dockerfile:
HEALTHCHECK --interval=10s --timeout=3s --start-period=5s
Issue 5: Configuration Not Updating
Symptom: Changes to nginx.conf don’t take effect
Solution:
# Ensure volume mount is correct
docker inspect reverse-proxy | grep -A 5 Mounts

# Check file permissions
ls -la nginx/nginx-v1.conf

# Force recreate container
docker-compose up -d --force-recreate nginx
10.Advanced Deployment Patterns
Multi-Service Deployments
When you have multiple microservices:
# docker-compose-microservices.yml
services:
  nginx:
    # ...

  frontend-v1:
    # ...

  frontend-v2:
    # ...

  api-v1:
    # ...

  api-v2:
    # ...

  database:
    image: postgres:15
    # ... never versioned!
API Version Coexistence
Run multiple API versions simultaneously:
# nginx/multi-version.conf
upstream api_v1 {
    server api-v1:80;
}

upstream api_v2 {
    server api-v2:80;
}

server {
    location /api/v1/ {
        proxy_pass http://api_v1/;
    }

    location /api/v2/ {
        proxy_pass http://api_v2/;
    }
}
Gradual Traffic Migration
# 80% v1, 20% v2
upstream app_backend {
    server app-v1:80 weight=80;
    server app-v2:80 weight=20;
}

# Then gradually shift:
# 60/40, 40/60, 20/80, 0/100
Conclusion & Next Steps
In this project, we implemented a real zero-downtime deployment strategy using Docker Compose and Nginx. By running two application versions in parallel and placing Nginx in front as a reverse proxy, traffic is switched safely without interrupting users. The deployment process supports health checks, instant rollback, and a production-ready automation script, ensuring reliable and repeatable releases.
Through this setup, you learned essential DevOps skills including container orchestration with Docker Compose, traffic management using Nginx, container health monitoring, zero-downtime deployment techniques, and Bash automation. These are core skills used in real production environments and form a strong foundation for modern DevOps roles.
As a next step, you can move this approach to Kubernetes, where rolling updates, canary deployments, and auto-scaling handle zero-downtime deployments at larger scale. Adding a CI/CD pipeline with tools like GitHub Actions, GitLab CI, or Jenkins will further automate deployments and reduce manual effort. Implementing monitoring with Prometheus, Grafana, or the ELK stack will help observe system health after each release.
Zero-downtime deployments are not complex — they are the result of good architecture and safe traffic control. Once users no longer notice deployments, you know your system is working correctly.
Happy deploying
