Introduction
In modern DevOps environments, automation is essential for delivering reliable and high-quality software. Jenkins is a popular open-source automation server that helps teams implement Continuous Integration (CI) and Continuous Delivery (CD). By automating build, test, and deployment processes, Jenkins helps teams reduce manual effort and accelerate release cycles.
Running Jenkins on an Ubuntu EC2 instance provides a scalable, cloud-based setup that closely mirrors real production environments. Hosting Jenkins on AWS ensures flexibility, accessibility, and cost efficiency, as you only pay for the resources you use.
In this step-by-step guide, you will learn how to install Jenkins on Ubuntu 22.04 EC2, configure required dependencies, start the Jenkins service, and access the web dashboard successfully.
What is Jenkins?
Jenkins is an open-source automation server that helps teams implement Continuous Integration (CI) and Continuous Deployment (CD). It automatically builds, tests, and deploys applications whenever developers push code to a version control system such as Git.
As a result, teams can identify errors early in the development process and fix them quickly. This approach reduces manual work and minimizes human errors. In addition, automation speeds up the release cycle and improves overall software quality.
Moreover, Jenkins supports hundreds of plugins. Therefore, teams can easily integrate it with tools like GitHub, Docker, AWS, Kubernetes, and Slack. These integrations make Jenkins highly flexible and suitable for different project requirements.
Because of its strong community support and continuous improvements, many organizations trust Jenkins for their DevOps workflows. Today, it remains one of the most widely used CI/CD tools in modern software development.
Furthermore, Jenkins works on multiple operating systems and supports both simple projects and complex enterprise pipelines. For this reason, it is an ideal choice for beginners as well as experienced DevOps engineers.
Jenkins Architecture on Ubuntu EC2
Before starting the installation, it is important to understand the basic architecture of this setup.
In this configuration:
- A user accesses Jenkins through a web browser.
- Jenkins runs on an Ubuntu 22.04 EC2 instance.
- Port 8080 is used to access Jenkins.
- Port 22 is used for secure SSH access.
This setup creates a cloud-hosted Continuous Integration environment similar to real-world DevOps infrastructures.

Prerequisites
Before starting, ensure the following requirements are met:
- An AWS account
- An Ubuntu EC2 instance running
- SSH access to the instance
- Basic Linux command knowledge
- A Slack workspace with permission to create apps
These prerequisites ensure a smooth installation process.
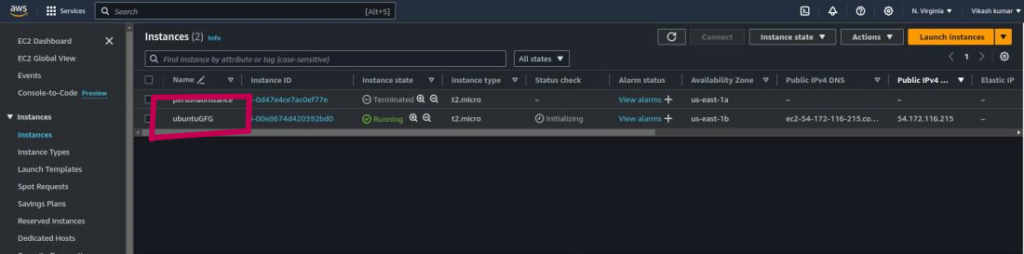
Launching an Ubuntu EC2 Instance
Create an EC2 instance using Ubuntu Server 22.04 LTS, which provides long-term support and stability for production workloads.
- Instance type: t2.micro (free-tier friendly)
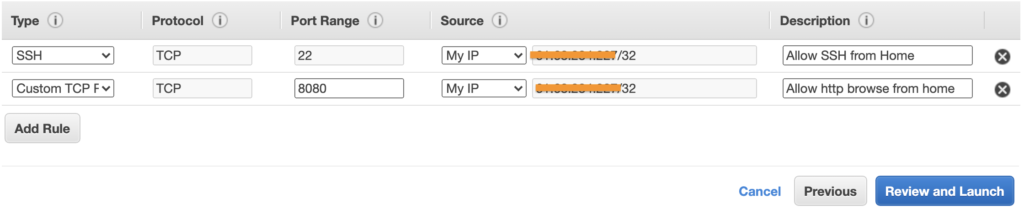
- Security group rules:
- SSH: Port 22
- Jenkins: Port 8080
- Once the instance is running, connect to it securely using SSH.
Connecting to the EC2 Instance
SSH allows secure remote access to the Ubuntu server. This connection is required to install and configure Jenkins. Ensure your key pair permissions are set correctly before connecting. After login, you can begin setting up the server.
ssh -i your-key.pem ubuntu@<EC2_PUBLIC_IP>
Updating the System Packages
Updating system packages ensures the latest security patches and stable installations. This step helps avoid dependency issues during Jenkins installation. Updating the server is a standard best practice in real environments.
sudo apt update && sudo apt upgrade -y
Installing Java for Jenkins
Jenkins is built using Java and requires a Java runtime to function correctly. Therefore, installing Java ensures that Jenkins can start properly and manage jobs without issues. OpenJDK is a stable and widely used Java distribution for server environments. Java 21 is recommended because it is a long-term support (LTS) release and provides better performance and security.
sudo apt install fontconfig openjdk-21-jre
java -version
If the installation was successful, you should see an output similar to the following:
openjdk 21.0.8 2025-07-15
OpenJDK Runtime Environment (build 21.0.8+9-Debian-1)
OpenJDK 64-Bit Server VM (build 21.0.8+9-Debian-1, mixed mode, sharing)
Installing Jenkins on Ubuntu
Jenkins is installed using its official repository to ensure secure and stable updates. Adding the repository allows Jenkins to receive updates directly from the Jenkins team. This is the recommended method for production setups.
sudo wget -O /etc/apt/keyrings/jenkins-keyring.asc \
  https://pkg.jenkins.io/debian-stable/jenkins.io-2026.key
echo "deb [signed-by=/etc/apt/keyrings/jenkins-keyring.asc]" \
  https://pkg.jenkins.io/debian-stable binary/ | sudo tee \
  /etc/apt/sources.list.d/jenkins.list > /dev/null
sudo apt update
sudo apt install jenkins
Start Jenkins
To ensure Jenkins starts automatically at system boot, enable the Jenkins service using the following command:
sudo systemctl enable jenkins
Next, start the Jenkins service to begin running Jenkins on the server:
sudo systemctl start jenkins
Finally, verify that Jenkins is running correctly by checking the service status:
sudo systemctl status jenkins
If everything has been set up correctly, you should see output similar to this:
Loaded: loaded (/lib/systemd/system/jenkins.service; enabled; vendor preset: enabled)
Active: active (running) since Tue 2018-11-13 16:19:01 +03; 4min 57s ago
Accessing Jenkins Web Interface
Jenkins provides a web-based dashboard to manage jobs and pipelines. By default, Jenkins runs on port 8080. Ensure this port is allowed in the EC2 security group. Accessing the web interface confirms successful installation.
http://<EC2_PUBLIC_IP>:8080
Unlocking Jenkins for the First Time
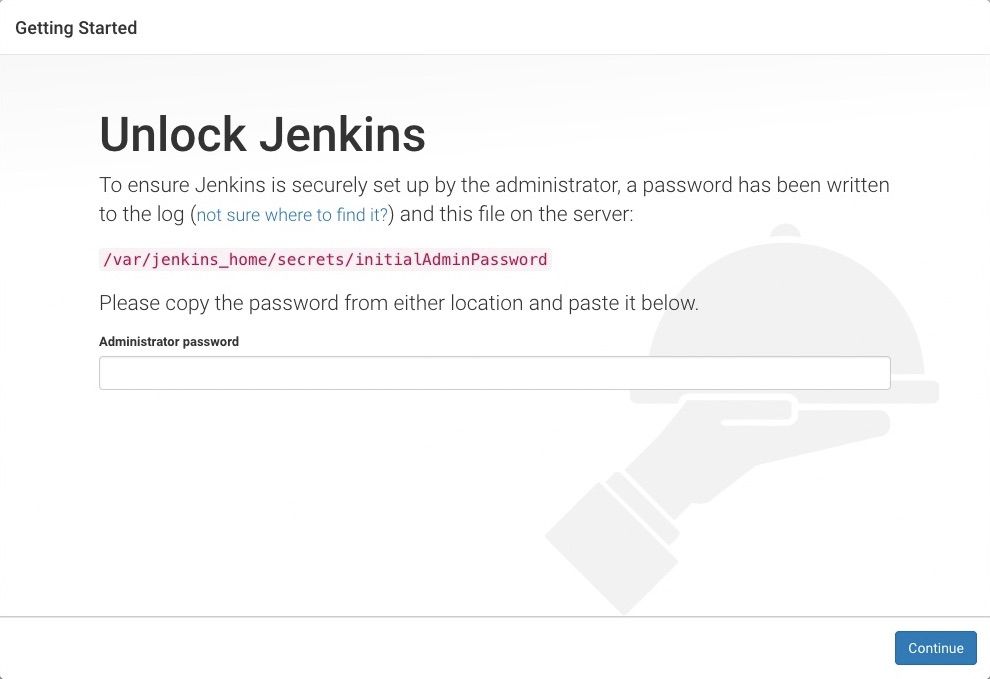
During the first login, Jenkins asks for an initial admin password to secure the setup. The password is stored on the server and must be retrieved manually. After unlocking Jenkins, required plugins are installed automatically.
sudo cat /var/lib/jenkins/secrets/initialAdminPassword
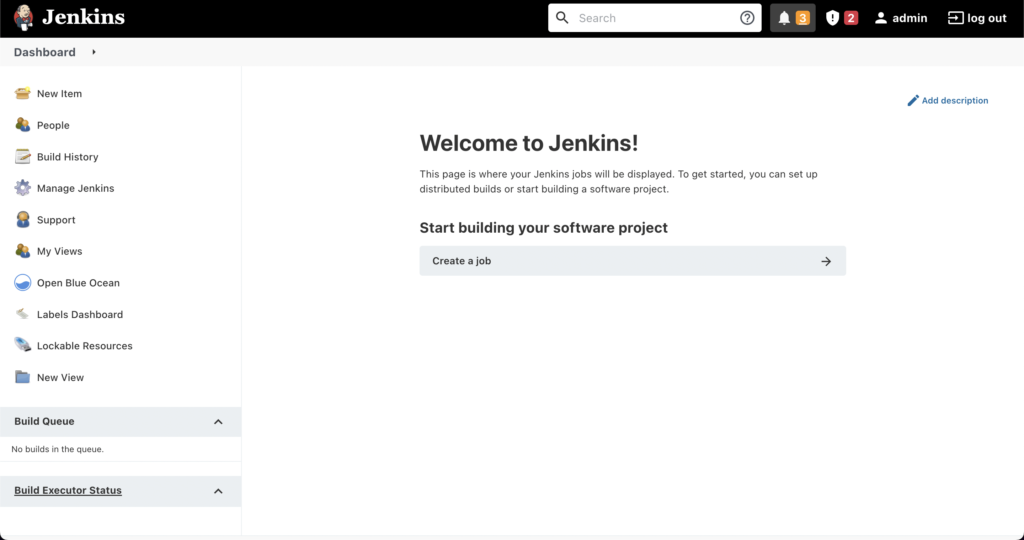
Jenkins Dashboard Overview
After setup, the Jenkins dashboard becomes accessible. This dashboard allows you to:
- Create jobs and pipelines
- Install and manage plugins
- Monitor build status
It acts as the central control panel for CI/CD workflows.
Conclusion
You have successfully installed Jenkins on Ubuntu EC2 and configured it for first-time access. By setting up Java, adding the official repository, enabling the Jenkins service, and accessing the web dashboard, you have created a production-like Continuous Integration environment in the cloud.
Hosting Jenkins on AWS EC2 provides scalability, flexibility, and real-world infrastructure experience. This setup forms the foundation for building automated pipelines, integrating Git repositories, and deploying applications efficiently.
Now that your Jenkins server is live, you are ready to move to the next step—creating CI/CD pipelines and integrating additional DevOps tools.