If you are just getting started with Terraform, you have probably learned that it is a tool used to create and manage cloud infrastructure by writing configuration files. Terraform is declarative, which means you describe what you want — like an EC2 instance on AWS — and Terraform figures out how to make it happen. But sometimes, just creating the infrastructure is not enough. You also need to do things like install software on a server, copy configuration files, or run a script after the server is ready. That is exactly the problem that Terraform provisioners solve.
In this guide, we will walk through everything you need to know about provisioners and connection blocks — from the very basics to best practices — in a way that is easy to understand even if you are new to Terraform.
What Are Provisioners?
Imagine you ask Terraform to create a brand new virtual machine on AWS. Terraform does its job perfectly — the server exists, it has an IP address, it is running. But it is essentially a blank machine. There is no software installed, no configuration applied, nothing is set up yet. Now, what if you need Nginx installed on it? Or a configuration file placed in a specific folder? Or a database schema created?
This is where provisioners come in. A provisioner is a block of code inside your Terraform configuration that tells Terraform to run a script or command either on your local machine or on the remote resource — right after the resource has been created (or just before it is destroyed). Think of it as a post-creation automation step.
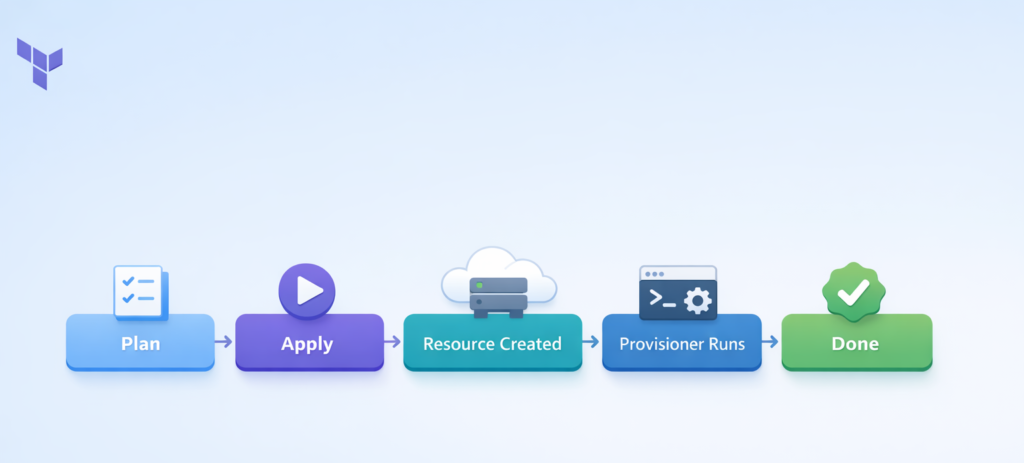
Provisioners are placed inside a resource block in your Terraform code. They run once when the resource is first created. If you run terraform apply again without any changes, the provisioner does NOT run again. However, if the provisioner fails during execution, Terraform marks the resource as “tainted” — which means on the next apply, it will destroy and recreate that resource and try the provisioner again.
There are three main types of built-in provisioners in Terraform: local-exec, remote-exec, and file. Let us look at each one in detail.
The local-exec Provisioner
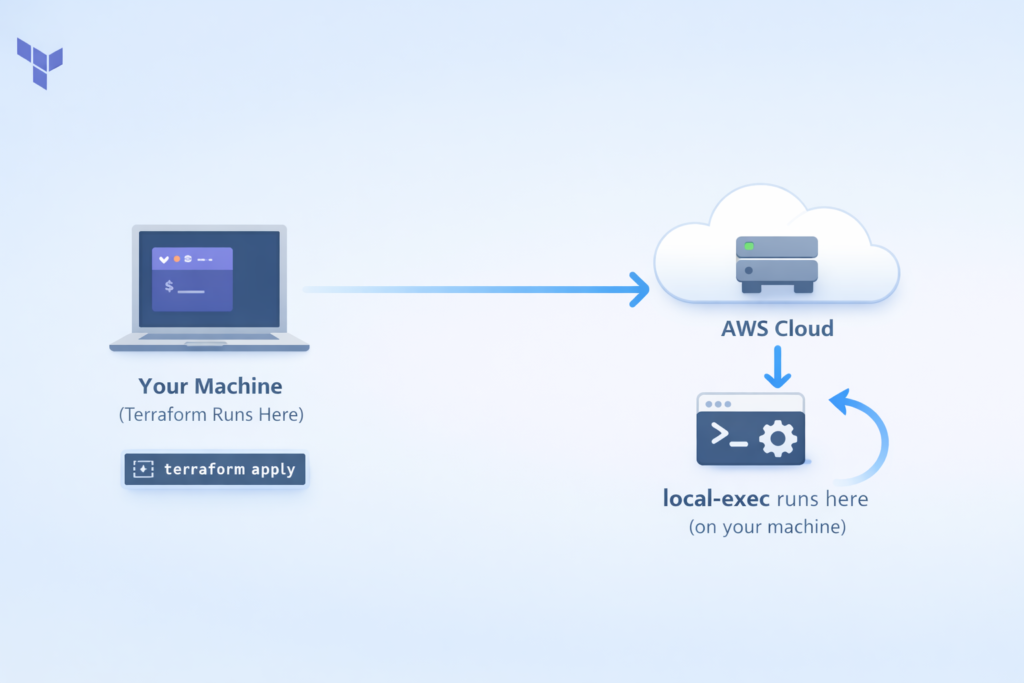
The local-exec provisioner runs commands on the machine where Terraform itself is running — that is, your laptop, your office computer, or your CI/CD pipeline server. It does NOT run anything on the cloud resource you just created. This is a very important distinction that confuses a lot of beginners.
So when would you use local-exec? Here are some real-world examples: You want to send a Slack notification to your team when a new server is created. Common scenarios include writing the server’s IP address to a local text file, triggering an Ansible playbook from your machine to configure the remote server, or registering the new instance in an external monitoring or inventory system.
Here is what a basic local-exec provisioner looks like:
resource "aws_instance" "web" {
  ami           = "ami-0c55b159cbfafe1f0"
  instance_type = "t2.micro"

  provisioner "local-exec" {
    command = "echo The server IP is ${self.public_ip} >> server_ips.txt"
  }
}
In this example, after Terraform creates the EC2 instance, it runs that echo command on your local machine and writes the server’s public IP into a file called server_ips.txt. The self.public_ip part is how you reference the newly created resource’s attributes from within the provisioner.
You can also pass environment variables to your local commands, which is a clean way to avoid hardcoding values:
provisioner "local-exec" {
  command = "python3 scripts/notify.py"

  environment = {
    INSTANCE_ID = self.id
    REGION      = var.aws_region
  }
}
You can even specify a working directory or use a different interpreter like Python or PowerShell:
provisioner "local-exec" {
  command     = "print('Server created: ${self.id}')"
  interpreter = ["python3", "-c"]
}
One important thing to know is the on_failure option. By default, if the provisioner command fails, Terraform marks the resource as tainted and fails the entire apply. But if your command is optional — like a notification — you can tell Terraform to just continue even if it fails:
provisioner "local-exec" {
  command    = "optional-notification-script.sh"
  on_failure = continue
}
The remote-exec Provisioner
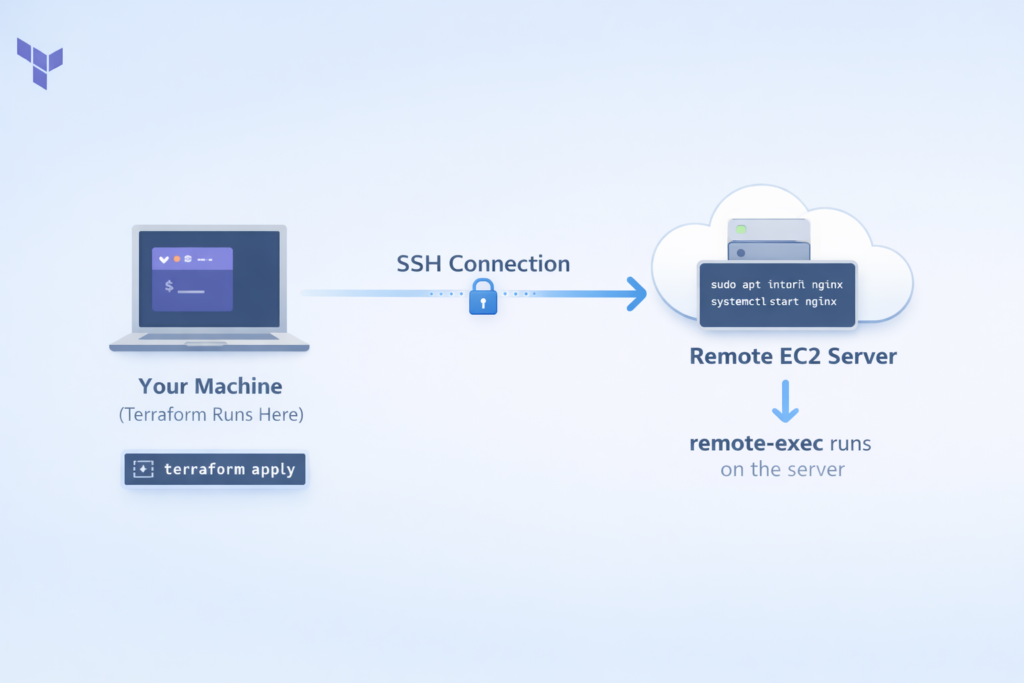
Unlike local-exec, the remote-exec provisioner runs commands directly on the remote resource — the server that was just created. This is like Terraform automatically SSH-ing into the new server and typing commands for you.
The process works like this: Terraform creates the resource, waits for it to become accessible, opens an SSH (or WinRM for Windows) connection, runs your commands on the remote machine, and then closes the connection.
This is useful when you need to install packages, configure services, set up a database, or do anything else directly on the server itself.
There are three ways to provide commands to remote-exec:
Option 1 — Inline commands are the simplest approach. You just list the commands you want to run:
resource "aws_instance" "web" {
  ami           = "ami-0c55b159cbfafe1f0"
  instance_type = "t2.micro"
  key_name      = aws_key_pair.deployer.key_name

  provisioner "remote-exec" {
    inline = [
      "sudo apt-get update",
      "sudo apt-get install -y nginx",
      "sudo systemctl start nginx",
      "sudo systemctl enable nginx"
    ]

    connection {
      type        = "ssh"
      user        = "ubuntu"
      private_key = file("~/.ssh/id_rsa")
      host        = self.public_ip
    }
  }
}
Option 2 — A single script file is better when your setup logic is too long for inline commands:
provisioner "remote-exec" {
  script = "scripts/setup-web-server.sh"
}
Option 3 — Multiple script files is best for complex, multi-stage setups where you want to separate concerns:
provisioner "remote-exec" {
  scripts = [
    "scripts/01-install-dependencies.sh",
    "scripts/02-configure-app.sh",
    "scripts/03-start-services.sh"
  ]
}
A very important tip: always add set -e as the first line in your inline commands. This tells the shell to stop immediately if any command fails, instead of continuing and hiding errors silently:
inline = [
  "set -e",
  "sudo apt-get update",
  "sudo apt-get install -y nginx"
]
The file Provisioner
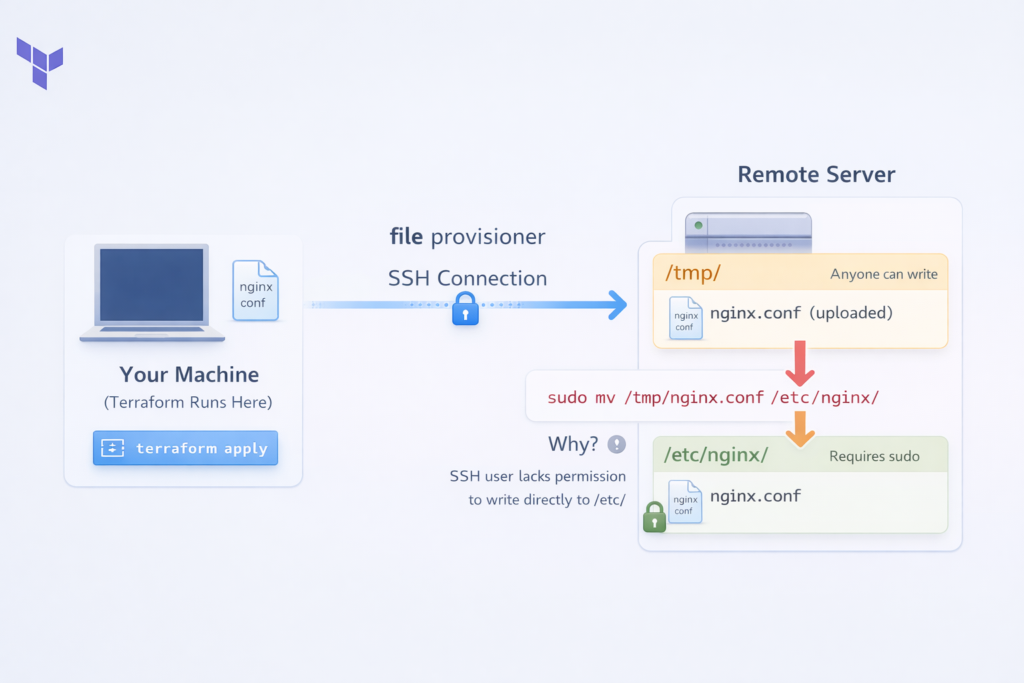
The file provisioner is used to copy files or entire directories from the machine running Terraform to the newly created remote resource. It works similarly to the scp command you might use manually, but it is fully automated inside your Terraform workflow.
This is very useful when you have configuration files, scripts, application code, or templates that need to be placed on the server as part of the setup process.
You can transfer a single file like this:
provisioner "file" {
  source      = "conf/nginx.conf"
  destination = "/tmp/nginx.conf"
}
Notice that the destination is /tmp/nginx.conf and not /etc/nginx/nginx.conf. This is intentional and a best practice. The SSH user usually does not have permission to write directly to /etc/. So you upload to /tmp first, and then use a remote-exec provisioner to move it with sudo. You will often see file and remote-exec used together for this exact reason:
resource "aws_instance" "web" {
  ami           = "ami-0c55b159cbfafe1f0"
  instance_type = "t2.micro"

  connection {
    type        = "ssh"
    user        = "ubuntu"
    private_key = file("~/.ssh/id_rsa")
    host        = self.public_ip
  }

  provisioner "file" {
    source      = "conf/nginx.conf"
    destination = "/tmp/nginx.conf"
  }

  provisioner "remote-exec" {
    inline = [
      "sudo mv /tmp/nginx.conf /etc/nginx/nginx.conf",
      "sudo systemctl restart nginx"
    ]
  }
}
You can also generate file content dynamically using templatefile(). This is great when your config file needs values like a database host or environment name that are only known after other resources are created:
hcl
provisioner "file" {
  content = templatefile("${path.module}/templates/config.json.tpl", {
    database_host = aws_db_instance.main.endpoint
    environment   = var.environment
  })
  destination = "/tmp/app-config.json"
}
Connection Blocks
For both remote-exec and file provisioners to work, Terraform needs to know how to connect to the remote resource. That is the job of the connection block. Without it, Terraform has no idea what IP address to connect to, what username to use, or how to authenticate.
Think of the connection block as the bridge between Terraform and your remote server. It answers four key questions: How do I reach the server (IP or hostname)? What protocol do I use (SSH or WinRM)? What user do I log in as? How do I prove my identity (private key or password)?

SSH Connections (for Linux Servers)
SSH is the standard way to connect to Linux servers. Here is the most common and recommended way to set it up using a private key:
connection {
  type        = "ssh"
  user        = "ubuntu"
  private_key = file("~/.ssh/id_rsa")
  host        = self.public_ip
  timeout     = "5m"
}
The type tells Terraform to use SSH. The user is the login username — this varies by operating system image: it is ubuntu for Ubuntu AMIs, ec2-user for Amazon Linux, and admin for Debian. The private_key is your SSH private key file. The host is the IP address of the server, referenced using self.public_ip. And timeout tells Terraform how long to keep trying before giving up — useful because new servers sometimes take a minute or two to fully boot.
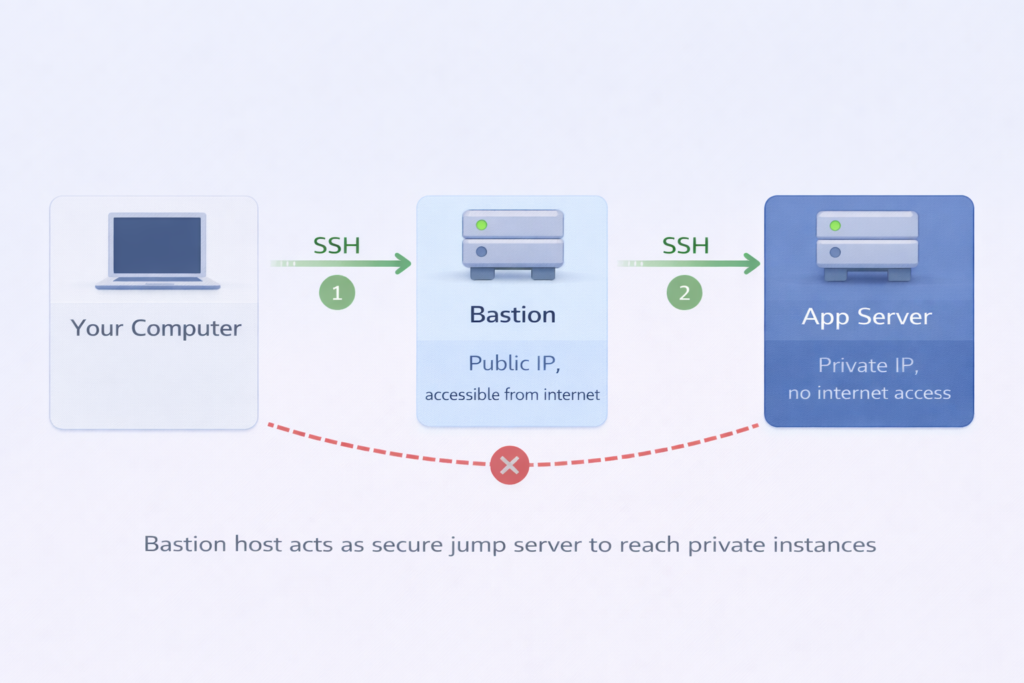
In real-world deployments, your servers might be inside a private network with no direct internet access, and you connect through a bastion host (also called a jump server). Terraform supports this natively:
connection {
  type                = "ssh"
  user                = "ubuntu"
  private_key         = file("~/.ssh/app-key.pem")
  host                = self.private_ip

  bastion_host        = aws_instance.bastion.public_ip
  bastion_user        = "ubuntu"
  bastion_private_key = file("~/.ssh/bastion-key.pem")
}
With this configuration, Terraform first connects to the bastion host using the bastion_* parameters, and then from there it hops into the private server. All of this happens automatically.
WinRM Connections (for Windows Servers)
Windows servers do not use SSH. Instead, they use WinRM (Windows Remote Management). The configuration looks slightly different:
connection {
  type     = "winrm"
  user     = "Administrator"
  password = var.admin_password
  host     = self.public_ip
  port     = 5986
  https    = true
  use_ntlm = true
  timeout  = "10m"
}
For production environments, always use HTTPS (port 5986) with NTLM authentication, as this encrypts the communication and is much more secure than plain HTTP.
Where to Place the Connection Block
You have two options for placing connection blocks. The first and recommended approach is to define it at the resource level, outside any individual provisioner. This means all provisioners inside that resource share the same connection settings, which keeps your code clean and avoids repetition:
resource "aws_instance" "web" {
  ami           = "ami-0c55b159cbfafe1f0"
  instance_type = "t2.micro"

  connection {
    type        = "ssh"
    user        = "ubuntu"
    private_key = file("~/.ssh/id_rsa")
    host        = self.public_ip
  }

  provisioner "file" { ... }
  provisioner "remote-exec" { ... }
}
The second option is to define the connection block inside a specific provisioner, which is useful when different provisioners need different connection settings — for example, one connecting via public IP and another via private IP.
When to Avoid Provisioners (Best Practices)
Now that you understand how provisioners work, it is equally important to understand when NOT to use them. HashiCorp, the company that created Terraform, officially recommends treating provisioners as a last resort. This is not arbitrary — there are serious technical reasons behind this advice.
They Break Terraform’s Declarative Model
The core problem is that provisioners break Terraform’s declarative model. When you use a provisioner to install Nginx, Terraform only records that the provisioner ran successfully. It does not actually know if Nginx is installed, running, or properly configured. If someone later SSHes into the server and uninstalls Nginx, the next terraform plan will say “No changes needed” — because Terraform has no visibility into what the provisioner did. Your application could be completely broken, but Terraform would have no idea.
Cannot Run Safely Multiple Times
Another major issue is that provisioners cannot run safely multiple times. This means that running the same operation twice gives different results. Terraform’s native resources handle this well — if you run terraform apply ten times, you still end up with one EC2 instance.
But if a provisioner appends a line to a log file, running it ten times appends ten lines. If a provisioner creates a user, running it a second time will fail because the user already exists. You have to write defensive shell code to handle these cases manually, which is error-prone and hard to maintain.
Limited Error Handling
Provisioners also have very limited error handling. There are no retries, no conditional logic, no rollback support. If one command in your inline list fails, everything after it is skipped and the resource gets tainted. Compare this to a proper configuration management tool like Ansible, where you can set retry counts, handle errors gracefully, and run tasks conditionally.
Difficult to Test
Finally, provisioners are difficult to test. To find out if your provisioner works correctly, you have to run a full terraform apply, wait for the instance to boot, wait for the provisioner to run, and if it fails, destroy everything and try again. This cycle is slow and expensive.
Comparison: Provisioners vs Configuration Management Tools
| Feature | Provisioners | Better Tools |
|---|---|---|
| Idempotency | No – runs once, doesn’t check state | Yes – can run repeatedly safely |
| Error Handling | Basic – fail or continue only | Advanced – retries, rollbacks, conditions |
| Testing | Difficult – need full infrastructure | Easy – can test independently |
| Drift Detection | None – doesn’t track changes | Yes – detects and fixes drift |
| State Tracking | Not tracked in Terraform state | Tracks configuration state |
| Use Case | Last resort only | Built for configuration management |
What to Use Instead
Cloud-Init / User Data
Cloud-Init / User Data is the best alternative for initial server setup. Instead of SSH-ing in after the fact, you provide a startup script that runs automatically when the instance first boots. No connection required from Terraform’s side, and it is integrated directly with AWS and other cloud providers:
resource "aws_instance" "web" {
  ami           = "ami-0c55b159cbfafe1f0"
  instance_type = "t2.micro"
  user_data     = file("${path.module}/scripts/setup.sh")
  user_data_replace_on_change = true
}
Packer for Pre-Baked Images
Packer is a tool by HashiCorp that lets you pre-bake your configuration into a machine image (AMI). Instead of installing Nginx every time you create a server, you build an AMI that already has Nginx installed and tested. Then Terraform just launches that pre-configured image. Instances boot faster, there is nothing to fail at runtime, and the configuration is version-controlled and tested before deployment.
Configuration Management Tools
Ansible, Chef, or Puppet are purpose-built configuration management tools. They are idempotent by design, have rich error handling and retry logic, can detect and fix configuration drift, and have massive module ecosystems. If you need ongoing configuration management, these tools are the right choice — not Terraform provisioners.
Dedicated Terraform Providers
Dedicated Terraform Providers exist for many tasks that people mistakenly use provisioners for. Need to create a DNS record? Use aws_route53_record. Need an SSL certificate? Use aws_acm_certificate. Need to register something in a monitoring system? Check if a provider exists first. The Terraform Registry has thousands of providers covering a huge range of services.
When Provisioners Are Actually Acceptable
Despite all of the above, there are legitimate scenarios where provisioners make sense. Provisioners make sense in several legitimate scenarios. Legacy applications that cannot be containerized and lack configuration management support may leave you with no better option. Additionally, one-time data migrations from on-premises to cloud environments work well with a null_resource and local-exec provisioner. Finally, when integrating with external systems that have neither a Terraform provider nor a callable API, provisioners provide a practical solution. The key is to use them intentionally and knowingly — not as a default habit.
Conclusion
Terraform provisioners are a powerful but sharp-edged tool. They exist to fill the gap between infrastructure provisioning and application configuration — but that gap is almost always better filled by purpose-built tools like cloud-init, Packer, or Ansible.
When you do use provisioners, use local-exec for triggering local automation in response to infrastructure changes, use remote-exec for running commands directly on a new server, and use file to copy configuration files or scripts to a remote resource. Always pair your remote provisioners with a proper connection block, and prefer SSH key authentication over passwords.
The golden rule is this: reach for a provisioner only after you have asked whether a cleaner alternative exists. Your future self — and your teammates — will thank you.
Written by Deekshitha R
LinkedIn: www.linkedin.com/in/deekshitha-raveendran-31581527b
