Introduction
In this comprehensive guide, I’ll show you how to deploy a production-ready static website on AWS using Terraform. Specifically, this hands-on tutorial demonstrates how to provision AWS S3 and CloudFront for hosting static websites without using any pre-built modules. As a result, you’ll gain deep understanding of the underlying infrastructure and complete control over your deployment.
What You’ll Learn
Throughout this tutorial, you’ll master several essential skills for cloud infrastructure deployment:
- AWS S3 Provisioning: First, you’ll learn how to set up S3 buckets specifically configured for static website hosting
- CloudFront CDN Setup: Next, you’ll implement CloudFront for global content delivery and improved performance
- Security Implementation: Additionally, you’ll configure proper bucket policies to protect your content
- Terraform Management: Finally, you’ll manage infrastructure with Terraform from the ground up without relying on modules
Prerequisites
Before starting, however, make sure you have the following requirements ready:
- AWS Account with appropriate IAM permissions for S3 and CloudFront services
- Terraform installed (version 1.0 or higher) on your local machine or deployment environment
- AWS CLI configured with valid credentials and access keys
- Basic understanding of Terraform syntax and AWS core services
Project Overview
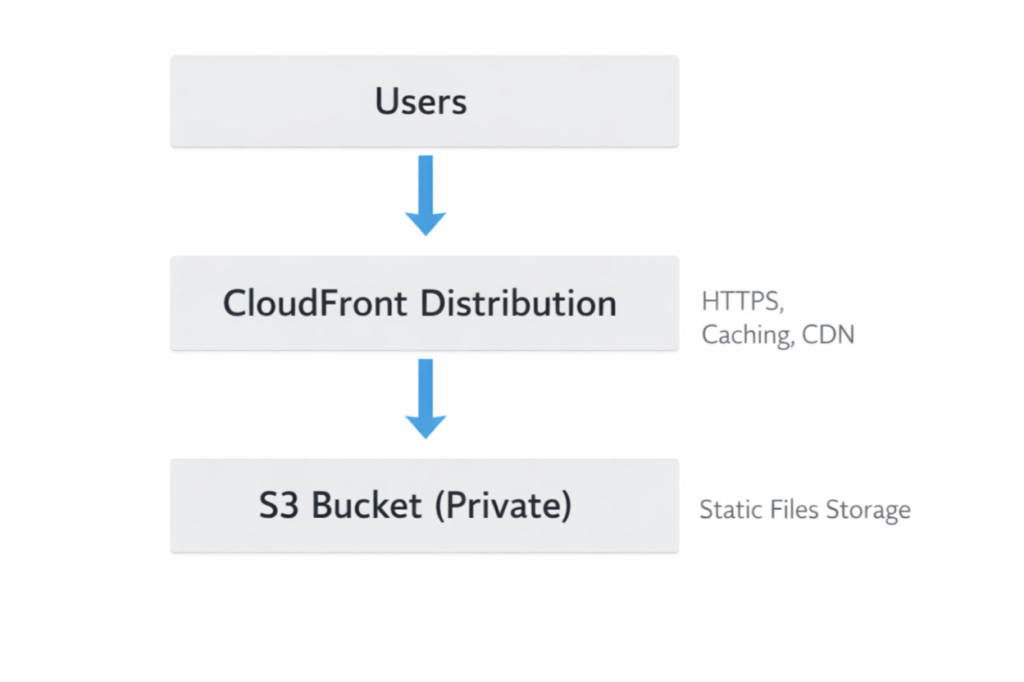
Now, let’s look at what we’re building. This project creates a complete static website hosting solution using three main AWS services:
Core Components
- Amazon S3: Initially, this serves as the storage layer for all your static files including HTML, CSS, JavaScript, and images
- Amazon CloudFront: Subsequently, this provides CDN capabilities, HTTPS support, and global edge caching for faster content delivery
- Terraform: Finally, this handles all infrastructure provisioning and management through declarative configuration files
Why Build Without Modules?
You might wonder why we’re not using Terraform modules for this project. While Terraform modules are certainly powerful for code reusability, building without modules offers significant learning advantages:
Learning Benefits
- Deeper Understanding: First and foremost, you’ll understand the underlying infrastructure architecture much better by building each component from scratch
- Complete Control: Moreover, you’ll have full control over every single resource and configuration parameter
- Fundamental Knowledge: Additionally, you’ll learn Terraform fundamentals thoroughly, which strengthens your infrastructure-as-code skills
- Easier Debugging: Finally, troubleshooting becomes simpler when you know exactly how each resource is configured without layers of abstraction
Consequently, this approach makes you a more proficient DevOps engineer who can handle complex infrastructure challenges confidently.
Architecture Design
Infrastructure Components
Key Features
This infrastructure implementation includes several powerful features that ensure security, performance, and reliability. Let’s explore each component in detail.
1. S3 Bucket Configuration
First, the S3 bucket is configured specifically for static website hosting with multiple security layers:
- Static Website Hosting: Initially, the bucket is enabled for serving HTML, CSS, and JavaScript files directly
- Private Access Control: Moreover, the bucket remains private with carefully controlled access permissions
- Document Configuration: Additionally, both index and error documents are properly configured for seamless user experience
2. CloudFront Distribution
Next, CloudFront provides enterprise-grade content delivery capabilities:
- Global CDN Network: First and foremost, content is distributed across worldwide edge locations for minimal latency
- HTTPS Encryption: Furthermore, HTTPS is enabled by default to ensure secure data transmission
- Optimized Caching: Additionally, intelligent caching policies improve performance and reduce origin requests
- Origin Access Control: Finally, OAC (Origin Access Control) provides modern security for S3 bucket access
3. Security Implementation
Most importantly, the infrastructure follows AWS security best practices:
- No Direct S3 Access: First, the S3 bucket is completely inaccessible to the public internet
- CloudFront-Only Access: Instead, all content requests must go through CloudFront distribution
- Restricted Bucket Policy: Consequently, the bucket policy explicitly blocks any unauthorized public access attempts
As a result, this multi-layered security approach protects your content while maintaining optimal performance for legitimate users.
terraform-static-site-no-modules/
│
├── main.tf
├── variables.tf
├── outputs.tf
├── terraform.tfvars
├── .gitignore
├── README.md
│
├── website/
    ├── index.html
    ├── error.html
    └── style.css
Setting Up the Infrastructure
Step 1: Create the Project Directory
First, let’s set up the project structure for our Terraform configuration.
mkdir terraform-static-site-no-modules
cd terraform-static-site-no-modules
Step 2: Create Variables File
Next, we’ll define all the input variables for our infrastructure.
variable "aws_region" {
  description = "AWS region for resources"
  type        = string
  default     = "us-east-1"
}

variable "bucket_name" {
  description = "Name of the S3 bucket (must be globally unique)"
  type        = string
}

variable "project_name" {
  description = "Name of the project"
  type        = string
  default     = "static-website"
}

variable "environment" {
  description = "Environment name"
  type        = string
  default     = "production"
}
Step 3: Main Configuration (main.tf)
Now, let’s build the core infrastructure resources including S3 and CloudFront.
terraform {
  required_providers {
    aws = {
      source  = "hashicorp/aws"
      version = "~> 5.0"
    }
  }
}

provider "aws" {
  region = var.aws_region
}

resource "aws_s3_bucket" "static_site" {
  bucket = var.bucket_name
}

resource "aws_s3_bucket_website_configuration" "static_site" {
  bucket = aws_s3_bucket.static_site.id

  index_document {
    suffix = "index.html"
  }

  error_document {
    key = "error.html"
  }
}

resource "aws_s3_object" "index" {
  bucket       = aws_s3_bucket.static_site.id
  key          = "index.html"
  source       = "website/index.html"
  content_type = "text/html"
  etag         = filemd5("website/index.html")
}

resource "aws_s3_object" "error" {
  bucket       = aws_s3_bucket.static_site.id
  key          = "error.html"
  source       = "website/error.html"
  content_type = "text/html"
}

resource "aws_s3_object" "style" {
  bucket       = aws_s3_bucket.static_site.id
  key          = "style.css"
  source       = "website/style.css"
  content_type = "text/css"
}
resource "aws_s3_bucket_public_access_block" "static_site" {
  bucket = aws_s3_bucket.static_site.id

  block_public_acls       = false
  block_public_policy     = false
  ignore_public_acls      = false
  restrict_public_buckets = false
}
resource "aws_s3_bucket_policy" "public_read" {
  bucket = aws_s3_bucket.static_site.id

  depends_on = [
    aws_s3_bucket_public_access_block.static_site
  ]

  policy = jsonencode({
    Version = "2012-10-17"
    Statement = [{
      Effect    = "Allow"
      Principal = "*"
      Action    = "s3:GetObject"
      Resource  = "${aws_s3_bucket.static_site.arn}/*"
    }]
  })
}
resource "aws_cloudfront_distribution" "static_site" {

  origin {
    domain_name = aws_s3_bucket.static_site.bucket_regional_domain_name
    origin_id   = "s3-origin"
  }

  enabled             = true
  is_ipv6_enabled     = true
  default_root_object = "index.html"
  price_class         = "PriceClass_100"

  default_cache_behavior {

    allowed_methods  = ["GET", "HEAD"]
    cached_methods   = ["GET", "HEAD"]
    target_origin_id = "s3-origin"

    viewer_protocol_policy = "redirect-to-https"

    forwarded_values {
      query_string = false

      cookies {
        forward = "none"
      }
    }
  }

  restrictions {
    geo_restriction {
      restriction_type = "none"
    }
  }

  viewer_certificate {
    cloudfront_default_certificate = true
  }
}
Step 4: Outputs File (outputs.tf)
After that, we need to configure the output values for easy reference.
output "s3_bucket_name" {
  description = "Name of the S3 bucket"
  value       = aws_s3_bucket.static_site.bucket
}

output "cloudfront_domain_name" {
  description = "CloudFront distribution domain"
  value       = aws_cloudfront_distribution.static_site.domain_name
}
Step 5: Variable Values File (terraform.tfvars)
Moving forward, let’s specify the actual values for our variables.
aws_region   = "us-east-1"
bucket_name  = "bucket_name"
project_name = "static-website"
environment  = "production"
Step 6: .gitignore
Additionally, create a .gitignore file to exclude sensitive files from version control.
**/.terraform/*
*.tfstate
*.tfstate.*
crash.log
*.tfvars
*_override.tf
.terraformrc
terraform.rc
.terraform.lock.hcl
Step-by-Step Implementation
Creating Website Files
Create a website/ directory with your static files:
File: website/index.html
Begin by creating the main homepage for your static website.
<!DOCTYPE html>
<html>
<head>
<title>My Static Website</title>
<link rel="stylesheet" href="style.css">
</head>

<body>

<h1>Welcome to My Terraform Static Website</h1>
<p>This website is hosted on AWS S3 and delivered using CloudFront.</p>
<p>Deployed using Terraform Infrastructure as Code.</p>

</body>
</html>
File: website/error.html
Subsequently, add a custom error page for better user experience.
<!DOCTYPE html>
<html>
<head>
<title>Error Page</title>
</head>

<body>

<h1>Oops! Page not found</h1>
<p>The page you are looking for does not exist.</p>

</body>
</html>
File: website/style.css
Finally, include the stylesheet to make your website visually appealing.
body {
  font-family: Arial, sans-serif;
  text-align: center;
  background-color: #f2f2f2;
}

h1 {
  color: #2c3e50;
}
Deployment Process
Now let’s deploy the infrastructure step by step.
Step 1: Initialize Terraform
To begin with, initialize your Terraform working directory:
terraform init
Step 2: Validate Configuration
Before proceeding, validate your configuration for syntax errors:
terraform validate
Step 3: Plan the Deployment
Next up, preview what Terraform will create:
terraform plan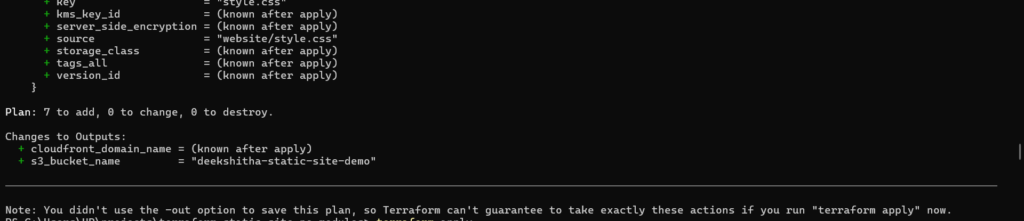
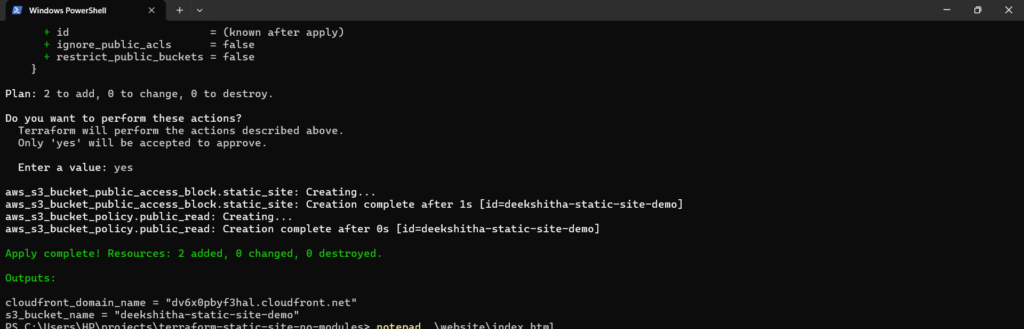
Step 4: Apply the Configuration
Now it’s time to deploy your infrastructure:
terraform applyType yes when prompted.
Deployment Time: 10-15 minutes (CloudFront takes the longest)
Testing & Verification
Verify S3 Bucket in AWS Console
First things first, navigate to the AWS Console to confirm your S3 bucket was created.
- Log in to AWS Console
- Navigate to S3
- Find your bucket

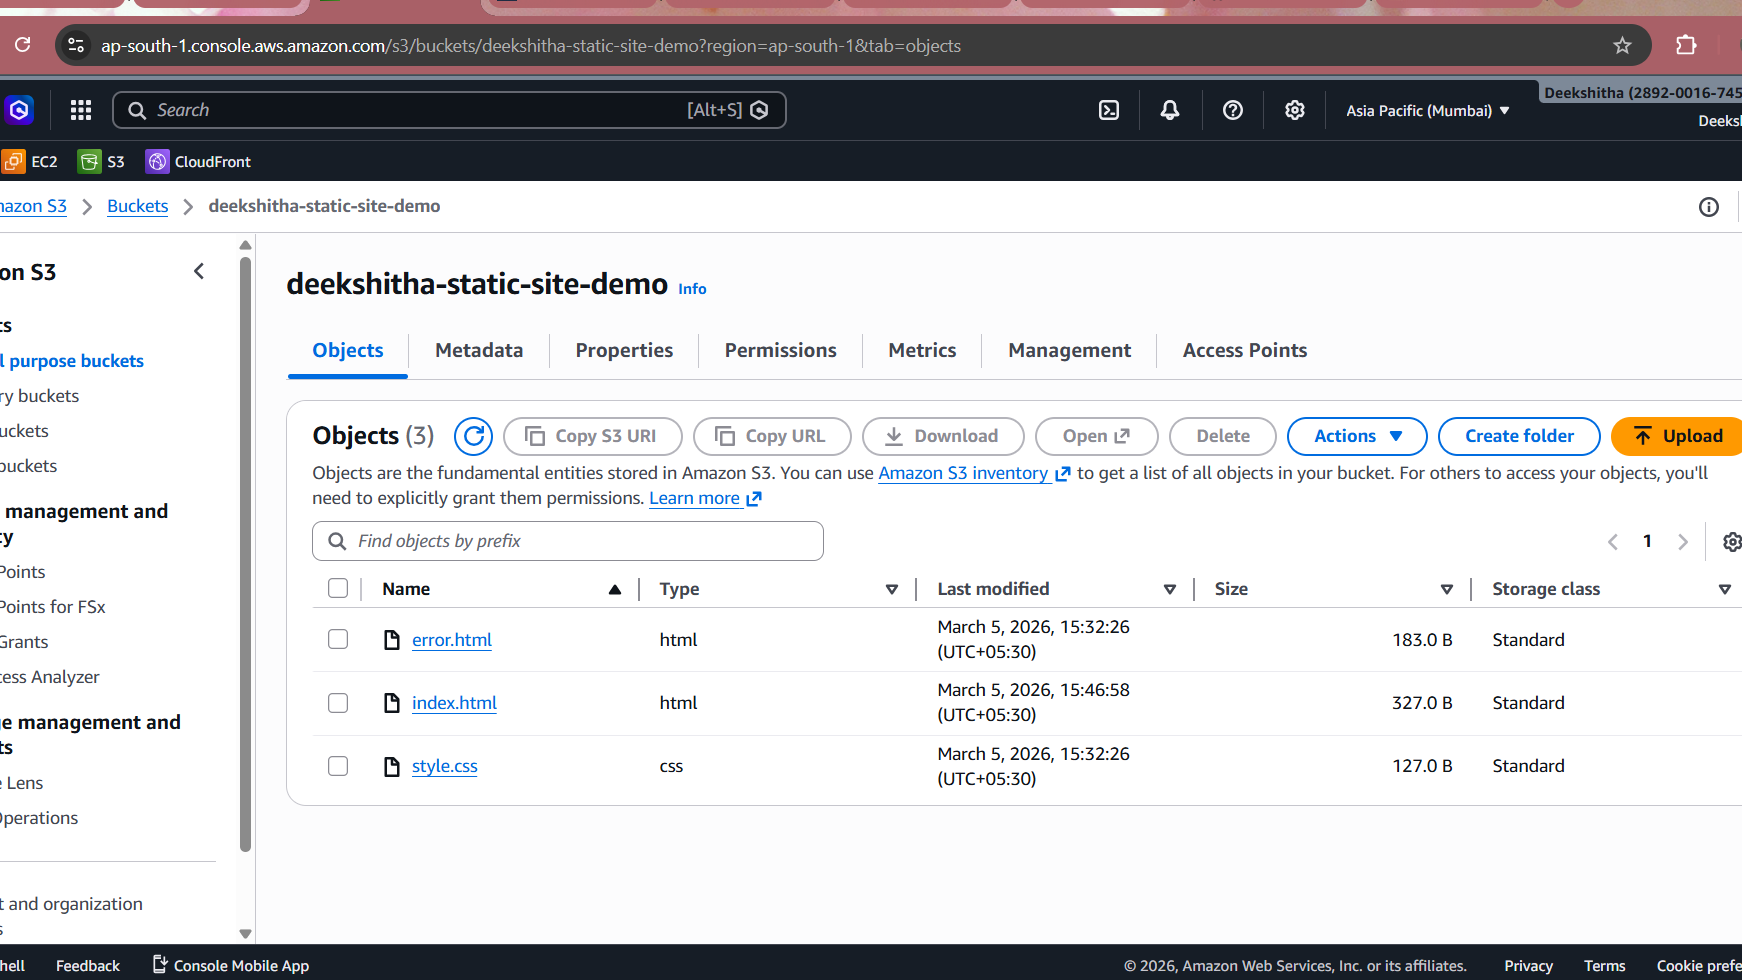
Verify Files Uploaded to S3
Following that, check the bucket contents to ensure all website files are uploaded correctly.
- Click on your bucket
- View Objects tab
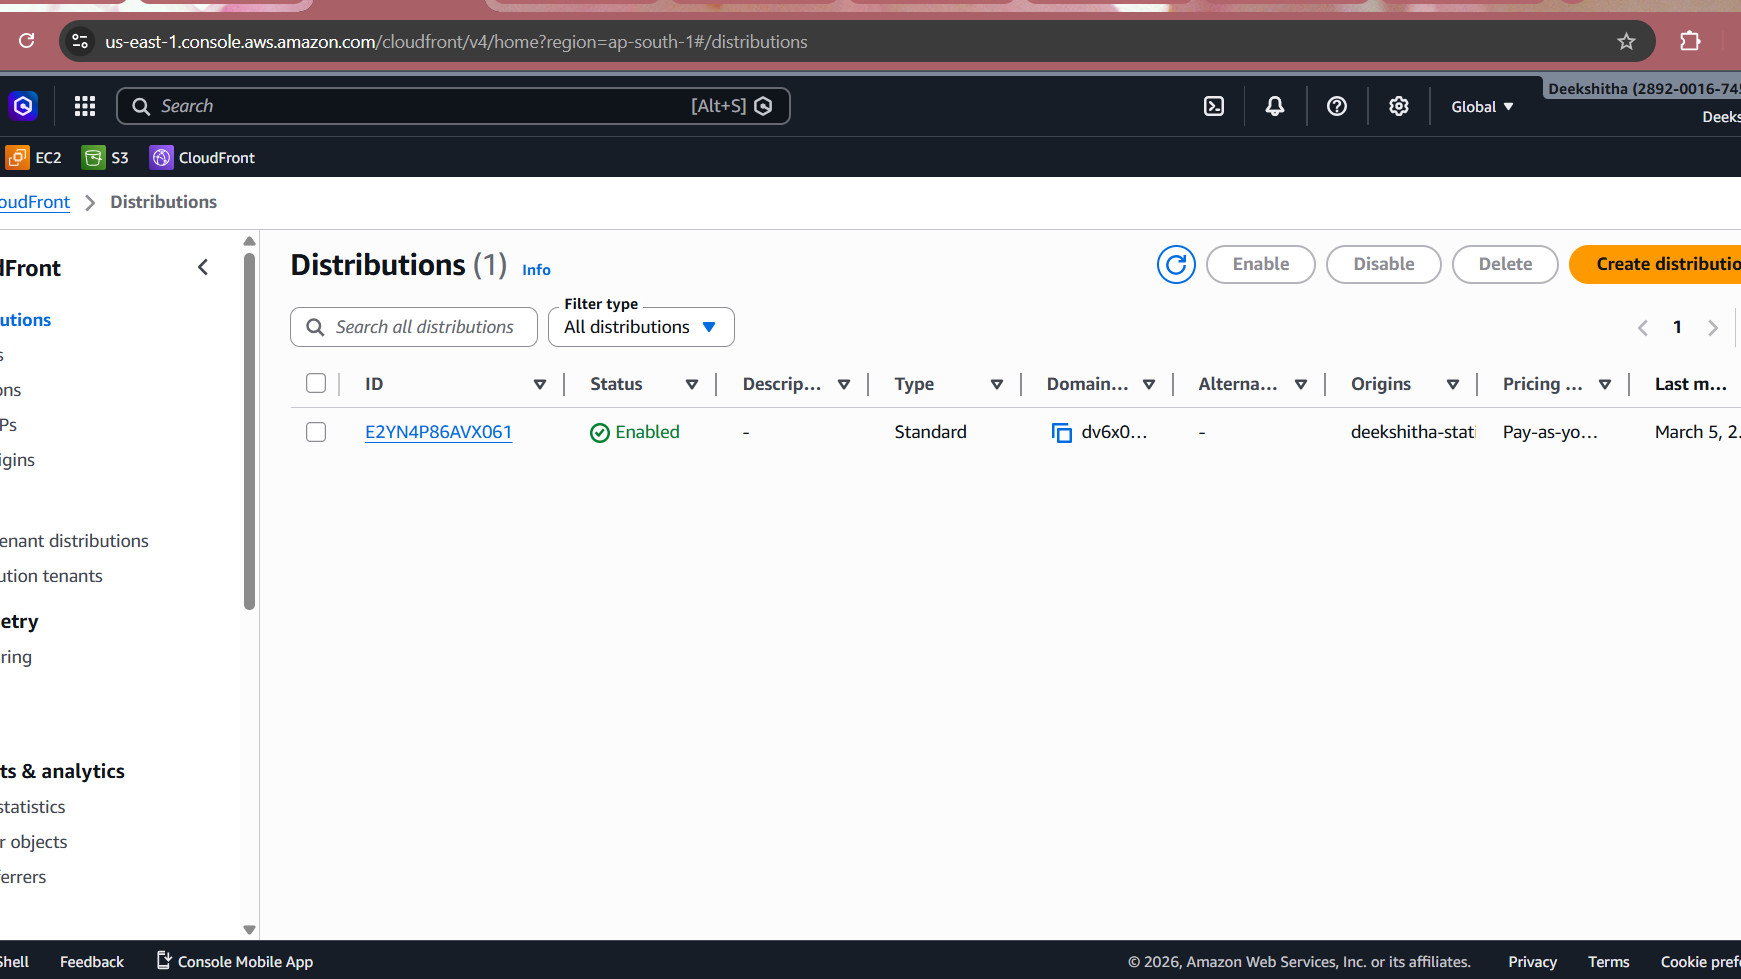
Verify CloudFront Distribution
Lastly, confirm your CloudFront distribution is deployed and accessible.
- Navigate to CloudFront in AWS Console
- Find your distribution
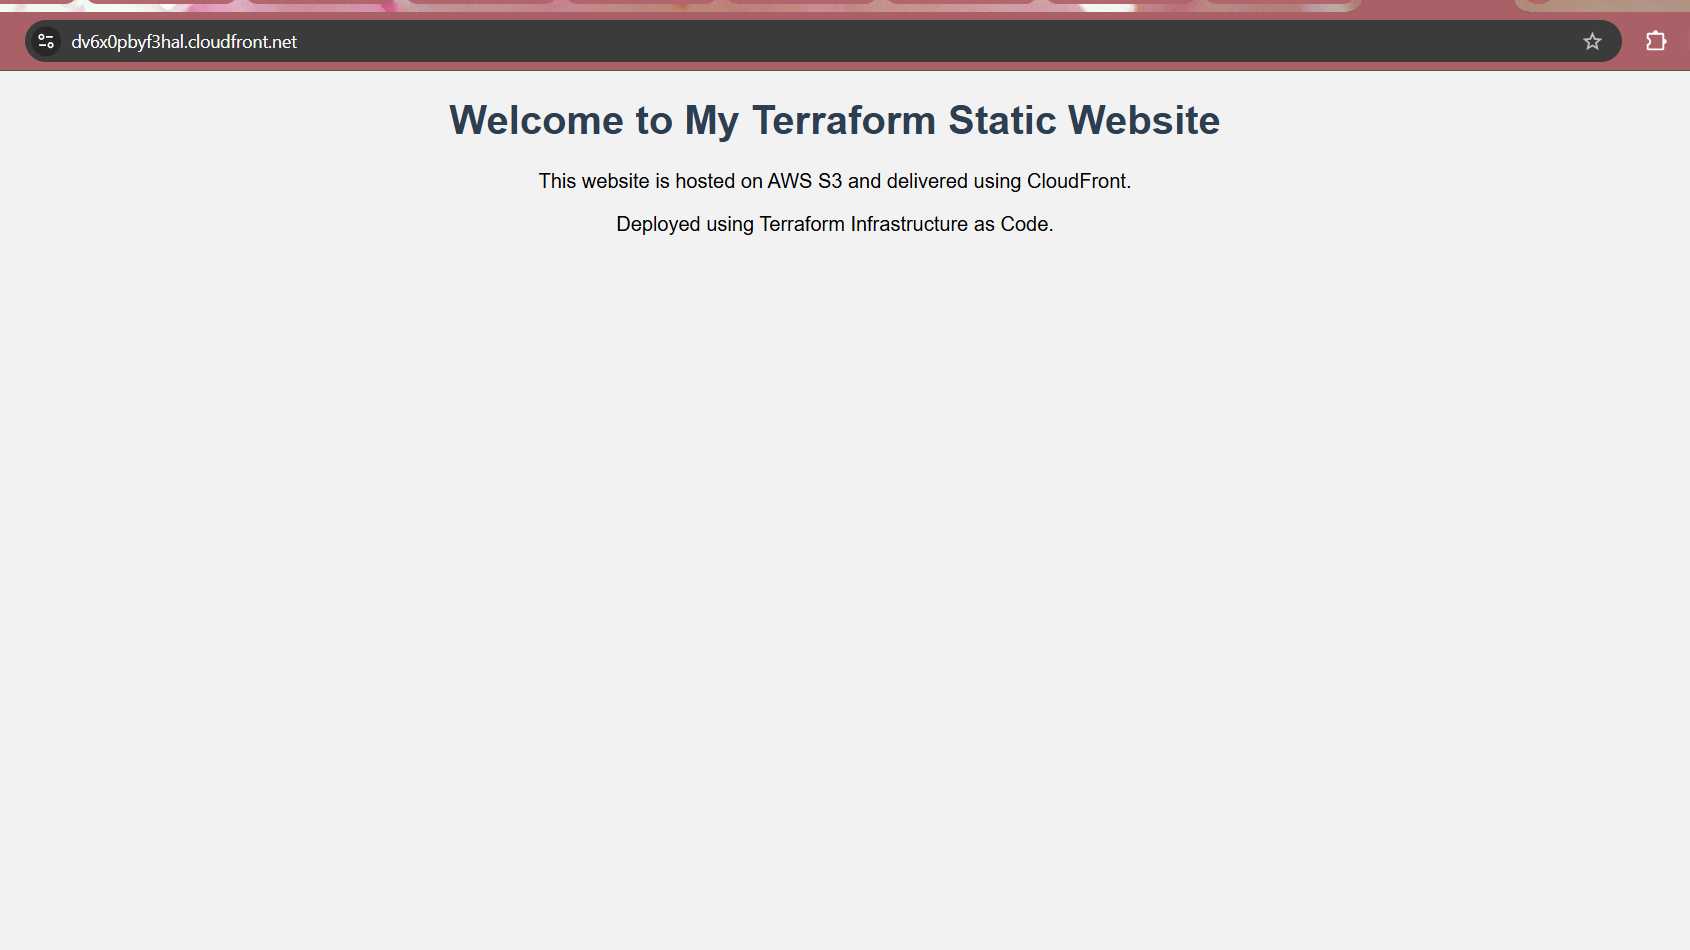
Test Live Website
- Copy CloudFront domain from outputs
- Open in browser: https://d1234567890abc.cloudfront.net
Push to GitHub
After successful deployment and verification, I pushed the project to GitHub for version control.
A .gitignore was created to exclude Terraform state files, provider binaries, and sensitive variable files from the repository.
*/.terraform/ *.tfstate *.tfstate.backup .terraform.lock.hcl *.tfvars crash.log
Then initialized and pushed:
git init
git add .
git commit -m "initial commit: terraform static site with modules"
git remote add origin https://github.com/<username>/terraform-static-site-no-modules.git
git branch -M main
git push -u origin main
Repository is available at: https://github.com/DeekshithaRaviI/terraform-static-site-no-modules.git
Conclusion
Congratulations! You’ve successfully deployed a production-ready static website on AWS using Terraform without relying on any pre-built modules. Moreover, this hands-on project demonstrates fundamental Infrastructure as Code (IaC) concepts while giving you complete control over your AWS infrastructure.
What You’ve Accomplished
Throughout this tutorial, you’ve achieved several significant milestones:
- Infrastructure Mastery: First, you’ve learned how to provision AWS resources from scratch using Terraform
- Security Implementation: Additionally, you’ve implemented proper security measures with Origin Access Control and bucket policies
- Performance Optimization: Furthermore, you’ve configured CloudFront CDN for global content delivery and caching
- Production Skills: Finally, you’ve gained practical DevOps skills applicable to real-world projects
Next Steps
Now that you’ve completed this project, consider these advanced enhancements:
- Custom Domain: Add Route53 and ACM certificate for your own domain name
- CI/CD Pipeline: Automate deployments using GitHub Actions or GitLab CI
- Monitoring: Implement CloudWatch alarms for traffic and error monitoring
- Cost Optimization: Set up lifecycle policies and analyze CloudFront usage patterns
Continue Your Learning Journey
To deepen your knowledge, explore these valuable resources:
- AWS S3 Documentation – Learn advanced S3 features and configurations
- Terraform Registry – Discover community modules and providers for future projects
- HashiCorp Best Practices – Master Terraform workflows and collaboration patterns
Consequently, you’re now well-equipped to build more complex cloud infrastructures and tackle real-world DevOps challenges confidently. Keep practicing and experimenting with different AWS services!
Written by Deekshitha R
LinkedIn: www.linkedin.com/in/deekshitha-raveendran-31581527b
