A Complete DevOps Guide to Scalable, Isolated Cloud Infrastructure on AWS
Introduction
In modern DevOps practices, a proper Terraform multi-environment setup is one of the most critical skills you can have. Managing test, develop, and production environments separately — without duplicating code or risking configuration drift — is exactly what this guide covers. Using Terraform workspaces and a custom reusable EC2 module, you will learn how to provision isolated AWS infrastructure in a clean, scalable, and production-aligned way.In modern DevOps practices, managing multiple environments like test, develop, and production is one of the most critical and challenging aspects of infrastructure management. If you are manually creating separate configurations for each environment, you are not only wasting time but also introducing the risk of human error and configuration drift.
This is where Terraform comes in. Terraform is an open-source Infrastructure as Code (IaC) tool by HashiCorp that lets you define, provision, and manage cloud infrastructure using simple configuration files. In this blog, I will walk you through how I implemented a complete multi-environment infrastructure setup on AWS using Terraform Workspaces and a Custom Reusable EC2 Module — a production-aligned approach that is modular, scalable, and cost-optimized.
By the end of this blog, you will understand how to isolate environments using workspaces, how to build reusable modules, how to dynamically fetch AMIs, and how to follow Free Tier best practices while working on real-world DevOps projects.
What Are We Building?
Here is a quick summary of what this project covers:
- Three isolated environments — test, develop, and production
- Terraform Workspaces to manage each environment separately with its own state
- A custom reusable EC2 module that accepts dynamic inputs
- A data source that automatically fetches the latest Amazon Linux 2 AMI for the ap-south-1 region
- A local mapping that provisions 1 instance in test, 2 in develop, and 3 in production
- Sequential deployment and destruction to stay within AWS Free Tier limits
Prerequisites
Before starting, make sure you have the following ready:
- An AWS account with IAM user credentials (Access Key and Secret Key)
- Terraform installed on your local machine (version 1.0 or above recommended)
- AWS CLI installed and configured
- Basic understanding of HCL (HashiCorp Configuration Language)
- A code editor like VS Code with the Terraform extension
Why Terraform Workspaces?
Before diving into the code, let us understand why we use workspaces instead of maintaining separate folders for each environment.
When you work with Terraform normally, everything shares the same state file. This means if you apply changes for your production environment, it could accidentally affect your test environment. Workspaces solve this by creating a separate state file for each environment within the same configuration directory.
Think of workspaces like Git branches. You write the code once, but you switch context to apply it differently depending on the environment you are targeting. This keeps your codebase clean, minimal, and easy to manage.
Benefits of using workspaces:
- Single codebase for all environments
- Isolated state per environment so no accidental overwrites
- Easy to switch between environments with a single command
- Reduces maintenance overhead significantly

Why a Custom Reusable Module?
A Terraform module is essentially a container for multiple resources that are used together. Instead of writing the same EC2 resource block three times for three environments, we write it once inside a module and call that module from the root configuration with different inputs.
This follows the DRY principle — Don’t Repeat Yourself — which is a fundamental software engineering best practice. If you ever need to change the instance type or add a new tag, you update it in one place and it reflects across all environments automatically.
Benefits of using a custom module:
- Eliminates code duplication completely
- Improves maintainability and readability
- Makes the codebase scalable for future environments
- Enforces consistency across all environments
Project Directory Structure
Here is how the project is organized:
terraform-multi-env/
├── main.tf
├── variables.tf
├── outputs.tf
└── modules/
└── ec2/
├── main.tf
├── variables.tf
└── outputs.tf
The root level files handle the provider configuration, data sources, locals, and module calls. The modules/ec2 folder contains the reusable EC2 resource logic that accepts inputs and provisions instances accordingly.
Step 1 – Setting Up the Project Directory
Open your terminal and create the project structure:
mkdir -p terraform-multi-env/modules/ec2
cd terraform-multi-env
This creates the root directory and the nested module directory in one command. The -p flag ensures that all parent directories are created automatically.
Step 2 – Building the Custom EC2 Module
Now let us build the core of our project — the reusable EC2 module. Navigate into the modules/ec2 folder and create three files.
modules/ec2/variables.tf
This file defines all the input parameters the module will accept:
variable "instance_count" {}
variable "ami" {}
variable "instance_type" {}
variable "environment" {}
These four variables make the module completely dynamic. The caller decides how many instances to create, which AMI to use, what instance type to deploy, and what environment label to apply.
modules/ec2/main.tf
This is where the actual EC2 resource is defined:
resource "aws_instance" "this" {
  count         = var.instance_count
  ami           = var.ami
  instance_type = var.instance_type

  tags = {
    Name        = "${var.environment}-instance-${count.index + 1}"
    Environment = var.environment
  }
}
The count meta-argument is what makes this powerful. It tells Terraform to create multiple instances of this resource based on the value passed in. The tags dynamically name each instance using the environment name and index, so you get names like test-instance-1, develop-instance-1, develop-instance-2, and so on.
modules/ec2/outputs.tf
This exposes the instance IDs so the root module can access them:
output "instance_ids" {
  value = aws_instance.this[*].id
}
The [*] splat expression collects IDs from all instances created by the count, returning them as a list.
Step 3 – Writing the Root Configuration
Now create the root level files that tie everything together.
variables.tf
variable "instance_type" {
  default = "t3.micro"
}
We default to t2.micro which is eligible for the AWS Free Tier, making it safe to use for practice and learning without incurring costs.
main.tf
This is the heart of the entire setup:
provider "aws" {
  region = "ap-south-1"
}

locals {
  instance_counts = {
    test        = 1
    develop     = 2
    production  = 3
  }
}

data "aws_ami" "amazon_linux" {
  most_recent = true
  owners      = ["amazon"]

  filter {
    name   = "name"
    values = ["amzn2-ami-hvm-*-x86_64-gp2"]
  }
}

module "ec2" {
  source         = "./modules/ec2"
  instance_count = local.instance_counts[terraform.workspace]
  ami            = data.aws_ami.amazon_linux.id
  instance_type  = var.instance_type
  environment    = terraform.workspace
}
outputs.tf
output "instance_ids" {
  value = module.ec2.instance_ids
}

output "workspace" {
  value = terraform.workspace
}
These outputs display the provisioned instance IDs and the current workspace after every apply, which is very useful for verification.
Step 4 – Configure AWS Credentials
Before running any Terraform commands, configure your AWS credentials:
aws configureEnter the following when prompted:
- AWS Access Key ID
- AWS Secret Access Key
- Default region: ap-south-1
- Output format: json
This links your local Terraform setup to your AWS account so it can provision resources on your behalf.
Step 5 – Initialize Terraform
Run the following command from the root of your project:
terraform init
This command downloads the AWS provider plugin, sets up the backend, and prepares your working directory for use. You only need to run this once unless you add new providers or modules.
Step 6 – Test Environment (1 Instance)
Now we begin the environment-by-environment deployment. Start with test:
terraform workspace new test
terraform workspace select test
terraform workspace show
The first command creates the workspace, the second selects it, and the third confirms you are currently in the test workspace.
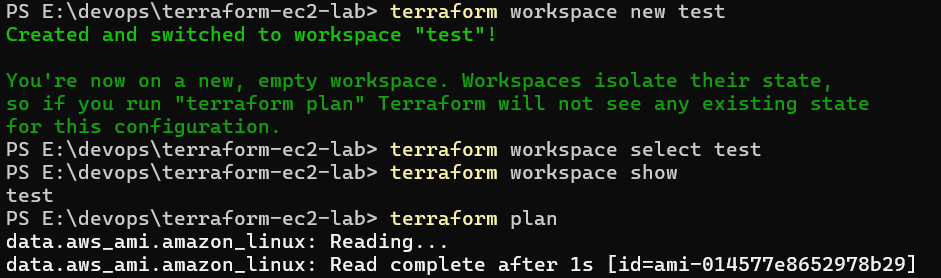
Now plan and apply:
terraform plan
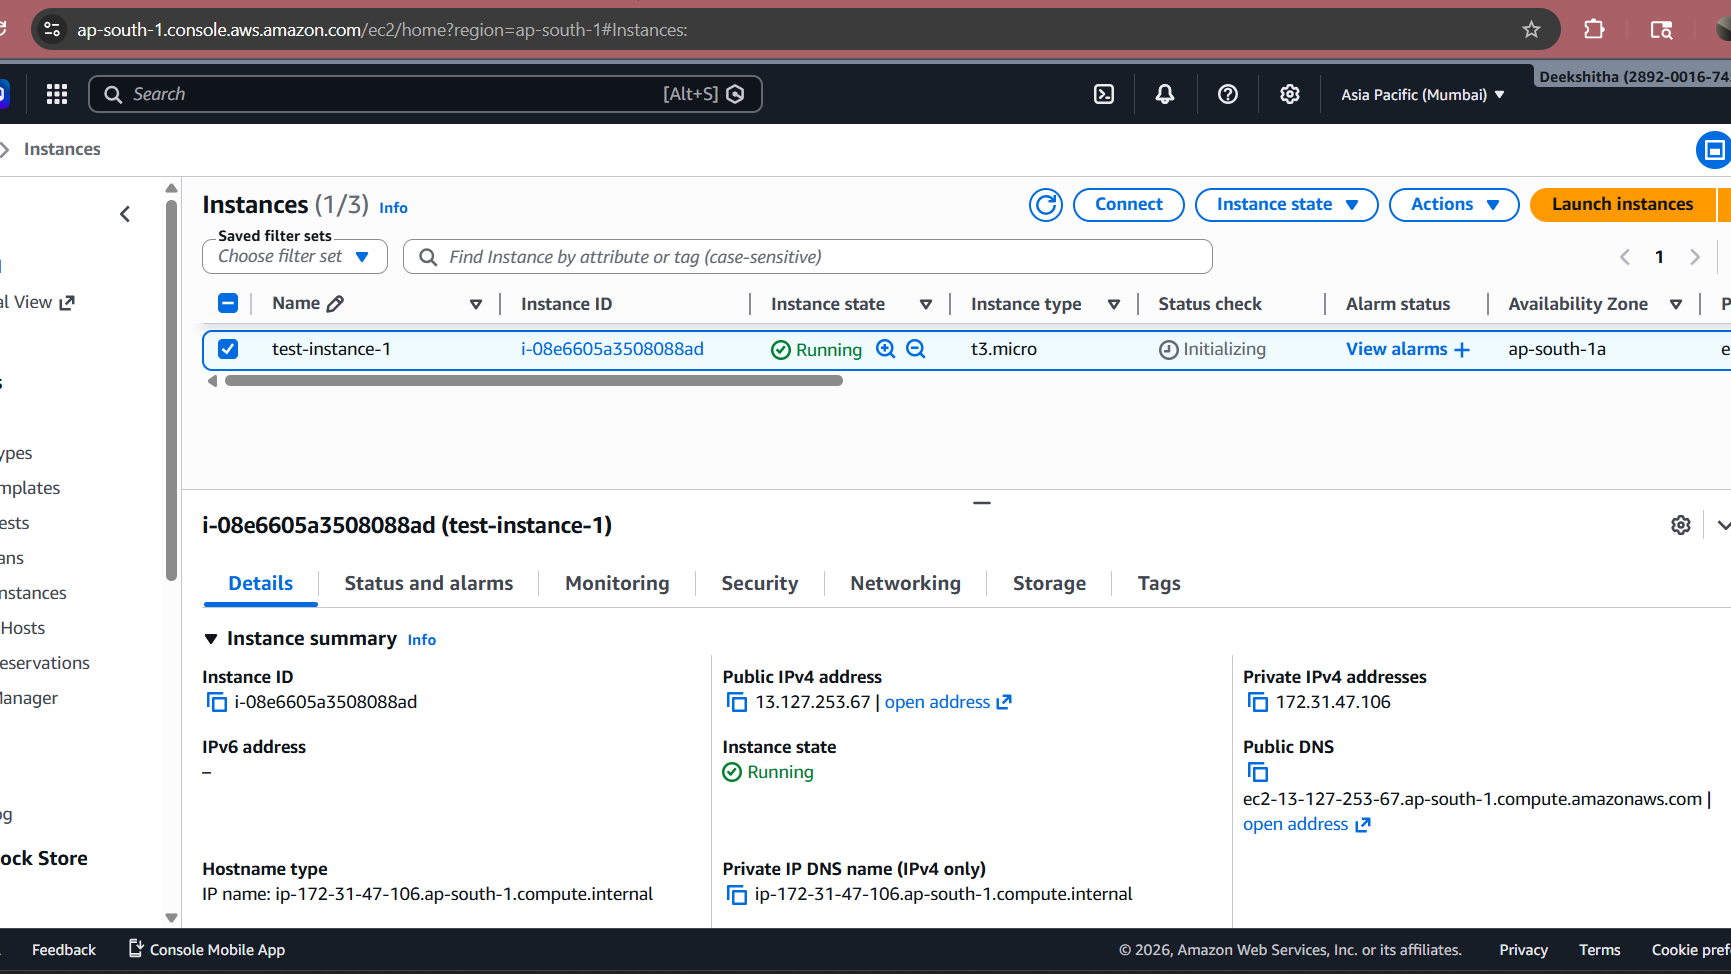
terraform applyType yes when prompted to confirm. Terraform will provision 1 EC2 instance in ap-south-1 named test-instance-1.
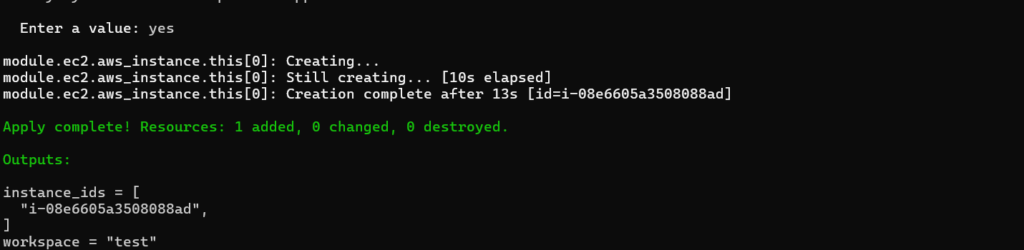
AWS EC2 Console showing the test-instance-1 running in ap-south-1 with the correct tags
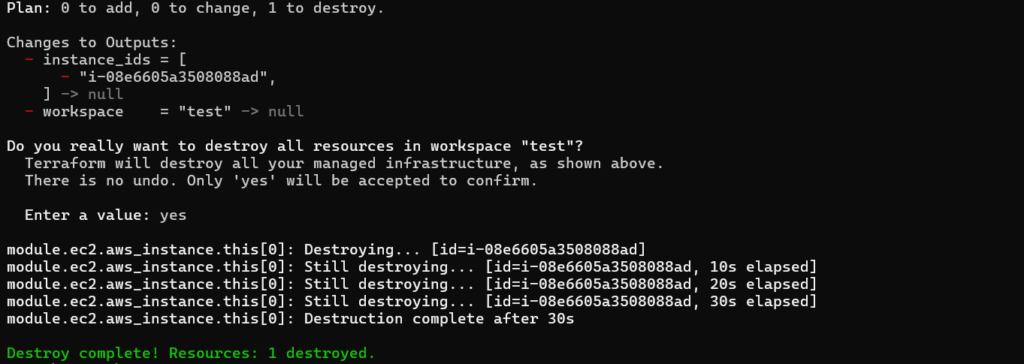
Now destroy to stay within Free Tier:
bash
terraform destroyType yes to confirm. All resources created in the test workspace will be removed.
Step 7 – Develop Environment (2 Instances)
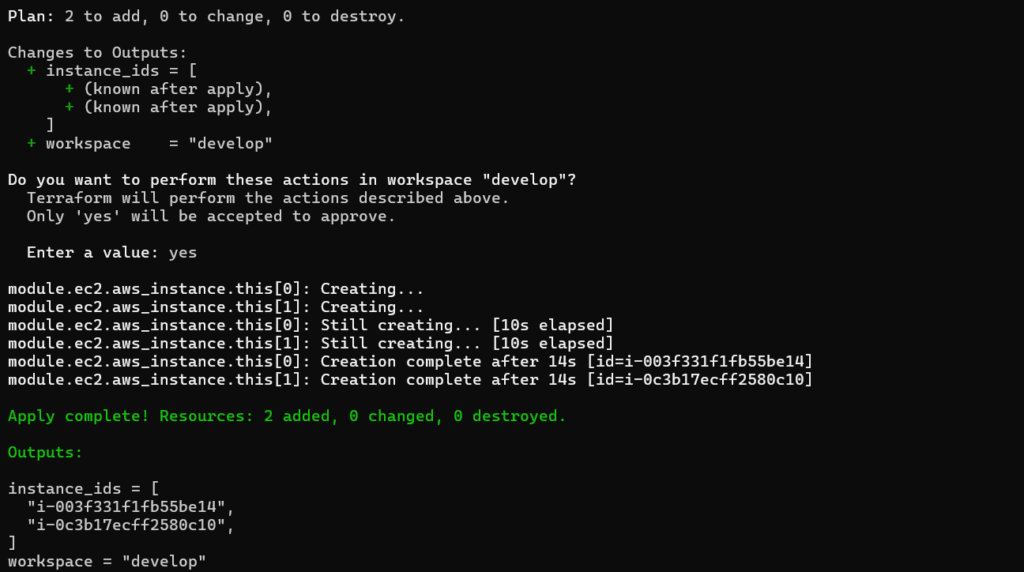
Switch to the develop workspace and repeat the process:
terraform workspace new develop
terraform workspace select develop
terraform plan
terraform apply
Terraform now reads the locals map, sees that develop maps to 2, and provisions 2 EC2 instances named develop-instance-1 and develop-instance-2. Same code, different context — this is the power of workspaces combined with local mappings.
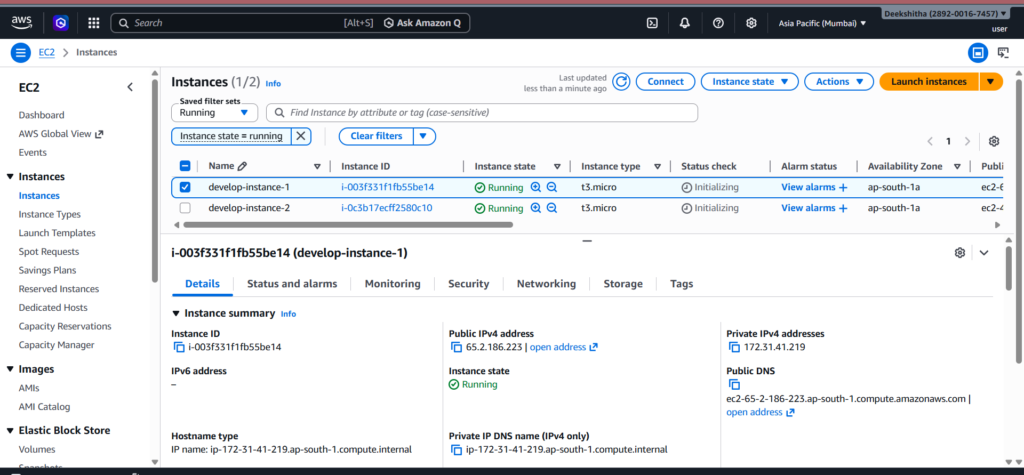
AWS EC2 Console showing both develop instances running with correct tags
Destroy after verification:
terraform destroyStep 8 — Production Environment (3 Instances)
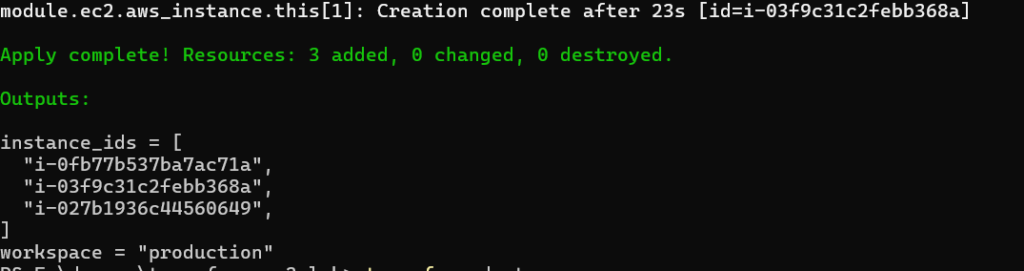
Finally, switch to production:
bash
terraform workspace new production
terraform workspace select production
terraform plan
terraform apply
This time, Terraform provisions 3 EC2 instances named production-instance-1, production-instance-2, and production-instance-3. Everything is driven by the same configuration file — only the workspace changed.
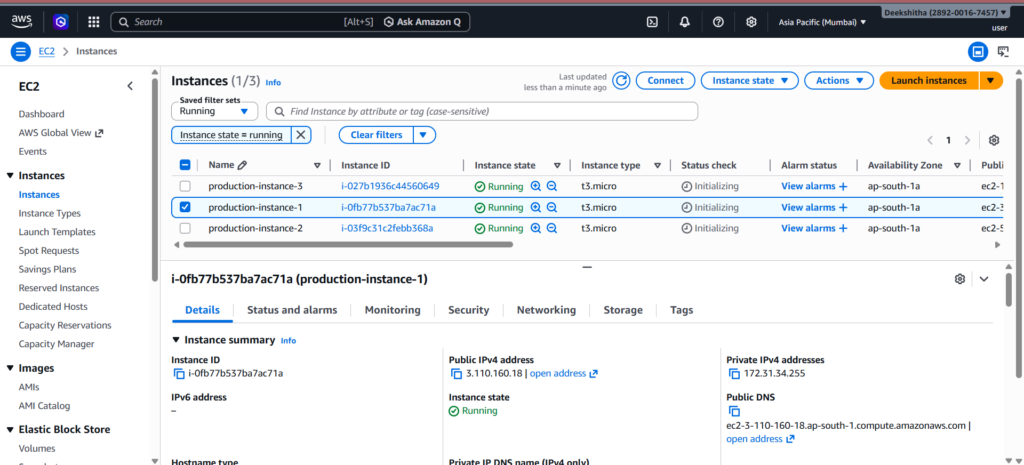
AWS EC2 Console showing all 3 production instances running with correct tags
Destroy after verification:
terraform destroyStep 9 – Verify Workspace Isolation
At any point during the task, you can verify all workspaces and confirm state isolation:
terraform workspace list
The asterisk shows your currently active workspace. Each workspace has its own state file stored separately, meaning there is zero risk of one environment’s resources interfering with another.
How terraform.workspace Drives Everything
This is the most elegant part of the entire setup. The expression terraform.workspace returns the name of the currently active workspace as a string. When you combine it with the locals map like this:
hcl
instance_count = local.instance_counts[terraform.workspace]Terraform automatically looks up the correct instance count for whichever workspace is active. You never have to change a single line of code between environments. Just switch the workspace and run apply — Terraform handles the rest intelligently.
Why Dynamic AMI Fetching Matters
Hardcoding an AMI ID like ami-0abcdef1234567890 is a bad practice for several reasons. AMI IDs are region-specific, meaning the same ID does not work across regions. They also get deprecated over time as AWS releases newer versions. By using a data source to dynamically fetch the latest Amazon Linux 2 AMI, you ensure your infrastructure always uses a compatible, up-to-date image without any manual maintenance.
Key Benefits of This Approach
Modularity — The EC2 module can be reused across any project. Just call it with different inputs and it works seamlessly.
Scalability — Adding a new environment is as simple as adding a new entry to the locals map and creating a new workspace. No new files needed.
Maintainability — A single module file controls all EC2 provisioning logic. One change propagates everywhere automatically.
Isolation — Workspaces ensure environments never share state, eliminating the risk of accidental cross-environment changes.
Dynamic Configuration — The combination of terraform.workspace and data sources means zero hardcoded values in your configuration.
Production Alignment — This approach mirrors how real DevOps teams manage infrastructure at scale, making it directly applicable to professional environments.
Conclusion
This project demonstrates a production-grade approach to multi-environment infrastructure management using Terraform. By combining workspaces for isolation, a custom reusable module for consistency, a local mapping for dynamic instance counts, and a data source for automatic AMI selection, you get an infrastructure setup that is clean, scalable, and easy to maintain.
Whether you are a beginner learning Terraform or a DevOps engineer looking to improve your infrastructure patterns, this approach gives you a solid foundation to build on. The same principles can be extended to manage VPCs, security groups, load balancers, databases, and entire application stacks across multiple environments.
If you followed along and completed all the steps, you have successfully implemented a real-world multi-environment Terraform project that you can confidently showcase in your DevOps portfolio.
Written by Deekshitha R
LinkedIn: www.linkedin.com/in/deekshitha-raveendran-31581527b
